The first step on the road to recovery.
In a prior article, we created a system image backup using the free version of EaseUS Todo. That’s by far the most important first step.
Now it’s time to prepare for the day when we might need to restore that image.
It’s time to create what EaseUS calls an emergency disk.
Become a Patron of Ask Leo! and go ad-free!

EaseUS Todo emergency disk
An emergency disk is used to restore a backup image to your system. You can create it beforehand or when needed. Run EaseUS Todo, click on the Tools menu, and click on Create Emergency Disk. Choose from creating an ISO file, a USB stick, or a CD/DVD. Make sure to test your ability to reboot from the emergency disk you create.
When and why you need an Emergency Disk
There are two common scenarios that require an emergency disk.
- The first is the most obvious: your hard disk fails, and you need to restore your backup to a replacement hard disk. Since that replacement drive is empty, you don’t have EaseUS Todo installed to process the recovery. In fact, your machine won’t even boot because Windows isn’t on that empty hard drive!
- The second scenario is malware. You want to restore your system to an image backup taken before the malware’s arrival. You can’t boot into Windows, since you can’t restore it to its prior state while it’s running; you can’t overwrite a file while it’s being used.
In both cases, as well as a few others, the solution is to boot from something else.
That “something else” is the EaseUS Todo emergency disk. When you boot from it, it automatically runs a copy of EaseUS Todo you use to locate your backup image and restore that image to the computer’s hard drive.
You can create the emergency disk at the time you need it, but only if you have a separate working system on which to do that. More commonly, you’ll want to create the disk before you need it, while your system is working normally. I’ll expand on this below.
Creating an Emergency Disk
Run EaseUS Todo. Click on Tools on the far right and then Create Emergency Disk in the resulting drop-down menu.
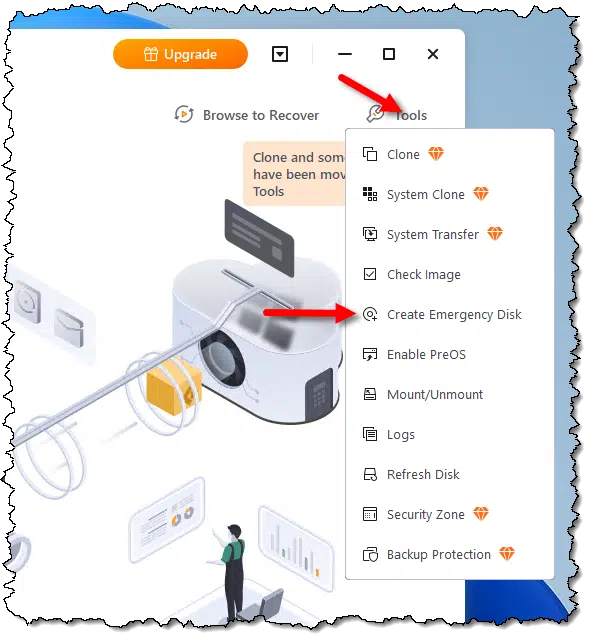
You’ll then be shown a dialog box containing several choices.
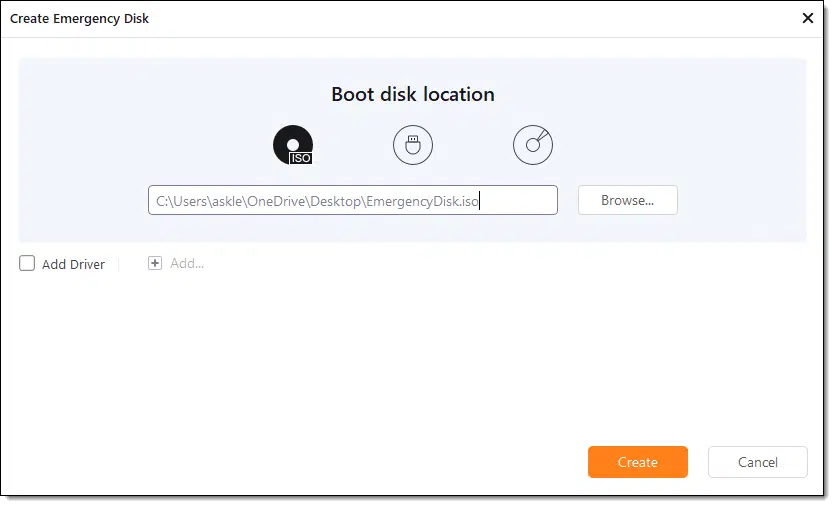
Boot disk location determines what media your disk will be created on.
- ISO: the first icon with the text “ISO” on it. If your machine can boot from CD or DVD but doesn’t have the ability to actually burn a CD or DVD, you can create an ISO file, and then take it to another machine to actually create the media.
- USB: the second icon that kind of looks like a USB mini-thumb drive. If you have a USB thumb drive you can dedicate to this purpose (whatever is currently on it will be completely erased), and you can configure your machine to boot from USB, this is probably the most convenient option.
- CD/DVD: the third icon that looks somewhat like optical media. Use this if your machine is capable of burning a CD or DVD and you can configure your machine to boot from CD.
Once you’ve made a selection appropriate to your situation, click on Create.
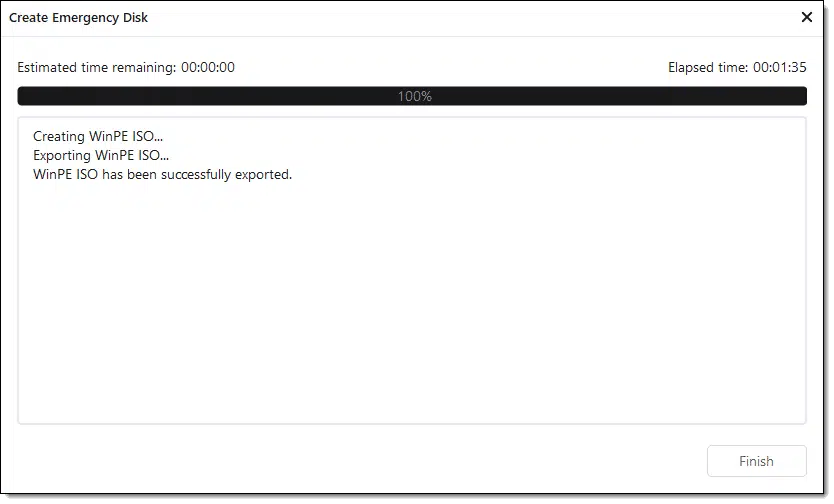
After a short time, the process completes, and the emergency disk is ready.
When to create your emergency disk
There are two schools of thought as to when to create your emergency disk.
Create it before you need it
This is important if you have no other computer available from which to make the emergency disk in an emergency. You’ll need to have it ready to go so you can simply boot from it and deal with the crisis.
Technically, you should only need to create the emergency disk once. However, there are strong arguments for creating a new one each time EaseUS Todo is updated. I recommend doing so at least for major version updates to ensure compatibility with the backup software and address any issues updated in the emergency disk itself.
Create it when you need it
This works if you have another working machine from which to create the emergency disk. The emergency disk does not need to be created on the same machine you’ve been backing up or on the machine to which you plan to restore — any Windows PC will do.
If you plan to create it when needed, I recommend that you download the latest version of EaseUS Todo Free first. That will ensure you get the latest version of the emergency disk.
Do this
My recommendation is that you create an emergency disk now and test that you can boot from it. Save it somewhere. When the time comes, you have the option of using that, or, if you can, downloading the latest version to burn a new, more up-to-date emergency disk.
My other recommendation? Subscribe to Confident Computing! Less frustration and more confidence, solutions, answers, and tips in your inbox every week.
Podcast audio

Related Video


Footnotes & References
Articles in this series:
- Creating a Backup Image Using EaseUS Todo Free
- Creating an EaseUS Todo Emergency Disk
- Restoring an Image Using EaseUS Todo
- Restoring a File from an EaseUS Todo Image Backup
Also see: How to Back Up Windows 10 & 11

So how do you compare EaseUS Todo to Macrium Reflect when it comes to system image backups?
They each have strengths and weaknesses but overall I consider them roughly equivalent. I have seen each fail on some machines so I generally choose whichever one works. 🙂
Read all about Ease Todo and image making, including making a recovery disk.
Question: will this disk be equivalent to the rescue disk as made by W10
using current W10 back-up and recovery and may both disk be used by either system?
Thanks for your attention to my question.
Bob.
Each software backup makes, and requires it’s own rescue disc. You couldn’t use the Win10 disc with Easus Todo, and vise versa.
No, They are very different and serve different purposes. The Windows recovery disk will let you restore a Windows-created image back up (not an EaseUS created one), or possibly even reinstall Windows from scratch as well as having Windows diagnostic tools. The EaseUS Emergency disk is only for restoring EaseUS-created image backups (or making them).
Hi .. Thanks for this info. I use Macrium Reflect (heard about from Leo).
Do I need an emergency disk for that? How to create?
THANKS … Joe
Yes, if you ever want to be able to restore an image backup to your computer. You do it from within Macrium Reflect. I don’t have it in front of me right now, but I believe the Tools menu.
Happy New Year… I’m writing at the end of the year 2018. This article and its comments are over a year old–I do realize that these topics are in continual flux! I am not a tech guy, just a home-business person with computers…
For precautionary purposes, I made a Windows 10 Recovery Drive per your article (2017) but did not see any later articles about *using* the Recover Drive. I’m confused by the talk of UEFI and BIOS… I don’t see clear steps to ensure my Win 10 Recovery Drive is operational…. I’m in a 2016 model Dell PC running Win 10 Pro.
Also, from what I read, my understanding is that WIn 10 backup tools are sort of being demoted and that MS recommends using 3rd party tools… now what? Do I bother with Win 10 Recovery Drive? Or just stay with EaseUs ToDo tools, all the way ???
I’m not in an urgent situation– just setting up precautions for 2019 ! Thank you… Brad
Yes. Microsoft is removing the native backup program, so EaseUS Todo is a good alternative. As for using the recovery drive, there are two articles in the Related Posts section of this article on that – “Restoring an Image Using EaseUS Todo” and “Restoring a File from an EaseUS Todo Image Backup“.
To test the integrity of your backup, you can use “Restoring a File from an EaseUS Todo Image Backup” and copy a couple of files from the backup.
How Do I Test My Backups
The BIOS/UEFI is only an issue if it doesn’t allow you to boot from external media.
How Do I Boot from CD/DVD/USB in Windows 8 & 10?
Thanks for the article. Great! for users that do not usually get involved in saving their own systems (DIY), One major piece of data needed however; what SIZE (minimum) cd/dvd or USB drive is needed to create the “Rescue Disk”
No need for me to specify: the smallest available is big enough.
Hi .. Thanks for this info…How to remove this WinPE Emergency from the hard disk after creation if we don’t like it anymore
I’m confused. The EaseUS Todo Emergency disk (what this article is about) is not something on your hard disk — it’s a separate disk. If you don’t like it, discard or overwrite that separate disk.
What am I missing?
Maybe he means the ISO file?
Hi
Using EaseUS ToDo Backup on new Windows 11 PC
When I try to make a USB Emergency Disk,( 32Gb) it fails with error 0XD7554001[?] each time
Also tried with 16Gb usb
It gets to your usb needs to be formatted, then seems to try to make it, but fails.
With no real reason, seem to think it may erase the USB disk then windows cannot see it, so EaseUS does not see it
Any Ideas be appreciated
Thank you
Try formatting the USB stick using Windows prior to creating the Emergency Disk.
Bought a new usb stick drive and when I tried make a rescue usb I kept getting error the it needed to be formatted. I went to file explorer, found the drive, and did a quick format. still didn’t work. Went to the help chat and was told to go to disc management and do a full format. Worked great
Hi, I am about to create an EaseUS ToDo emergency disk as per your article using a USB thumb drive. Do you have any idea on what size USB drive I need to use? I have recently upgraded my PC (to a Geecom mini) and don’t have DVD capability. All my previous DVD backups etc now need to be redone on USB.
Thanks.
A small 1 GB drive is sufficient is sufficient.
So I just bought a USB Flashdrive of 128 GB, so I bought far too much for what would be needed. I wish I could have found this article first.
You can get a smaller capacity flash drive cheap an copy you backup to the 128 GB drive for an extra data backup which you can keep far from you computer. You can update it periodically.
Hasleo has many good free tools, and backup is one of them.
How would it compare to Easeus (free) backup tool?
I’ve had similar problems creating a uSB directly from Easeus, it fails too often. My solution is to create an ISO and then use Rufus to create a bootable USB.
Is there another way for me to restore an image if I can’t get the EaseUs Todo “rescue media” to boot up? For instance, I’m wondering if it’s possible for me to boot into a secondary OS from my flash drive and run an installed copy of the main EaseUs Todo app on there…from which point I’d follow the standard process of picking a previous image stored on my external SSD and restoring to the main disk on the machine.
Nothing is working when it comes to the rescue media. I first tried creating the emergency disk on a dedicated empty flash drive that was exFAT formatted. The creation of the media succeeded. I then rebooted my PC and can see that the bootable USB is recognized as a boot option. When I select to boot from it, it never gets past the black screen and simply restarts the device, at which point I can try again or select to boot into my main disk. I then followed your suggestions in the “How Do I Boot From a USB Thumb Drive?” article. I booted into the BIOS and disabled secure boot and changed the boot order so my flash drive was ranked highest. That made no difference. I then tried the emergency disk creation process on a different USB flash drive altogether, repeating all the above conditions to see if it had something to do with the specific thumb drive. Finally, I resorted to creating the rescue media by generating the ISO file, and subsequently tried to create a bootable USB using both the Rufus app (which failed at the creation point) and Ventoy. My Ventoy drive has multiple other ISO files and I have successfully verified that I can boot into them, but I cannot boot into the EaseUs rescue media ISO. The ventoy documentation appears to support other EaseUs products but doesn’t explicitly name the backup rescue media as one of them, so this may be a compatibility issue. But I wanted to mention that context because all roads lead back to the EaseUs rescue media not working in various methods, while other bootup media does in my case.
Many thanks for all the articles about backups. I am trying to get this process going on a new laptop before I start using it as my daily, and your content has been very easy to follow along. I actually got the new laptop last year and had started setting it up using Macrium Reflect. But since then, I see that Macrium is ending support on their free version and now caught sight of your process with EaseUs. Funny enough, I had Macrium fully set up and even had the recovery media installed as a direct boot option, which works when I select to boot from it by bringing me directly into the app upon startup. But my trial elapsed and I don’t have the funds right now to commit to their annual plan, so I am exploring other options. I dread having to look for and learn another imaging process if I can’t find a way to restore my images with EaseUs. Looking forward to any suggestions that you may have.
This is just a shot in the dark. EaseUS Todo has 2 different recovery discs. One is Windows based and the other Linux based. Whichever one you used,use the other. It might work.
Thanks for the suggestion! Unfortunately I think the Linux option may no longer be available in later versions of the software.
The EaseUs Todo app that I’m running is on a Windows 11 machine, and when I click on [Tools] > [Create Emergency Disk], there is nothing that subseqently offers me to pick between an OS variant. It is the exact same screens as what you have listed in your accompanying video tutorial.
I tried searching for any mentions of a “Linux” variant, and the furthest I got was seeing a screenshot of an application screen that matches your suggestion. That screenshot is available at: whatsoftware[dot com]/easeus-todo-backup-free[dash]disk-imaging-software[dash]norton-ghost-alternative (please feel free to remove the link, I broke it up enough to avoid any cross references or promotions). Other than that, a Linux variant is mentioned across a few forums and Q&A sites, but nothing in the official knowledge base article or on the provider website.
If you have any other suggestions I’d be glad to try them out. If there’s nothing else, I think my only other recourse would be to switch to a different imaging program. It makes me un-easy to know that I might be scrambling for a recovery solution if and when the day comes just to realize that there’s a bug or system limitation that prevents me from restoring my image.
Hi
Would this software work on a Windows 2022 Server? Or it only for Windows 10, 11?
I believe it works for server.
For some PCs, you need to use the “Add driver” option when creating the recovery bootable disk.
This may make a disk created on a different PC not bootable.
I found this with Macrium Reflect (which is similar in creating the recovery disk), where a recovery disk created on my PC would not work on my wife’s PC, which includes Intel Optane memory.
With all the recommendations for backups, it would be advisable to have a backup copy of the recovery media also.
I have the free version of Macrium Reflect (version 8.0.7279.0). I get notifications that a newer version is available, but I wonder if updating it will make it not free.
It’ll stay free, but I think the nag changes to “this isn’t supported any more, buy a copy” kind of nag.
when i reformat the usb what shouold the settings be on. ntfs, or what ?? I am confused
Either one should work, but since the files don’t exceed 4GB, I’d go with FAT32 as it’s compatible with more systems.
This was again a helpful article in the series. There were a couple things that confused me a bit in the process (using the 2024 version of the software).
1) When making the recovery disk, EaseUS tries to get the user to upgrade to the paid version (As an inexperienced user, I felt slightly confused whether I would actually be able to create the disk for free).
2) In the middle of creating the disk, EaseUS needed my permission to format the disk.
3) After the disk was created successfully, there was no content on the disk when I viewed it in File Explorer. I wondered if the process failed. To my pleasant surprise, the boot disk works!
Thanks again for another easy-to-follow tutorial.
Ads to upgrade are the price of free. Some are tricky and make you think the program won’t work if you don’t upgrade. Learning to handle those ad requests is, in a way, part of learning how to use the program.
But why when you open the usb does it say the file is empty. That is what it has done to me and I never tried to use it
Which file are you trying to open? the backup or the rescue disc? How? What is the exact wording of the error message?
I have the same issue. When trying to create USB emergency disc, it tells me needs formatted, then tells me complete. In file explorer I can see that it has been named Easeus Todo, but when I click on it in explorer it says empty. Have tried twice. I created an ISO version to the desktop and that seems to have worked. Copied that file to the USB and now the USB has the same information as the ISO, but I’m guessing that’s not good enough? Curious about the previous user that said his was blank but the USB still worked?
Mark
I have a similar issue with creating an emergency disk to a USB thumb drive. Tried it on different thumb drives and on one computer running Windows 10 and the other one running Windows 11. All tries showed it was successful, but when I looked at the USB thumb drive in Windows File Manager, it showed nothing there.
I then ran the program to create the emergency disk on an external drive. This worked with both computers.
If I copy the file from the external drives to a USB thumb drive, will that work. And do I need one emergency disk thumb drive for each computer (W10 and W110.
I did the backups using easeUS Todo for both computers and they worked.
Thanks for the good presentations. A great help.
No. You can’t copy a bootable drive to another drive and have it work. You need to install it to the thumb drive with a program like Rufus.
Convert an ISO to a Bootable USB Using Rufus
I just finished a backup to portable 4T hard drive. It took almost two hours. Where is it? I have been using this for my Macrium Reflect backups and when I sorted the files on the disk by date a Macrium was at the top. Just rechecked and the backup went to drive E.
Hi Leo, thanks for all your good videos! I will give EaseUS a try as it seems like a good tool according to your findings. About the emergency disk one question: I plan on using the image backup tool on multiple PC’s and place the content of each on the same external hard drive, do I need to create an emergency disk for each individual PC or can I reuse the same one across all PC’s? They are all running Windows 11.
Regarding the image backup itself, does EaseUS always have to do a full backup or is there a way to do a differential backup to be more efficient? I have many large files that remain unchanged over time and my backups are a few terabytes, taking hours to execute. I saw there was a Sync button in the program but not sure what this does. What is your advice to find a good balance between convenience and efficiency?
Thanks a lot!!
One emergency disk should do.
EaseUS can do differential and incremental backups. I tend to recommend monthly full, with daily incrementals.
Great guide Leo I alway enjoy your videos. Everything work great except my rescue disk goes to loading drivers and stops. I then have to manually turn off computer to get free. Any idea what’s going on with that? Windows 11 system.
Hello. I’ve been using the free version of EaseUS for many years. Until now, I have used an external USB hard drive as the target for the backup files. However, this last time, I had the backup sent to another PC that is on my home network. I then decided to test my EaseUS USB emergency boot “disk”. The USB boot disk starts up just fine, but when I go to try and browse for recovering a backup file, I find that the network cannot be browsed. The EaseUS app does not see any of the computers on my home network. I tried this USB boot disk on a number of different PCs with the same result — cannot see any of the other PCs on the network.
So, is there something special to be done when creating the USB emergency disk? Related to drivers?