How to use the safety net of your image backup.
In previous articles, I covered how to use the free version of EaseUS Todo to make a system image backup and emergency disk.
Now it’s time to use that emergency disk; perhaps your hard disk died and you want to restore your backup to a replacement drive, or maybe you’ve run afoul of malware. Let’s restore a backup image to your machine.

Restoring a backup image using EaseUS Todo
- Boot from an EaseUS Emergency Disk.
- Browse for the backup image you want to restore — typically on an external hard disk.
- Confirm that you want to overwrite everything currently on your hard drive.
- Restore.
What an image restore means
It’s important to realize what restoring an image means: it replaces everything on the disk with the contents of the backup image.
If you took an image backup on Monday and now it’s Wednesday, restoring Monday’s image backup will overwrite everything on the hard disk, and your machine will be as it was at the time of that Monday backup. Everything you did on your computer on Tuesday and Wednesday would be lost.
If you’re restoring because of a malware infection, then that’s exactly what we want: to restore the computer to its state before the malware arrived. On the other hand, if you don’t want to lose important work you did on Tuesday and Wednesday, you need to save that work before the restoration. You could copy the new files elsewhere or create a new image backup.
Of course, if you’re restoring because of a hard drive failure, you may not have a choice. You’ll simply restore the most recent image you have to the replacement drive.
I’ll call it Step Zero: before performing the restore, save any data that hasn’t been backed up if you can.
Step one: boot from the emergency disk
Exactly how to boot from an emergency disk varies from machine to machine. Check the instructions for your specific computer to learn how to boot from the CD/DVD or USB emergency disk you created earlier.
In some cases, it’s a simple choice at boot time.

In other cases, most notably newer machines with UEFI and Secure Boot, the process can be more complex.
Locate the image
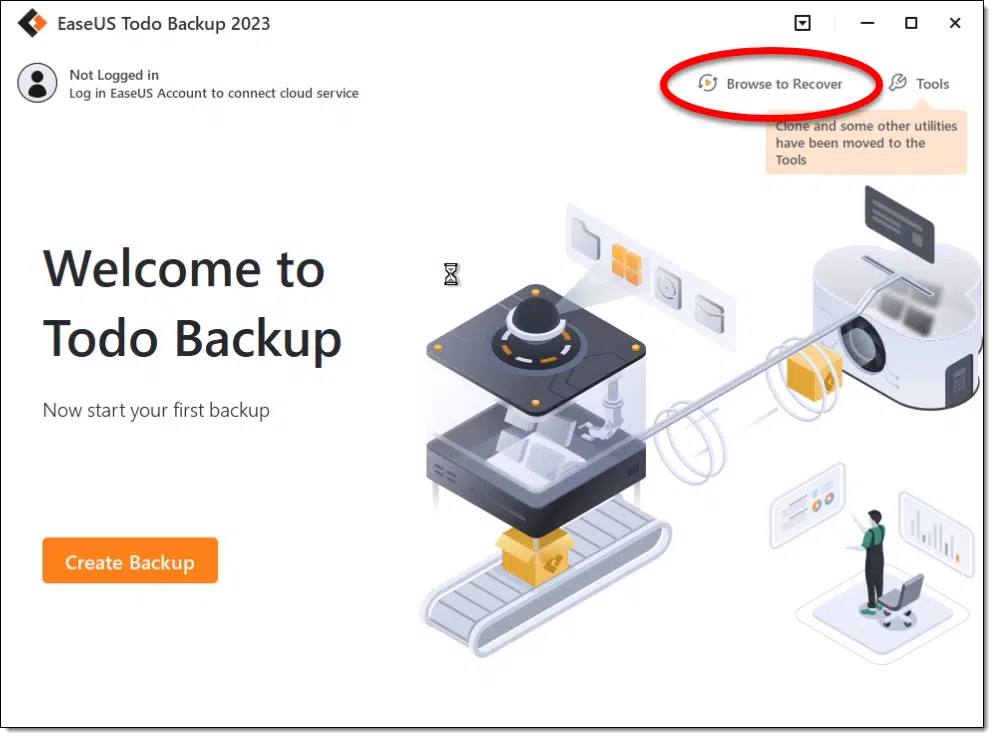
Booting from the emergency disk automatically runs EaseUS Todo. On its opening screen, click on Browse to Recover to begin the restoration process. (See the image at the top of this page.)
First, you need to indicate where your backup image is stored.
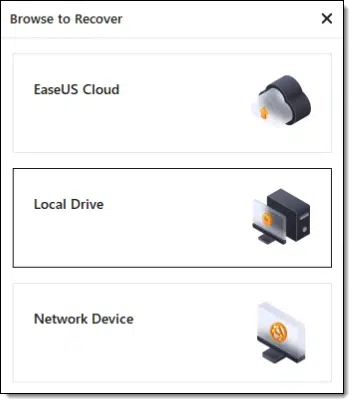
Todo supports several options. In these examples, we’ve been storing our images on external drives, so click on Local Drive. This will open a file-selection dialog.
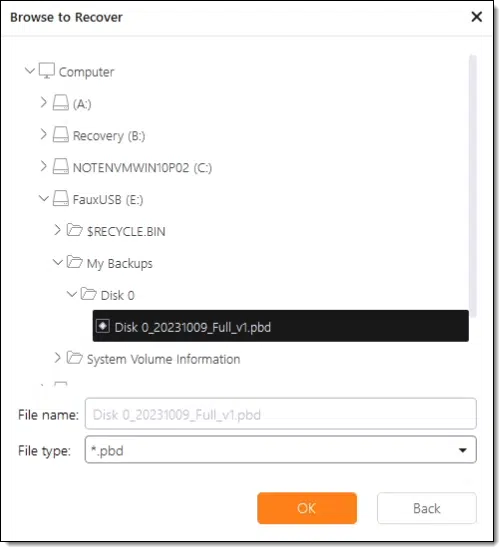
In the example above, to locate the backup image to restore (a “.pdb” file), I’ve clicked on the “>” to expand each of:
- Computer
- FauxUSB (E:)
- My Backups
- Disk 0
The filename Disk 0_20231009_Ful_v1.pdb indicates its contents:
- Disk 0 – the primary disk on the machine.
- 20231009 – the date the backup was created.
- Full – This image contains a full (as opposed to incremental) image.
Select the .pdb file and click on OK.
This will open the dialog to select the location you want to restore the image to.
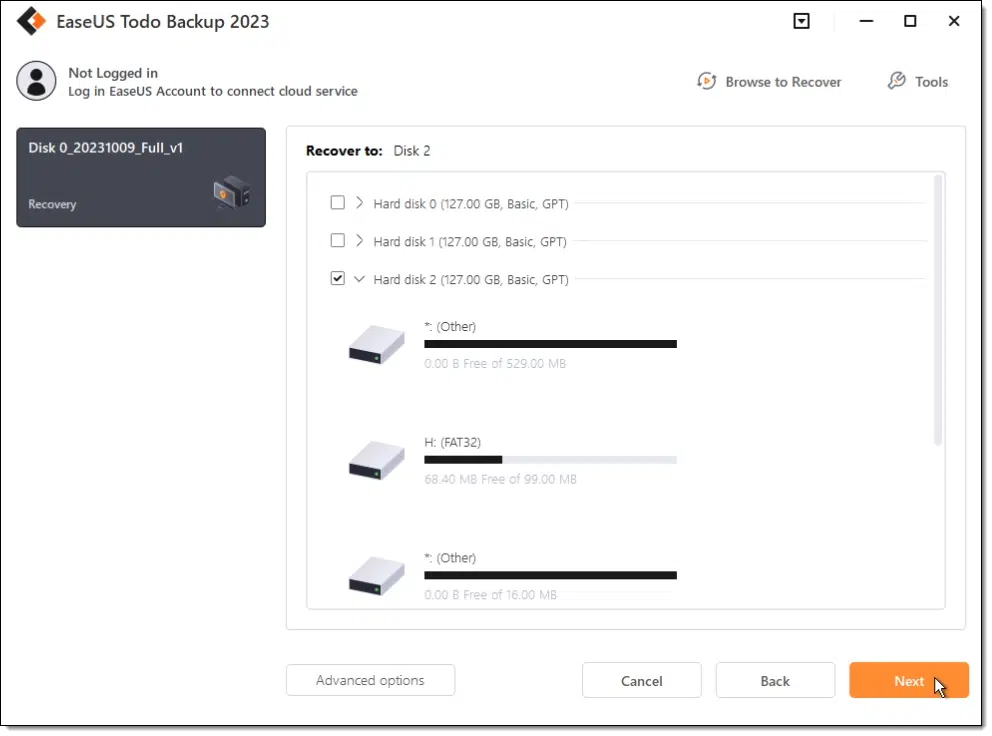
If you have multiple disks, as I do, make sure to select the correct disk. Typically, you’ve backed up the drive containing the C: drive, so restore to the drive showing C:.
Click on Next to begin the restore.
Remember, the restore will overwrite everything currently on your hard drive. EaseUS reminds you of that before continuing.
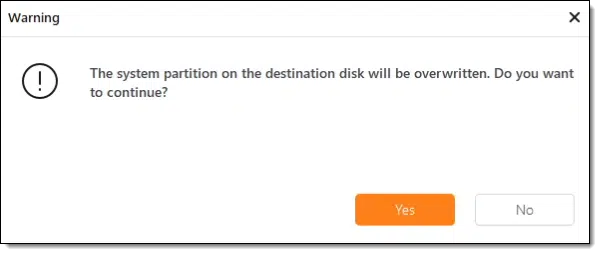
Click Yes. A summary of what’s about to transpire is displayed.
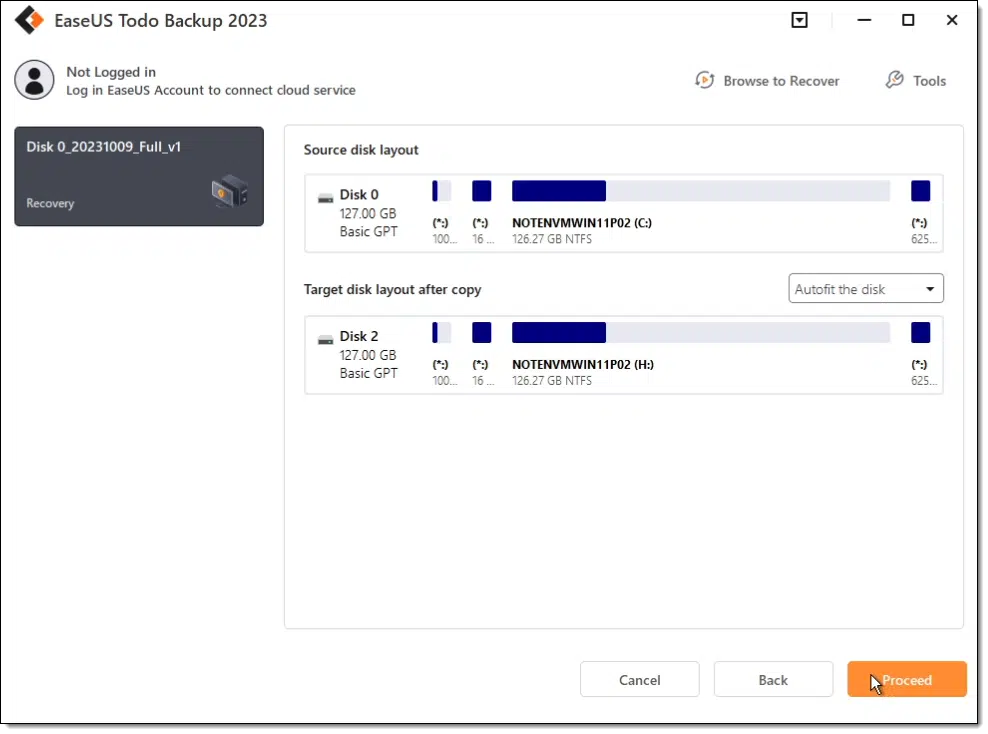
Click Proceed, and the restore begins.
Restore complete
Like the backup, how long the restore takes depends on how fast your drives are, how fast your computer is, and how much data there is to be restored. Progress will be displayed along the way.
Eventually, it finishes.
Close EaseUS Todo by clicking on the “x” in its upper-right corner.
Your machine will reboot. Take care to remove the emergency disk or to select your computer’s system disk from which to book. Again, how to do this depends on your computer.
When the boot completes, you can breathe a sigh of relief as familiar screens appear.

Remember, however: this is Windows as it was when you took the backup image.
You’ve successfully restored your backup image.
Do this
Subscribe to Confident Computing! Less frustration and more confidence, solutions, answers, and tips in your inbox every week.
I'll see you there!
Podcast audio

Related Video


Footnotes & References
Articles in this series:

I think it’s worth mentioning that in Step #1 of this article, the user needs to boot from the emergency disk – EVEN IF your PC has absolutely no problem booting. This was a point of confusion for me as I had been using Acronis TrueImage to create image backups before switching to Macrium Reflect. With Acronis, I never had to use an emergency/rescue/repair disk to restore an image backup, which is much simpler because you don’t have to mess with the boot order in the BIOS and you don’t have to deal with another disk. So when Leo instructed the readers to first boot from an emergency disk in his Macrium book (and in this article for EaseUS Todo), I mistakenly thought that instruction applied to only those users whose PC will not boot. That mistake led to an “Unable to lock drive” error that prevented me from restoring an image backup with Macrium. Fortunately, after some research, I figured out my mistake and even found a way to restore an image backup without using an emergency disk in Macrium.
I think what you experienced is due to something specific to your system. It’s possible that whatever caused you to need to restore also caused the restore from the current Windows session to fail. I’ve restored from backups while logged into Windows running from my C: drive. Normally, if you can run your backup program within Windows, you can restore from it. If it fails, then you would need to boot from the rescue media.
The article states “Unless you know otherwise, you generally want the most recent backup image”. If you do know otherwise, for example, your computer got a virus yesterday before it was backed up, the date of the backup is included in the backup’s file name. So choose the backup file with the day before yesterday’s date. Just keep in mind, if you have your backups scheduled to run after midnight, the day before yesterday’s backup will have yesterday’s date.
The concern I have is how can I be relatively certain as to when I actually became infected with a virus. If my anti-malware scan on Day 5 was clean, but my scan on Day 7 showed an infection, how certain can I be that the infection didn’t occur BEFORE Day 5? Are the effects of an infection usually immediate? To be on the safe side, I usually pick an image backup that was created at least several weeks before the possible infection. (My data files are backed up again before I restore the image backup.)
If you restore and find out that your computer is still infected, you can go back another day or two when you discover it. On the other hand, going back more days than necessary isn’t bad either as you can still get more recent data from the infected image as the malware wouldn’t generally harm the user data.
I’ve been playing around with EaseUS ToDo Backup Free this morning. I would love to be able to have the ability to put all-I-need onto one USB drive. a.k.a. – a bootable USB that includes any restore program AND the Image(s).
I tried making an EaseUS ToDo Emergency Disk and then just copying the previously made Image to that USB, but It said there wasn’t enough space on the huge USB drive that ToDo formatted?!?!?!
Why dedicate 2 of my 32G USB sticks (1=Emergency Disk & 2=the Image) when 1 USB stick has more than enough space?!?!?!?
Does such a beast exist?
I’m not aware of a way to do what you’re looking for. I agree it would be nice, but. (OK, you MIGHT be able to: make the emergency disk, use a partition manager to expand the partition to take up the entire drive, and then have room. But that seems like a lot of extra effort when thumbdrives are cheap and easy to come by.)
A USB flash drive large enough to hold a system image backup plus the PE operating system would probably cost more than a flash drive and an external HDD combined. Additionally, flash memory is less reliable than an HDD and high a higher chance of damaged sectors.
Hello Leo,
If this “Booting from the emergency disk automatically runs EaseUS Todo.” is still true (in ver. 12.0), you may want to mention the future advantages of creating such a recovery DVD (or CD?) in the Backup article (https://askleo.com/creating-backup-image-using-easeus-todo-free/).
Thanks,
Tom
Here’s a link to that article
https://askleo.com/creating-easeus-todo-emergency-disk/
Leo doesn’t consider making a rescue disc a high priority as it can be done on a different computer even after your hard drive has failed.
after pressing Proceed you state:
“Remember I said the restore would overwrite everything currently on your hard drive?”
Just to be sure this really means “partition” not hard drive, correct ?
That depends on how you backed up. If you performed a partition backup, it would restore only that partition. If you backed up the entire physical drive, the backup method we recommend, it would overwrite the entire drive.
That depends on what you’re restoring. If you’re restoring only a partition, then only a partition. If you’re restoring the entire hard drive, then the entire hard drive is overwritten. As Mark points out this is sometimes a characteristic of what you backed up in the first place, but it can also be a choice you make at restore time.
I am using EaseUS Todo Backup 2022. I made a full image backup on July 1st. Every day since then I have made an incremental backup. Now I have a problem restoring my SSD. I want to recover using the full image from July 1st and include all incrementals up to and including July 25th. I can find no way of doing that. When I select the incremental for July 25th, it recovers but won’t boot because of missing boot image from the full backup. When I recover selecting the July 1st full backup my computer will boot up fine but it’s missing all the incrementals. How can I restore everything up to and including July 25th incremental?
Easus should restore everything necessary that it has if you select “restore the 25th”. Meaning it should apply the full, and all the intervening incrementals.
Missing boot image makes me wonder if you actually backed up the entire disk (all partitions), or just the C: partition?
One time I had a backup of my C: drive and I neglected some of the other system partitions. To get it working, I installed Windows from the installation disc. I then ran the recovery for the c: drive and my system worked perfectly. After that, I always specified “Create an image of the partition(s) required to backup and restore Windows”.
I don’t even do that. I backup the entire disk — all partitions. There’s really no reason not to.
Based on your suggestions I always backup the entire disk (all partitions). I have been following your advice for years about backing up the entire disk. As you suggested I do a full backup at the beginning of each month and incremental every day after the first. I have spent last night and all day today trying in vain to restore my new Windows 11 pro desktop. It was running great. I got confused trying to install perl (no problem here) and SpaceVim IDE. I finally decided to reload with my easeus todo backups. It’s been downhill ever since. I think I’ll try Mark’s suggestion.
SOLVED: Well partially. I could not restore using the latest (July 25th) incremental, so I started trying to restore with each incremental going backward until I reached July 14th. Using that incremental I was able to restore everything, and my Windows 11 Pro functioned normally once again. It took a long time trying each incremental, but I was happy to have my computer back. After successfully using my computer for a day or so I decided to do a “Check Image” using the July 25th incremental. The check image took 24 hours to complete and then it reported that I had a good image (no errors found). Now I am wondering if I can trust Easeus ToDo backups in the future. Your thoughts would be appreciated. As of today my Windows 11 Pro is still functioning wonderfully.
I did a backup that covered two physical drives. When I restored using the image, C: drive restored perfectly (on the first physical drive); the second image finished loading and then asked if it should be bootable. This is where the problems started. I said “No” because I didn’t want to boot from the second physical hard drive. When I rebooted the computer, I had “No bootable media”. Everything gone. This is confusing. Can you shed some light on what’s happening here?
Hey Leo,
I just stopped using Easeus ToDo because of information that appeared when creating the emergency boot disc. It seems unless one purchases this software, the free version of this platform will not allow one to image the OS from the boot drive. At least that’s the impression I got reading the info that popped up just as I was about to create this disc.
I have switched to another program and it does not impose this limitation with its FREE version. Also, the new platform I switched to, its footprint on my internal drive is a lot smaller than that of Easeus ToDo.
Hey Leo,
I would like an answer to T. Kirshbaum’s impression too. I have the same concern: Does EaseUS Todo copy the operating system on the boot drive it creates? Here’s the popup I got:
(Oops. I guess I can’t copy the Snip & Sketch image to this reply.)
Anyway, it said: “WinPE created with Free version does not support Clone or System Transfer. Upgrade now to enjoy all the features.”
Now, I admit I’m not savvy with computer terms so I don’t know what they mean by System Transfer. I would think I need the system files to “boot” but maybe not. And if not, does it mean it won’t restore Windows?
Pressing on anyway, I created the emergency disk on a thumb drive and, after EaseUS Todo formatted my drive, got this message: “WinPE ISO has been successfully exported.”
I figured that was good but when I went to check the drive to see what was on it, I got this popup from Windows as soon as I inserted it: “There’s a problem with this drive. Scan the drive now and fix it.”
Well, I tried again, tried another thumb drive, tried that again, and always with the same Windows popup. So I figured it was a quirk and went ahead and shut my system down and tried to boot from the thumb drives. They both worked.
So, what gives? Can I trust these things to work when I need them to? Apparently but I’m not sure. Error messages are disconcerting and I don’t have the knowledge to give me confidence. And what is meant by no support for “Clone or System Transfer?” If my hard drive needs to be replaced can I use EaseUS Todo’s backup ISO on my external drive to restore my computer completely?
A little “Confident Computing” is what I’m looking for I guess.
First, you should simply test being able to boot from the rescue disk you’ve created. (You should be able to, but it’s very wise to test.)
Short version is that as long as you can boot from it, then you can restore images created by the free version. The messages relate to advanced features in the paid edition.
I’ve gotten that “There’s a problem with this drive. Scan the drive now and fix it.” message often and it’s always been a false positive. Apparently, it’s found a harmless discrepancy in the file tables. You should probably run chkdsk.exe to be sure, although I never bother.
System Transfer means to install the system on a different machine.
Thanks as always for the great article. I have created a backup image and have made my recovery disc, and now I suppose I should test the recovery disc. My question is, is it possible to do this without actually rewriting the hard drive? My system is running fine and I don’t want to mess anything up.
You can test it by booting from the recovery disc and copying a few files from the backup. It’s not a full test, but it can give an indication of whether the backup file is corrupted or not.
How Do I Test My Backups
Thanks for the great videos. My question regards the following: My PC has one USB drive and a cd/dvd drive. My backup image is on an external hard drive with USB connection. So, I am assuming I need to create the emergency disk using the CD/DVD drive so I can boot the PC and run EaseUS so I can use the USB drive to access the external drive? I assume the emergency disk does not copy the files necessary to run EaseUS, etc. to allow the disk to be removed.Thanks.
Im not sure if the rescue disc program will run if you remove the USB flash drive. Since you have a DVD burner, you can burn a rescue CD or DVD, or get an inexpensive USB hub to attach more USB devices.
You can boot from a USB drive and remove it and see what happens.
I BELIEVE you can remove the Emergency disk after you’ve booted. As Mark said, you can burn a CD/DVD. You might also be able to get a USB hub to allow you to plug in both the rescue USB and external drive at the same time.
Okay, I’ve been doing my regular backup images. I have my emergency disc. Now, my C drive is full, and I have bought a brand new 4 terabyte drive that I have installed in addition to the current drive. As I understand it, I can do an image backup of my C drive, then reboot with the emergency disc, and choose to use the new drive to put the image on? I believe that then everything on C will now be on the new drive, and I can wipe C and use it for extra file storage, etc. Is that correct?
There’s an additional step. Once, you’ve restored the image, you’ll need to increase the size of the c: to fill up the whole drive.
This article discuses taking space from the d: drive. In this case it is expanding the c: drive to extend the c: drive to occupy the unallocated space. So you can skip the step of deleting the d: drive.
Can I Make C: Bigger by Taking Space From D:?
But this article seems to be explaining how to combine two partitions that are on one drive. I bought and installed a new, larger, faster drive that I would like to use as my main drive. In other words, since my original drive (C: ) is so full and slow, I basically want the new drive to be my new “C:” drive, or in other words, my new default drive that runs Windows and all programs, etc. Is that possible?
You can restore the backup to the replacement drive and it will work. There is an additional step of extending the c: drive to occupy the unallocated space on the drive.
How Do I Transfer My System to a Replacement Drive?
Can I Make C: Bigger by Taking Space From D:? (This article explains how to combine the c: and d:drive partitions into one c: drive. To install to larger drive, skip the step of deleting the d: drive and follow the instructions of extending the c: drive into the unallocated space.
1) Either should work. I’d probably do it with EaseUS Todo, but only because I’m more familiar with the tool.
2) If you scroll down on this page: https://www.easeus.com/backup-software/tb-free.html — there’s a feature comparison table. Nothing compelling, though the paid version is supposed to be faster.
The file extension for the backup file was .pdb. Is this in some way different from an image, like extension .iso ? So then EaseUS ToDo cannot restore a backup of the .ISO type?
That is correct. isos are different than pdbs which are different than the images created by most other backup programs.
EaseUS Todo creates system image backups with a .pdb extension.
Macrium Reflect creates system image backups with a .mrimg extension.
I know of no backup program that backs up to an ISO file. If, somehow, you’ve managed to clone your system to an ISO file, which is theoretically possible, I suppose you can restore it using Rufus, but you’d have to do some convoluted stuff to clone your system as an ISO. Stick with system image backups using a backup program.
I just installed and tried the Free version. Here’s what I got. Now, the question is what do I do? Thanks!
winPE created with Free version does not support Clone and System Transfer
Upgrade now to enjoy all the features.
After a few seconds, along with a big red X in a big red circle, I got this message:
There is no partition or active partition of target disk.
I’d have to see how you configured the backup. (That there’s no clone or transfer is no issue. That’s not what we’re doing.)
Cloning is something that is rarely done, probably never necessary for home users unless there is a problem (Why Might a Backup Program Talk About Sector by Sector Backups?).
And system transfer doesn’t always work correctly. A system image is what we want 99% of the time. OK, I made that number up. It’s probably higher.
Update: I forgot to indicate that this happened when I attempted to Create Emergency Disk
I just installed and tried the Free version. Here’s what I got. Now, the question is what do I do? Thanks!
winPE created with Free version does not support Clone and System Transfer
Upgrade now to enjoy all the features.
After a few seconds, along with a big red X in a big red circle, I got this message:
There is no partition or active partition of target disk.
Leo,
Thank you for your response. It’s taken me a bit to give you more information about my Imager Backup.
I following your YouTube illustration one-step-at-a-time. I directed my Image Backup to go to my new Samsung 1TB external hard drive. Identified as a y: drive.
I have re-formatted my “y:” drive and attempted to Image backup at least twice after the first time.
Is there ANYTHING I am not telling you to help me correct this??
I can, if possible start all over again, and take screen prints if that will help!
Thank you, and I’ve learned a lot from your various videos!
Larry
I’m afraid I’ve kind of lost the plot here on where you are and exactly what problem you’re having. Could you provide more detail:
I know it’s annoying, but I emphasize exact at every step because most people give me very vague information that’s typically not nearly enough for me use. The more detailed you can be the better.
You may want to move this to the ask-a-question page (askleo.com/ask) rather than continuing a long conversation in the comments section. We’d also be able to do screenshots there if needed.
Leo, I want to use EaseUS Todo to restore a full disk image backup to a brand new, just out of the box, disk/hard drive. Do I have to initialize the new drive first? I understand that it doesn’t need partitions or formatting of those partitions. Thank you.
Not sure. My guess is that as soon as you connect it to Windows, Windows will tell you. (Since you’re restoring to something other than the system drive you do NOT need to boot from the emergency disk.)
Leo,
I understand what you are saying…. But what I was planning to do was to test the full disk restore by removing the ‘good’ disk, and plugging in a new-out of the box drive that is the same make, model, and size as the ‘good’ disk. I know that if I connect an uninitialized drive thru a USB adapter… and start Windows’ Disk Management program, it pops up with a message that says ‘You must initialize a disk before Logical Disk Manager can access it.’ And you get the option to initialize it. I’ll make a note that says I will find out when I try it. LOL Thanks!