When you don’t want the entire image.
In a prior article, we created an image backup of your PC using the free version of EaseUS Todo.
Image backups are one of the most important types of backups because they back up absolutely everything. Should you need to replace a failed hard drive, for example, an image backup will restore everything and let you continue as if nothing had happened.
But what if you don’t need everything? What if you just need a single file you know is somewhere in that image backup?
No problem.

Restoring files
- Locate the backup image “.pdb” file.
- Double-click on it.
- Navigate to the file or files you want within the image.
- Copy the files to your hard disk.
Locate the image
Naturally, you’ll need the file or files containing your image backup.
If it’s a full backup, then only the single “.pbd” file is necessary. If it’s in an incremental backup, you’ll need the full image backup that it was based on plus the intervening incremental backups.
The files will be wherever you instructed EaseUS to place them when you created your image backup. Typically, that’s on your external backup drive, but it could be almost anywhere with sufficient storage space.
Navigate to that location in Windows File Explorer.
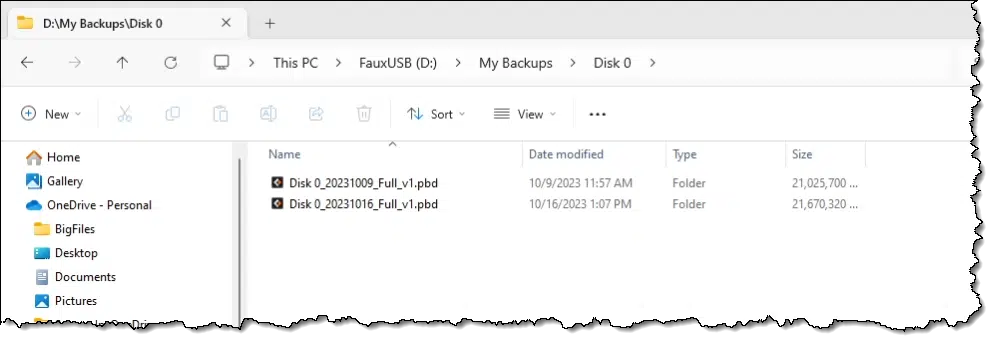
In the example above, the image file is located in:
- D: – my external backup drive. When I created my backup, I told EaseUS Todo to put the image files on this drive.
- My Backups – the folder on that drive where I told EaseUS Todo to put the image files.
- Disk 0 – the name of the folder EaseUS Todo created to represent the disk drive it was backing up.
The name of the image file itself — “Disk 0_20231009_Full_v1.pbd” — includes the disk name, the date of the backup, the type of the backup (Full), and the first version of a backup on that date.
If you have multiple backup files or incremental backups, locate the most recent file to access the most recently backed-up files. (If you need to get a file from “a week ago”, for example, locate the image file that corresponds to the backup taken immediately after that time.)
Double-click on that file. EaseUS Todo1 will mount the file, making its contents visible in Windows File Explorer.
Navigating the image
Windows File Explorer opens to the top-level contents contained in the image file.

In the example above, the image file contains backups of the C: drive as well as three additional partitions that were present on the disk.
Double-click on the drive containing the file(s) you want to restore. In our example, that’s the original “C:” drive.
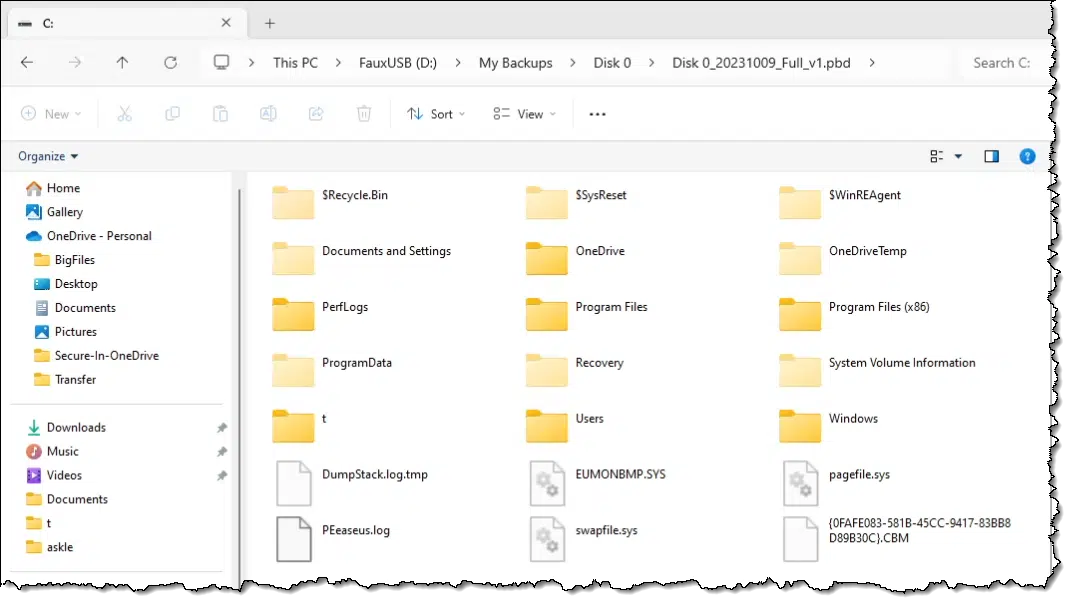
What you’ll see is the contents of the root of the C: drive as it was when the backup was taken. You can now navigate through that backup image just as you would with any other drive in Windows File Explorer.
Restoring your file
From the backup image in Windows File Explorer, navigate to the Documents directory within C:. In our example, that’s:
- C:
- users
- askleo – (would be replaced with your own login name)
- Documents
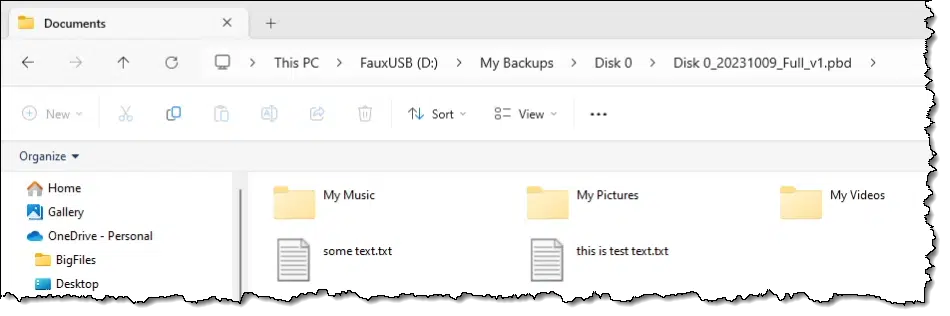
Remember, this isn’t your “real” C: drive; this is all part of the backup image stored on your external hard drive. The full path is, in reality:
D:\My Backups\Disk 0\Disk 0_20231009_Full_v1.pbd
And then within that image file:
C:\Users\askleo\Documents
To restore a file — such as the “some text.txt” file in the example above — simply copy it to any folder on your actual hard drive — the “real” C: — using any technique you’re comfortable with: drag and drop, copy/paste, or something else.
That’s all there is to it.
You can repeat this process for as many different files or folders as you want to restore from your backup image.
Do this
This is why we take full image backups. We don’t have to figure out what we need to back up because we back up everything. Then, if and when we need to restore something, it’s a simple matter to mount the backup image, locate what we need, and copy it back to our hard disk.
For more tips on backing up, subscribe to Confident Computing! Less frustration and more confidence, solutions, answers, and tips in your inbox every week.
Podcast audio

Related Video


Footnotes & References
1: This all assumes you’re working on the same machine you were backing up and thus have EaseUS Todo installed. You will need it installed in order for this process to work. You can restore files from an image taken of any machine, but Todo must be installed on the current machine.
Articles in this series:

Leo, just saw this Backup Newsletter… and as I have been running EaseUs TO DO Backup for several years, I’m going to peruse your article in detail. It’s been a satisfactory program for me… and once when something messed up my system so I couldn’t get it to do start… I used the restore from a separate usb drive I use for backups.. and it took a while, and while some programs that put a code in a particular sector, or wherever, needed me to put in the install code again… everything restored properly. The program seems to just keep on chugging along… and does what it’s supposed to do.
Best, Nat
Restoring a File From EaseUS
Hi Leo,
When you find the file you want to recover in your EaseUS image, right-click on it and a menu will open and provide a list of options, such as “restore to original location.”
Lloyd,
? Does the list of options allow one to restore a full-backup image to a DIFFERENT hard drive [options when the saved image file is right clicked] ?
Most apps don’t seem to give a definitive answer, simply assume the full-backup image will overwrite the original].
? Assuming not, and that I boot from a EaseUs recovery image/boot cd: Could I fool the restore file into actually restoring to a different drive by temporarily changing the drive signature of the recipient drive before restore; i.e. give the recipient drive the signature that the donor drive did have whilst it created the full-image backup file ?
No need to fool EaseUS Todo. A backup can be restored to a replacement hard drive.
Not via the right click option, but yes, you can restore images to other drives, and you can restore individual files to wherever you like.
Under the 2nd paragraph in the section “Locate the image” it says if it’s in an incremental backup you will need the full image backup that it was based on plus all the intervening incremental backups as well. The first nightly incremental image in the new month is a “full” image. Using Ease us todo TBImage Explorer I am able to open individual files in this image as well as in the next 3 nightly Backups. When I get to the 4th nightly Backup this procedure no longer works. What am I doing wrong? I have windows 10 with the latest update.
The procedure using Windows File Explorer does not work at all!
Any help in resolving thsi would be greatly appreciated.
It sounds like the 4th image might be damaged. If that’s the case, I’d move all the backups after number 3 to another folder or another drive (just in case there is recoverable information) and take an incremental backup which would be the new 4th backup. Hopefully, the backups should work after that.
Leo: I have multiple full-image backups in my folder, and double-clicked on the earliest one, exactly as you did. Instead, it mounted the most recent image and presented that in File Explorer. I’m sure of that, based on the contents and dates-modified of some of the files.
Page 56 of their user guide describes a Backup Image Explorer and includes a link to download it. I did so, and it does retrieve the correct image.
Any idea what I did wrong, and were you aware of this Backup Image Explorer?
I’m using the free product; don’t know whether Home version would be different.
I don’t understand … your comment doesn’t indicate anything went wrong with what you, or the tool, did. I wasn’t aware of the tool, but in theory it shouldn’t be needed.
Sorry – to be perfectly clear about what went wrong: Using File Explorer, I had navigated from the external backup drive to the EaseUS backup folder to the “Disk 0” folder of system image backups, which contained two .pbd folders, the 1/12/2025 backup and the 1/13/2025 backup. I clicked on the 1/12 backup, but the resulting display was of the 1/13 backup’s contents. I know that because it included files created after the 1/12 backup was run. As far as I can tell, I followed your instructions exactly.
Never mind, I think I’ve found the answer. The Backup Image Explorer seems to have been replaced by the Mount tool. When pointed to the desired folder, it does mount a drive (Z) and opens File Explorer to show its contents. The user guide does describe the Mount tool, but they should also remove the old Backup Image Explorer reference, and you might want to reexamine your procedure in this article.
Short story: I got a new computer and EaseUS ToDo for it. I have made one full image backup (created 7-9-25, 17:58pm) and two incrementals (created 7-10-25, 2:00am and 7-11-25, 5:49am). I had an incident and needed to restore a specific file. I wanted the 7-10-25 file and selected it. No matter what I did, whenever I tried to pull it over all the data showed it was changed on 7-11-25. Any of the three file versions seem to be the most recent one when I try to move it. Not what I want or need. I’m definitely stumped here. Help please.
You should be able to select the 7/10 image file and have the file restored form there.
If not, I’d be tempted to rename the 7/11 image file so as to not be accessible to EaseUS and see what happens.
Thank you, Leo. Much appreciated! I will give it a try and let you know what happens. I might just delete the 7/11 file since it really has no use to me and just seems to be complicating things. I’ll try renaming first, if that doesn’t help then deletion is the next effort.
Well heck, I’ve tried everything (I think) repeatedly and still cannot manage to successfully retrieve the single file that I want to restore from the date that I want. All of the incremental backups for that file have been changed to reflect the most lrecent incremental backup data. The way things have been going lately with this new computer setup I’d almost consider hanging myself – but I expect the rope would probably break.
I do appreciate your input though. Thank you for trying.
I have this same problem. I find the file I want, copy it over to another destination, but it contains the current file, not the previous version. Has anyone figured this out?
The only thing I can see causing that is if you aren’t going to a backup created before ther change-
I really appreciate the quick response Mark. This is a Word document I update every day. The incremental backup file is from May 1 but when I open it, it is up to date (today’s version). I can’t figure out what I’m doing wrong. I Googled and some sources are saying the Easeus Todo free version does not allow for previous versions? But it seems to work for everyone here…
Okay, after hours of dicking around, I finally found another solution using EaseUS Todo free software, but it wasn’t very simple. For others who might benefit, it goes something like this:
Open EaseUs Todo, go to your backup task. Select “Tools”, then “Mount Backup”, “Select backup file”, then navigate to the file in question and select it. I was shown one option, my hard drive, “C” and I selected it. Select “Finish”. This creates a temporary partition “Z” on the hard drive with the backup file loaded. Select “Open”. File Manager opens to that location. Navigate to the file you want, then copy it to a temporary folder on your hard drive. From there, you can copy the missing information into another document or save it somewhere, whatever. The last step is to go back to EaseUS Todo and unmount the temporary partition.
I hope I explained this properly. Bottom line, I got the previous version back, which is a relief. They could make it easier, though.
Thanks for all the great videos!