Working hard. Perhaps too hard?

I’d recommend none of the above.
100% disk usage is common, but typically only under certain conditions and only for “a while”.
I’ll review the common causes of this issue and what you can do to address them.

100% disk usage?
- Check whether your anti-malware software is scanning.
- Perform an anti-malware scan.
- Check for the content indexer indexing files.
- Examine your RAM usage and virtual memory impact.
- Examine tools like Dropbox rebuilding their indexes.
- Look for hard disk errors with Chkdsk /R.
- Consider upgrading to an SSD.
- Turn off Superfetch.
- Check for the state of defragging.
- Reset the page and swap files.
- Update Windows.
- Check for firmware and driver updates.
Clarity: usage versus usage
The term usage is ambiguous, so I want to clarify what we’re talking about.
We’re talking about disk activity, not disk space.
Disk activity means that one or more programs are actively reading from and/or writing to the hard disk. 100% means that they’re doing so to maximum capacity. This matters because all programs trying to read or write the disk are competing for the ability to do so. When it’s at 100%, there’s not enough to go around, and thus all the programs are slowed by some amount.
Task manager is a good place to look for the kind of usage we’re talking about.

This number consistently approaching or pegging at 100% is the kind of usage problem we’re here to investigate. Sorting that column by decreasing use can give us some targets to investigate. In the example above, while the machine is at only 18% usage and I’m not having any issues, we can see that Disk Defragmenter happens to be using the disk the hardest.
Speed, or a lack thereof, is often one of the first signs of 100% disk usage: a machine that seems excessively slow or just slower than normal.
This can happen on any disk regardless of how much data is stored on it.
Let’s investigate 12 possible causes of this problem.
Help keep it going by becoming a Patron.
1. Check whether your anti-malware software is scanning
By far, the number one cause of 100% disk usage is your security software doing its job.
Related
")
What Security Software Do You Recommend? (2025 Q3 update)
My updated guide cuts through the hype with four no-nonsense steps to keep your PC safe. Learn what works, what to avoid, and how to stay secure without overspending or overcomplicating.#3517
Particularly at start-up, many security tools perform a scan right away. Since it’s scanning either the entire hard disk, or at least large portions of it, it’s using the disk heavily.
Sometimes the anti-malware tool uses 100% all by itself, but other things are happening at startup as well, and that combination can reach the limit.
Recommendation: Take a break and let it run. Eventually, the scan will complete and the security software will fade into the background.
Alternative #1: See if your specific security software has settings letting you control whether or when an initial scan is run, or switch to a different tool that does.
Alternative #2: In the extremely rare case that the performance impact is due to a problem with the security software itself, make sure it’s up to date or completely remove and reinstall it.
Help keep it going by becoming a Patron.
2. Perform an anti-malware scan
While we’re on the topic of your security software, now is also a good time to perform a full scan of your system. Once again, make sure your tool and its database of known malware are as up-to-date as possible.
It’s almost never the case these days, but it’s still possible that slowdowns or hardware overuse could be the result of malware.
3. Check for the content indexer indexing files
The content indexer optimizes Windows’ built-in search function to more quickly search the contents of your files as well as their names and locations. To do so, it reads all of the files and adds them to an index used when searching.
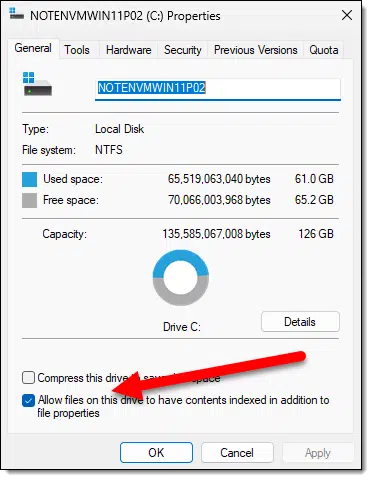
The quick test here is to stop indexing your hard disks. Right-click on each hard disk in Windows File Explorer, click on Properties and then on the General tab, and uncheck the option “Allow files on this drive to have contents indexed in addition to file properties”.
If the 100% disk usage problem goes away, then this was likely the cause.
Recommendation: Let it run to completion. It should eventually complete its job.
Alternative #1: Leave that checkbox unchecked and live without the content indexing feature and/or a slower Windows search overall.
Alternative #2: Rebuild the index. The theory here is that much like your web browser sometimes becomes “confused” and clearing its cache is the solution, the Windows Search index can also benefit from a do-over. Click on Start, then search for Indexing Options. Click on that when it appears.
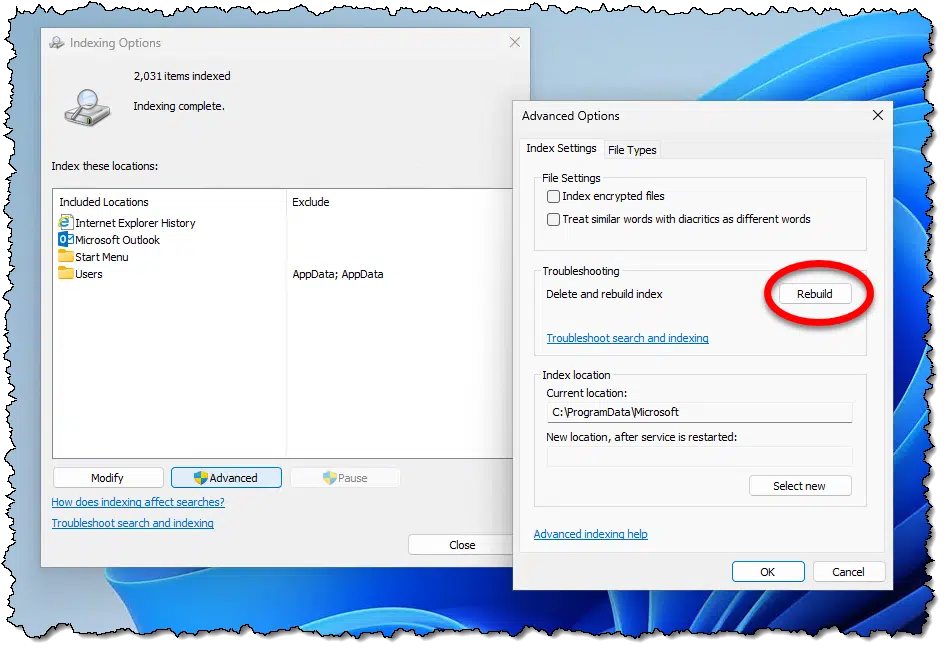
Click on “Advanced” in the resulting dialog (on the left, above), and then click on Rebuild in the next dialog to rebuild the search index.
Alternative #3: Disable search indexing completely. Your searches using Windows Start and Windows File Explorer will likely be much slower. Right-click on Start, then click on Computer Management. Click on Services and Applications, and then double-click on Services in the right-hand pane. Scroll down until you find Windows Search and double-click on it.
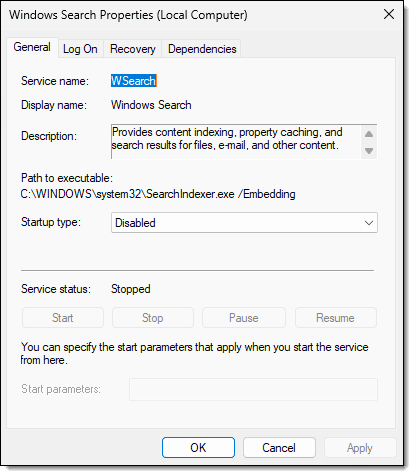
Click on Stop to stop the currently running service. Then change the “Startup type” to “Disabled”. Click OK.
Related

What is Virtual Memory?
Virtual memory is conceptually somewhere between RAM and hard disk space. It's disk space used to maximize the amount of RAM available to programs.#1925
4. Examine your RAM usage and virtual memory impact
A common cause of 100% disk usage is not having enough RAM for all the programs that are running.
When the combination of programs currently running on your machine needs more RAM than is installed in your system, Windows uses what’s called “virtual memory”, often abbreviated VM. VM transparently writes portions of RAM to a virtual memory or swap file and then frees that memory up for use. When memory that has been written to disk is subsequently needed, it’s read back in, possibly writing something else out to make room.
When this happens excessively, it’s referred to as thrashing and results in 100% disk usage. Typically, the system also slows down significantly overall as Windows spends more of its time managing virtual memory than it does allowing software to run.
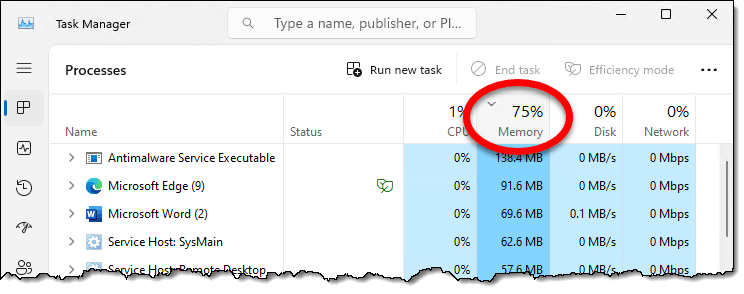
A quick way to tell if this is happening is to look at the Memory column in Task Manager.
Related

Uninstalling Software You Don’t Need
One way to reclaim space (and occasionally even performance) is to uninstall software you don't need. I'll review important places to help you do just that.#7482
If it’s at or approaching 100% consistently, you’re at least pushing the envelope, if not exceeding it. Sorting by Memory use will show you the programs using the most RAM — Microsoft Security (“Antimalware Service Executable”) in the example above.
My recommendation: If you’re running into this situation, add RAM to your system if possible. It’s a quick and easy (although not free) solution.
Alternative #1: Reduce the amount of running software. You can target those you see using the most in Task Manager, but it’s also a good idea to consider which pieces of software need to auto-start. Much of the software that runs automatically includes components that keep running, using resources like RAM. Disable the startup item, or, if it’s software you never use, consider uninstalling it.
5. Check for tools like Dropbox rebuilding their indexes
Because I have close to three terabytes of data in my Dropbox account, this bites me from time to time.
Dropbox (and I’m going to assume similar programs like OneDrive, Google Drive, and others), maintains an index on your PC of the files you have stored within it. In theory, this should be easy and transparent as the index is quickly updated as files come and go.
Empirical evidence says otherwise. Under unclear circumstances, Dropbox may decide it needs to rebuild the index, which can be a disk-intensive operation. If the Dropbox icon shows a constant not-ready state or says “indexing” as you hover your mouse over it, this is likely the cause.
My recommendation: Let it run.
Alternative #1: Dramatically reduce the number of files you keep on your machine in Dropbox.
Alternative #2: Don’t use Dropbox or other tools that exhibit this behavior.
Alternative #3: Uninstall and reinstall Dropbox. This forces Dropbox to rebuild its index from scratch, side-stepping any issues that may have been present before. The first time, of course, this will take some time.
Related

What’s the Difference Between CHKDSK /F and CHKDSK /R?
CHKDSK is a powerful Windows utility used to diagnose and repair disks. /F and /R represent two types of repairs.#125284
6. Look for hard disk errors with Chkdsk /R
This can be one of the hardest scenarios to diagnose, but it applies exclusively to traditional, older HDDs and not SSDs.
After all the diagnoses and perhaps even changes made — nothing. Your system is still slow.
One occasional scenario is that there’s a bad sector on your hard disk. When a disk encounters a bad sector (or perhaps a marginally bad sector), it keeps trying to use it. If it can’t read it the first time, in an effort to prioritize getting the data somehow, it’ll try again. And again. And a thousand times again. As you might imagine, this takes time. If there are a series of bad sectors clustered on a hard drive, it can add up. If those sectors happen to be in a frequently used part of the disk (the swap file, an operating system component, your browser cache, etc.), it can add up to a slow machine.
The good news is that the diagnostic and the solution are the same: CHKDSK.
My recommendation: Run CHKDSK /R on your hard drive. This may take a long time, particularly if there are bad sectors, but “/R” instructs CHKDSK to locate those, stop using them, and use spare sectors set aside for just this purpose. If the problem remains, it’s still possible that the hard disk has unrecoverable sectors; check the CHKDSK log for details.
Alternative #2: Back up the disk if at all possible and replace it.
Alternative #3: Back up the disk if at all possible and replace it with an SSD. (See #7.)
7. Consider upgrading to an SSD
Simply having an HDD doesn’t cause 100% disk usage, so if there’s a problem, replacing it with a faster disk might not help or might not help much.
On the other hand, if you’re approaching 100% use legitimately — you’re just doing a lot of disk work — then replacing your HDD with an SSD may improve your performance dramatically. There are a couple of scenarios depending on how the software is using the disk.
- You may still reach 100% usage but for shorter periods of time.
- You may see something less than 100% usage for the same length of time you were seeing 100% before.
Regardless, the speed benefits of an SSD over an HDD are present regardless of whether you’re tracking down a problem or not.
My recommendation: If your system drive is an HDD, update it to an SSD.
8. Turn off Superfetch
Superfetch is a Windows service that attempts to improve system responsiveness. Based on the programs you’ve run in the past, Superfetch tries to pre-load what it thinks you’re about to use next. If it’s wrong, that was an unnecessary load with unnecessary disk activity.
Full disclosure: I’ve never run into a situation where I needed to turn it off, but multiple (as in almost every) resource I looked at researching this article mentions it. There are some scenarios where it can make a real difference. Turning it off is benign, and particularly with SSDs, I’m not sure it benefits performance as much as it once did.
My recommendation: Turn off Superfetch.
Right-click on Start and click on Computer Management. Click on Services and Applications, and then double-click on Services in the right-hand pane. Scroll down until you find SysMain; double-click on it.
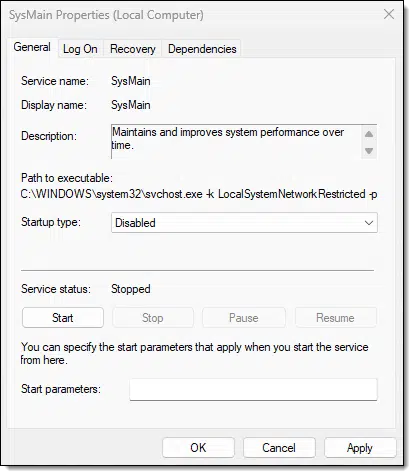
- Change the Startup type to Disabled
- Click on the Stop button.
- Click on OK.
9. Check for the state of defragging
If you have a traditional HDD that hasn’t been defragmented in a while, doing so can certainly help disk speed.
However, Windows has an automatic defrag scheduled once a week by default. As a result, your disk shouldn’t need additional defragging — once a week is fine.
But what happens if your machine is off when the defrag is scheduled to occur? Check to see how your machine is configured to respond in that situation.
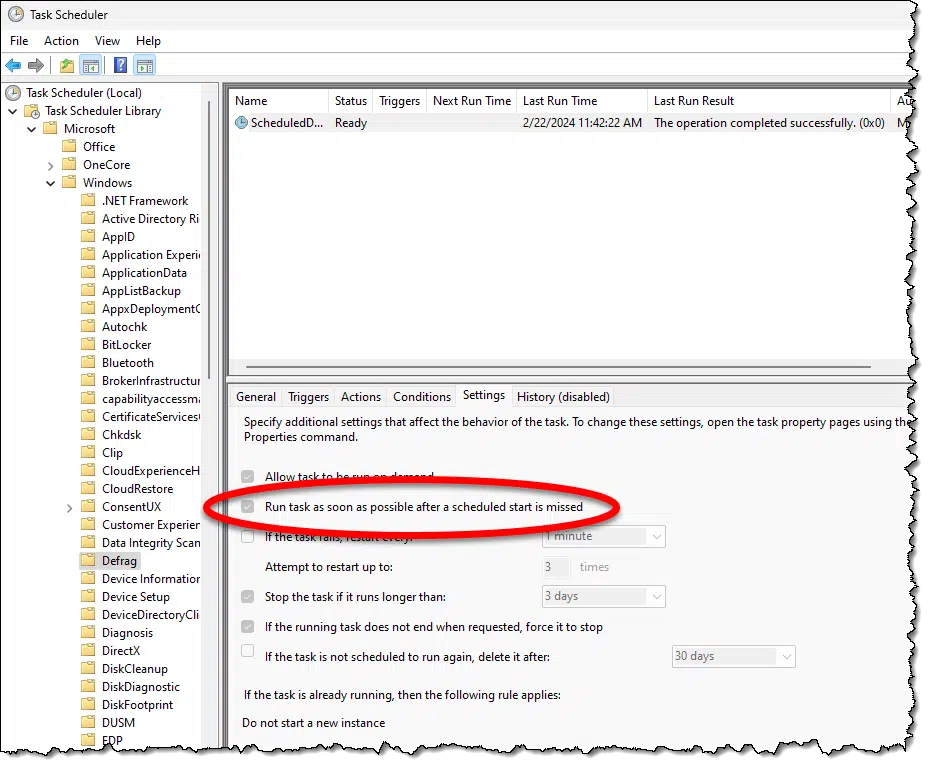
The scheduled task includes the option to “Run task as soon as possible after a scheduled start is missed”. What this means is that as soon as you turn your machine back on again, the task will run. Since defragging can take some time, it might impact your performance for “a while” after signing in — even to the point of 100% disk usage if other things are happening.
My recommendation: Let it run.
Related

How Should I Configure Virtual Memory Settings?
The default settings for virtual memory are good enough for most. Tweaking virtual memory settings depends on your computer and what you do with it.#3062
10. Reset the page & swap files
Now we’re getting into long-shot territory.
Windows uses paging and swap files during normal operation even if you’re not running low on RAM.1 One suggestion I’ve seen elsewhere that makes a small amount of sense is to “reset” them.
The process is conceptually easy: set your swapping file to zero, reboot, set it back to its original settings, reboot, and the files will be created anew. The file will be re-created elsewhere on the disk and any internal data structures will be rebuilt in case.
My recommendation: Do this if you like, but I consider it grasping at straws.
11. Update Windows
Honestly, this shouldn’t be necessary, since I recommend so strongly you always keep Windows as up-to-date as possible and Windows Update often makes it difficult to do otherwise.
That being said, if you have paused or prevented Windows Update from running, it’s a good idea to open that gate here. The issue is that sometimes system bugs can manifest in several different ways, one of them being performance. Updating Windows makes certain you have all the late-breaking fixes.
My recommendation: Keep Windows as up-to-date as possible.
12. Check for firmware and driver updates
Finally, the same things I’ve said about Windows in the previous point apply to your disks’ firmware and drivers. Windows updates most of them as needed, and we rarely need to think about them. In fact, I typically advise not updating drivers unless you have a reason.
If you’re still struggling with 100% disk usage, it might be a reason to at least check firmware and driver updates. The concept is simple: while Windows does keep drivers updated to a point, it’s common for device manufacturers to have drivers that either expose additional functionality or fixes that haven’t yet made it through Microsoft’s process to be included in Windows Update.
Exactly what drivers will be available and where you’d get them will vary dramatically based on the machine you have. Start with the manufacturer for instructions or pointers.
My recommendation: If you’ve run out of other options, updating your disk drivers is worth a shot. As always, take a full backup image first.
Do this
As you can see, fixing 100% disk usage isn’t a simple case of “just do this”. There are scenarios where patience is the proper response, or it may be the result of a problem of some sort. Hopefully, the list above will help you navigate the options and get you back to a well-performing system.
Also worth the effort (at least in my opinion): subscribe to Confident Computing! Less frustration and more confidence, solutions, answers, and tips in your inbox every week.
Podcast audio

Related Video


Footnotes & References
1: Why? I don’t know.

I think Leo’s article hinted at this, but didn’t quite say it: One reason for a high disk usage is if your disk (hard drive or SSD) is almost full. In that case you need to do some major cleanup, like off loading big applications and files from your drive. Typically you should have about 20% free disk space. Another factor is that 100% disk usage may be associated with high RAM and/or high CPU usage. That’s because something on your machine is doing something, and that activity will typically also use CPU and RAM. So look for applications that are making heavy use of CPU and RAM.
On the usage of CPU and RAM, one of the biggest culprits is Windows itself. Windows has many services that do things that you don’t need or want. Leo mentioned the Search and Indexing services. The User Experiences service is another, but there are many more. It’s unlikely that all these extraneous service would collectively cause 100% disk usage, but one or two of them may have gone nuts.
In addition to using CHKDSK, try these commands (run as admin in the command prompt window):
– SFC /scannow
– DISM /Online /Cleanup-Image /CheckHealth
– DISM /Online /Cleanup-Image /ScanHealth
– DISM /Online /Cleanup-Image /RestoreHealth
SSDs may be faster, but they can be susceptible to 100% usage for all of the same above reasons, especially if they have been used for a long time without any trim being performed on them. In Windows search for “disk optimize” and perform an optimization on it. Better yet, look in your SSDs documentation and see how the manufacturer suggests doing an SSD cleanup.
On the topic of changing drivers: if you didn’t have 100% disk usage before and suddenly you do, the reason may actually be that a Windows Update replaced your disk drivers automatically. I don’t allow Windows to update my drivers with any update. Of course, that may be easier said than done, especially if you have a Home version of Windows.
Dear Leo,
I would like to make a long comment about this post. First, let me say the post was excellent. There were things mentioned in this post that I had never heard of; and in many ways I wish I had.
Background, in spring 2021 I purchased a new desktop computer (well before I ever heard of Leo), specifically to use as a remote desktop for a new consulting job that I had just acquired. It came with a 2TB HDD. At first, everything was fine. Fairly quickly, however I started to notice that when first booted, the machine was not responsive. This would pass, but it seemed to be taking longer and longer to become usable.
I quickly discovered that the HDD was reporting 100% usage and until that dropped to something normal, the machine was basically unusable. I tried troubleshooting. I turned off indexing; I made sure the disk was 20m every morning for the machine to get past its disk thrashing. I assumed this was some type of software problem since I assumed that a hardware issue would recure at random intervals. Eventually, I decided something was wrong with the drive.
In frustration, I purchased a 2TB Samsung SSD and set about using it to replace the HDD in my computer. I downloaded and installed the Samsung tools. While I never could get the Samsung disk clone tool to work, the Samsung Magician tool reported that my HDD S.M.A.R.T. data was showing a critical level for the ‘ECC Error Rate’. I assumed I had found the problem.
When I got the SSD cloned (I ended up using EaseUS Backup for the clone) and installed, the problem disappeared. Note: it did not “improve”, it disappeared. At this point, I decided to install the HDD as a D: drive. I erased it, then did a low level format. Since then, the drive has worked fine. Samsung Magician still reports the ‘ECC Error Rate’ is at a ‘critical’ level in the S.M.A.R.T. data, but it works fine. I note that EaseUS Partition Master reports the disk status as “good” with no problems.
As a result, I still have no real solid answer as to what the problem was. Unfortunately, this kind of thing – especially the non-closure – leaves mental scars. Now, anytime my computer hiccups I immediately wonder if my disk drive(s) are acting up again. I only recently got around to turning ‘indexing’ back on; and I may turn it off again.
So, thank you for posting this article. I wish it had been available when I was troubleshooting this issue. Perhaps it would have convinced me to do what I did earlier, and saved me months of frustration.
Thanks for reading,
Jack
The impact situation for the highest disk usage is probably if your SSD or HDD is extra-extra full at 100% so you will need to clean up the C: drive like uninstalling some GOG and Steam games, but not every single computer game from the launcher itself. Usually you should have either 25% or 50% of disk space, but look for any software that are making heavier usage of CPU around Random Access Memory. type “Command Prompt” in the search bar and run it as administrator:
SFC / ScanNow
DISM /Online /CleanUpImage /CheckHealth /ScanHealth /RestoreHealth
Please update Windows via the settings window.