You can easily examine ISOs with functionality built right into Windows.
An ISO file is a disk image.
There are three ways to deal with a disk image:
- Put it on a disk.
- Make it look like you put it on a disk (a faux drive).
- Pretend it’s something else.

How to open an ISO file in Windows
ISO files can be mounted directly as faux disk drives by right-clicking on them in Windows File Explorer and selecting Mount. Windows can burn the disk image to actual discs by clicking on Burn instead. Tools like 7-Zip can read the contents of ISO files.
ISOs are a type of archive
An ISO1 file is kind of like a .zip file, only without the compression.
It contains an image of a disk. It contains all the files and folders from that disk, much like a .zip file contains a collection of files and folders. The important difference is that an ISO is a byte-for-byte copy of the low-level data actually stored on a disk.
The ISO format doesn’t know about files, folders, or even disk formats. It’s the raw data from the disk.
Just like a real disk, the raw data represents files, folders, and formatting details when interpreted correctly. The operating system looks to see what format was used (FAT32, NTFS, and the like), and then interprets the contents of the ISO file as if it were reading the data from an actual disk.
There are a few ways to deal with ISO files.
Help keep it going by becoming a Patron.
Mount the ISO file
Right-click on the .iso file.
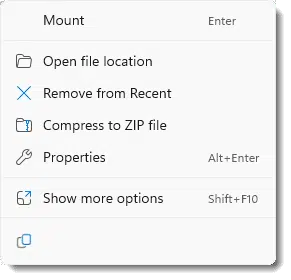
Click on Mount, and Windows will load the .iso file and make it appear as if it were another disk drive on your system.
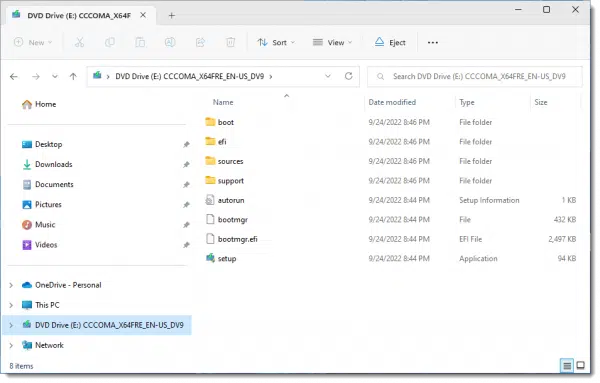
In this case, the virtual disk — a “faux” DVD drive — is read-only. You can navigate through its contents to examine what it contains.
Burn the ISO file to a disc
ISO files are frequently used to distribute CD or DVD images. For example, if you download a Linux distribution, what you’ll most likely download is an .iso file.
If your computer has a DVD burner, Windows supports burning an ISO directly. Just right-click on the .iso, and on Show more options, if present. That will bring up this window.
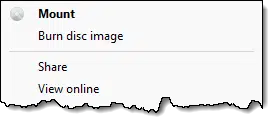
Click on Burn disc image to have Windows walk you through the process.
When you examine the completed disc, you’ll see all the files and folders contained within the ISO image. In the case of a Linux distribution, you’ll probably even be able to boot from the disc you just created.
Even when you’re not dealing with software distribution, simply burning the ISO file to a disc will make the contents of the ISO readable.
Treat the ISO file as if it were an archive
Some of the popular archiving utilities, including 7 Zip, can also read and extract the contents of ISO files.
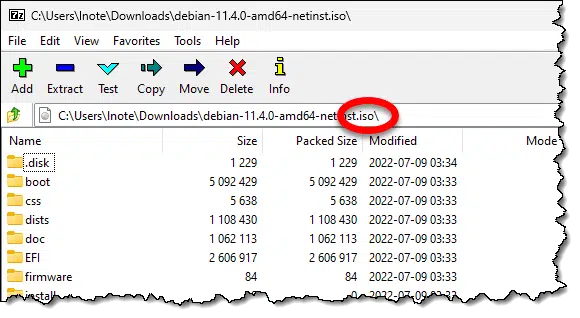
All you need to do is use those tools’ view or extraction functions on the ISO file to examine its contents or extract some or all of the files you need.
Do this
If you’re trying to get at something that’s stored inside an ISO file, mount the ISO as a drive and use Windows File Explorer to examine its contents or copy files and folders. If you’re so motivated, you could also grab a copy of 7-zip, which will let you extract the contents just as if it were a .zip file.
If you need to install or run something that was delivered as an ISO file, mount the drive in Windows and run the software directly from the faux drive. If the software requires that you boot from it, then use Windows “Burn to disc” function to create a CD or DVD, and then use the disk.
Interested in more answers, tools, and tips? Subscribe to Confident Computing! Less frustration and more confidence in your inbox every week.
Podcast audio
Footnotes & References
1: ISO is an acronym for International Standards Organization. When applied to discs, it refers specifically to ISO standard 9660.


I have a file with a “*.GI” extension, and I gather that it, too, is a disc image.But Windows doesn’t know what to do with it, and I have no program that reads it.
What can I do? I’m using Microsoft Windows 7 Home Premium.
.gi files are “Global Image” files. It is another format for disk image files. They can be opened by many disc image or disc burning programs. ImgBurn, a program Leo recommends and open and burn those.
I don’t have the mount or burn options. I’m using Windows 10 Home, so this feature might not be supported in Home versions.
I use 7Zip to view the contents of .iso files and ImgBurn to burn them.
Two questions.
1. Can I burn an ISO to a large flash drive instead of a CD/DVD? I don’t have a DVD unit on my new laptop.
2. If I burn a Windows 11 ISO file, can I boot from it to do a fresh install?
1. Probably, but whether it’s useful will depend on the contents of the ISO. Case in point:
2. Probably not. But instead of creating an ISO, the Windows 11 Media Creation tool will let you create a USB directly.
I don’t understand what you mean by #2. Windows Media Creation does create bootable media, but I’ve burned Windows and Linux installation and live rescue discs from .iso files to USB flash drives using Rufus and other media creation apps.
For ISO burning (along with general DATA and even standard audio CD burning(you can overburn audio CD’s)) I suggest ImgBurn. that was popular burning software years ago as while it’s not been updated since June 2013, it’s still my ‘go to’ burning software.
while I have not tried it personally I was told it works on Windows 11. but if at some point it fails to work on Windows in the future, one can always opt for Linux (see my “p.s.” section below).
p.s. I use ImgBurn on Linux Mint 21.1-Xfce. I ran the ImgBurn setup file through PlayOnLinux (run ‘sudo apt install playonlinux’ from terminal as the rest can be done through GUI(graphic user interface)) using Wine v6.0.1(32bit) (64bit works to but I use the 32bit Wine since it takes up less storage space) as you can download that through PlayOnLinux software itself. but to get ImgBurn working on Linux you have to make sure Wine is set to Windows XP mode (otherwise the program will hang upon loading) and then, for ImgBurn to see you CD/DVD etc burners, in the ImgBurn program itself, go to ‘Tools > Settings > I/O’. then on ‘Interface’ switch it to ‘SPTI – Microsoft’ and below that section where it says ‘SPTI – Enumeration Device Method’ select ‘Device Interface’ (or ‘Drive Letter’) and click OK. ImgBurn should now see your CD/DVD burners in the ‘ImgBurn Log’ window there and then you can pretty much use it like normal at this point. but for audio CD burning, to keep it simple, I temporarily convert my FLAC files back to WAV (you can use Foobar2000 for this, which also works on Linux) since ImgBurn can directly use WAV files without issue. the general section for creating standard audio CD’s on ImgBurn is ‘Tools > Create CUE File…’. then after you setup your audio CD to your liking it will save a cue file at which point you simply select the ‘Mode > Write’ and drag-and-drop the cue file into that ‘Source’ section and then select write speed etc and proceed to burn.