My new laptop is here, and I’m ready to start playing with it.
The first thing I’ll do probably won’t surprise you, but how I do it almost certainly will.
The problem I want to solve
I want to back up my machine. Specifically, I want to create a pristine image of the hard drive before I do anything to it.
Anything.
Unfortunately, in order to install backup software, I’ll have to fire up the machine and complete Windows setup first. That defeats the purpose, as by then the hard disk will no longer be “pristine”; it’ll have been modified by the setup process.
I want a backup before I set it up. I want an image of the hard disk that I’ve only semi-jokingly referred to as the disk “before I turn on the machine”.
Of course, short of removing the hard disk (not a practical option here), I’ll have to turn on the machine to back it up.
A classic chicken-and-egg dilemma: I have to turn the machine on to back it up, but I want to back it up prior to turning it on.
Rescue disk to the rescue
Popular imaging backup software like Macrium Reflect or EaseUS Todo creates rescue disks. They “rescue” by restoring a backup image to a machine that won’t boot from its internal hard drive or replacing whatever is on that hard drive.
What many people don’t realize is that rescue disks can also can also be used to back up.
So the sequence I’ll follow is this:
- Using a different machine, create a bootable Macrium Reflect (Free) rescue “disk” on a USB stick.
- Turn on the new machine and immediately enter the BIOS/UEFI configuration.
- Change it to boot from a USB stick.
- Reboot, booting from the rescue disk.
- Make a backup image to an attached external hard drive.
- Reboot, immediately entering the BIOS/UEFI configuration to reset it to boot from the hard disk as normal.
- Reboot one last time into Windows 10’s initial setup.
The result will be an image of the hard disk before Windows setup was ever attempted.
Changing BIOS settings
Honestly, this was probably the most difficult part of the exercise to figure out.
As I’ve explained before, modern UEFI BIOSs are complex and have additional security that — in extreme cases — can lock the machine down so tightly that I wouldn’t be able to do what I wanted. Fortunately, the Dell BIOS didn’t come that locked down.
The sequence I used follows, but I need to be clear: unless you’re dealing with a Dell machine — perhaps even a very similar Dell — what you need to do will almost certainly be different. As with this entire series, I’m presenting my experience not as a step-by-step guide, but rather an example of the kinds of things you’ll need to look for and do.
- I powered on the machine and began pressing F2 to enter BIOS Setup.
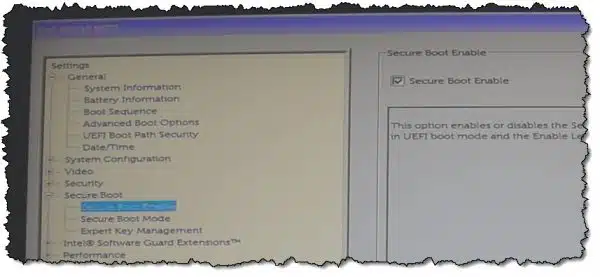
- I disabled “Secure Boot”.
- In “Advanced Boot Options”, I enabled both “Enable Legacy Option ROMs” and “Enable Attempt Legacy Boot”.
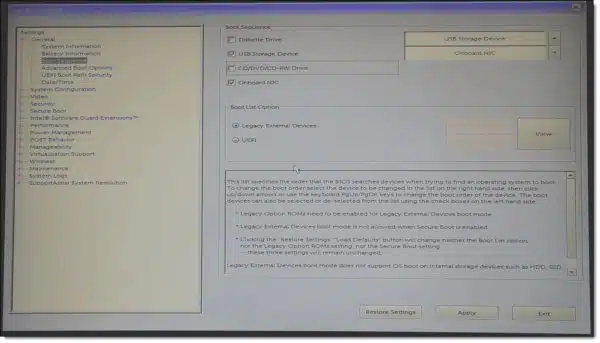
- In “Boot Sequence” I switched from “UEFI” to “Legacy External Devices”.
- I then had to reboot and return to the “Boot Sequence” BIOS setup page.
- I disabled “Diskette Drive” and “CD/DVD/CD-RW Drive” from the Boot Sequence, and made sure that “USB Storage Device” was to be checked first.

I inserted the rescue disk USB stick and rebooted the machine. Macrium Reflect started automatically.
Creating the image backup
The copy of Macrium Reflect on its rescue disk is essentially identical to the version that you install on your PC. Using it, I:
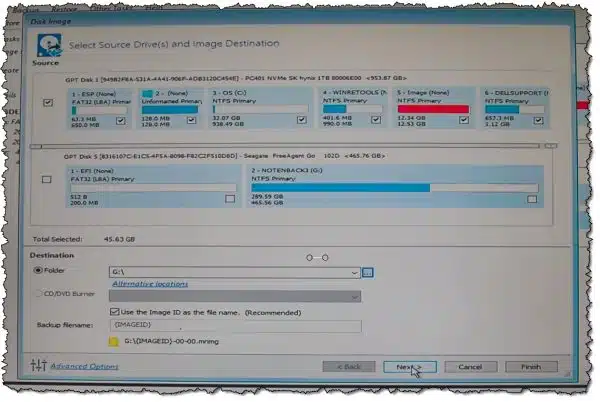
- Selected “Image selected disks on this computer”.
- Selected the internal hard drive, including all of its partitions, as the disk to be backed up.
- Connected my external USB hard disk.
- Selected that external disk as the destination for the backup image.
- Ran the backup.

Reflect proceeded to image the internal hard disk and create an image backup file on the attached external drive.
Once the backup was complete, I detached my USB rescue disk and external disk.
Undoing the BIOS changes
In order to boot into the pre-installed Windows, I needed to revert the changes I’d made to my BIOS settings. Specifically:
- In “Advanced Boot Options” I disabled “Attempt Legacy Boot”.
- In “Boot Sequence” I changed “Boot List Option” back to “UEFI”.
- Back in “Advanced Boot Options” I disabled “Enable Legacy Options ROMs”. (I’m not sure why it had to be done in this sequence.)
- I enabled “Secure Boot”.

After doing all that, I exited the BIOS setup. After a somewhat lengthy reboot, the machine began Windows’ first-time setup.
Why?
As I mentioned above, the moment you turn on a machine with Windows pre-installed, you initiate the Windows setup program. By definition, that immediately begins making changes and customizations to the copy of Windows installed on that hard drive.
By backing up the hard disk before any of that happens and saving the backup image somewhere safe, I have an additional recovery option available in the future: a restore to true factory-fresh condition, as if I’d never touched it. I can start Windows setup from scratch and, should I want to, make completely different choices in the process.
It’s not a replacement for backups taken after Windows has been set up. Those represent additional options that, with Windows already set up, might require less work should you ever need them.
But this truly pristine backup gives me an ability to truly start over that those backups simply can’t provide.
Next up? Updates. Lots of Updates.
Do this
Subscribe to Confident Computing! Less frustration and more confidence, solutions, answers, and tips in your inbox every week.
I'll see you there!
Podcast audio
More for Patrons of Ask Leo!
Silver-level patrons have access to this related video from The Ask Leo! Video Library.


A very impressive sequence of tasks. I really like your approach. Sounds like something that I would definitely want to achieve, but hesitant on how! You outlined it perfectly.
-Jim
With my new Dell, I went ahead and ran the setup, installed Macrium Reflect, and then backed up. Not quite as pristine as yours, but close.
That’s how I’ve always done it, but doing the backup before booting gives you a genuine factory reset backup. I think I’ll go for it with my next computer.
Indeed, and that’s what I expect most people to do. I just had this once-in-a-new-machine opportunity and was feeling pedantic.
Very neat approach! I kicked myself for not thinking of it.
Any thoughts on running Steve Gibson’s Spinrite utility at this stage?
One of the issues I always struggle with when setting up a new computer is choosing the break-points for back-ups as I do the set-up, catch up on updates, install and configure application software.
Your thoughts on this (& the best sequence for installing software & utilities utilities) would be appreciated (next article?).
I’ve also tried to separate OS & applications from data. Preferably separate physical drives but otherwise in different patitions. It’s a pity that Windows does not support this approach as part of the set-up process.
Spinrite: it’s not really something that’s stage-specific, as you can run it any time. I suppose earlier is better to weed out problems sooner, but honestly I haven’t used it in a long time now.
Without the backup I did here, I would next take an image backup after having brought Windows and drivers completely up to date.
And, indeed, my sequence of what gets installed when is in an upcoming article. 🙂
I accidently did a first time boot using Linux USb installation ISO that I downloaded from the net. So this was a clean Linux installation but later on I could not have the win activated.
After this I let machine install the win, create a admin local user, and then use the win USB to update the win, saving nothing.
So I have the win activated, and get rid of all extra sw. Then using HP Support Assistant (for HP) and update the correct drivers.
works for me
Wow! Would never have thought of doing this; I can see your logic, though.
Leo, I tried doing something very similar to a brand new Windows 10 Pro Dell Optiplex computer just a few days ago (too bad your article didn’t come out before I tried this!). I created my recovery media using a fully updated Windows 7 Pro computer, used a DVD instead of a USB stick for the media, used the most current version of Macrium Reflect Home edition (ver. 7.2.3957 64-bit). I researched how to change the UEFI bios settings as needed to boot from the DVD and made the changes. I then tired to boot from the Macrium recovery DVD but could not get it to do so…each time the activity LED would light up steady indicating the computer was reading from the DVD, I I could hear the DVD spinning for a long period of time, but it would sit there like that and go no further. After looking at your list, I probably had not made all of the BIOS changes I needed, but at the time I assumed that because I created the Macrium recovery DVD from an older Windows 7 computer, it was missing some key drivers needed for this new computer. Could that possibly have been the reason it failed?
The version of Windows used to create the recovery disk shouldn’t matter. Given the complexity of current BIOS’s, especially when it comes to trying to boot from something else, my money is on not having made all the changes needed. You might need to check with Dell for instructions on your model.
I’ve had problems booting a Macrium recovery disc on an HP computer. Turns out it was really booting but without the drivers for an HDMI monitor connection. Switching to a VGA connection on the monitor showed the computer had booted but without any display
Doesn’t the “Macrium Boot Menu” bypass all of your suggested changes to the Windows 10 BIOS? I don’t want to change something that doesn’t need changing whenever possible.
How about physically taking out the hard drive (or SSD), copying it to another hard drive with a drive duplicator, and inserting either the copy or the original SSD back in before the first Windows boot up? Would that work?
Today’s laptops are equipped with m.2 SSD sticks that get installed directly on the motherboard, and you would then need such an interface to read the contents outside the laptop. Moreover, there is more than one type of M.2 SSD, making this more complicated.
It could. This drive was not removable. From the article: “Of course, short of removing the hard disk (not a practical option here), “
Well done, Leo, and for sharing so comprehensively.
Pedantic works for me…every time.
Would using the factory installed recovery program not do the same thing?
Not if the hard disk dies — taking that recovery program with it.
Good procedure, but I have been a geek for so long that pulling the hard drive and making a dup or full metal backup is pretty much standard for me. Often at this point, rather than buying the machine with an SSD, I may dup from the orig drive and then insert the SSD, leaving me with a “actual” pristine drive, that I can reinstall when I sell the machine, used.
With the advent of almost everyone using laptops, this has become slightly more of a challenge (based on the laptop). Some are quite simple, where others are time consuming and onerous. You also run the risk of voiding any warranty, but I am willing to accept those “costs”. However the idea of a “pristine” backup is a solid piece of advice, and the described method is a much simpler routine for the normal user. The caveat of the bios setup should be heeded, and do you research first, not after your first (or several) failures. Think of it as “peace of mind”.
And to reiterate from the article, removing the drive wasn’t an option in this model.
Wow!. All I can say is that I am very impressed. The only thing (caveat) is that one has to make sure to have a good understanding of the BIOS/UEFI settings before even touching the new PC. And in case that it is totally a different model from Dell, the manual that came with it or the manufacturer’s site is your only best bet.
Very good article, Leo. Congrats!
A good number us would assume that the BIOS writer and the motherboard maker are not identical. Are Dell Computer BIOS’ written by Dell or a third party? If a third party, is not the specific procedure you reported characteristic of the BIOS writer’s rules not Dells? Please detail to whom we should listen.
There’s no single answer here. Many, if not most, BIOS’s may come from third parties, but are often customized to the specific computer manufacturer’s desires, often right down to the make and model. I’m not sure it really matters who created the BIOS, only that they are different from one machine model to the next.
I think that THE most important thing to do first is determine which key to press to enter BIOS Setup. If they blindly press F2 and that is not the right key, then the machine will boot Windows and goodbye pristine disk.
Yes, good point. I did carefully research that at the Dell site before turning the machine on.
Another concern (for non-laptops) is how do you get a wireless keyboard installed before you can install the software for that keyboard? Knowing which keystroke enters the BIOS doesn’t help if you don’t have a hard wired keyboard! Any work around for this? I have a new Dell PC and now don’t know how to proceed. I don’t think just plugging in the USB dongle for the keyboard/mouse prior to the first Power On will work during POST. The only wired keyboard I have in my “old equipment” box has a PS2 plug! Yes, it’s that old!
I use a wireless keyboard with an older Dell PC. I can access all of the BIOS settings by simply plugging in the dongle and using the keyboard. If you need a wired keyboard, you can borrow one from a friend or get an inexpensive keyboard under $10. It’s a good idea to have a backup wired keyboard for other contingencies, such as in case the batteries go dead and you don’t have replacements.
I do keep an wired keyboard for just this purpose. (You can get a wired keyboard & mouse for about $15 on Amazon and probably elsewhere.) SOME wireless keyboards, as Mark points out, will work to some basic degree without special drivers.
I’m hoping to use your brilliant technique on my new HP 17t-by300 laptop, which I haven’t turned on yet. I’ve been agonizing over this for days 🙂 and have read the user manual and other instructions.
My new HP has both a 512 Gb SSD and a 1 Tb regular HDD. Do you think I’ll be able to make a pristine backup of the whole thing with both drives with Macrium? I do have an external drive plenty large enough to take the backup. The laptop came with Windows 10, but what I want to do after a backup is to install Win 8.1, which I bought. I know, I know, but that’s what I want to do.
Do you have any suggestions or ideas I haven’t thought of? Something is bound to go wrong and I’d like to be somewhat prepared. Don’t mean to be a pessimist 🙂 Thank you 🙂
You SHOULD be able to. The hardest part, honestly, for me was getting the machine to boot into the Macrium Reflect rescue disc. Had to turn off secure boot and all that. Which you might need to do anyway to be able to install Win 8.