Stack the deck in your favor.

Windows networking is a mess. I’ve said it before. I’ll say it again.
However, over the years I’ve developed a strategy that kinda/sorta/usually works when I want to connect one of my machines to another.
I can’t guarantee that it’ll work for you — networking is a mess, after all — but I do believe it’ll increase your chances of success.

Increasing the odds of network success
- Use the same workgroup for all machines.
- Turn on Network Discovery.
- Choose “Private” network type.
- Make sure there’s a common account on all machines, ideally a local administrator-capable account.
- Create shares with appropriate permissions.
Same workgroup
The first thing I do is make sure all of my computers are in the same workgroup.
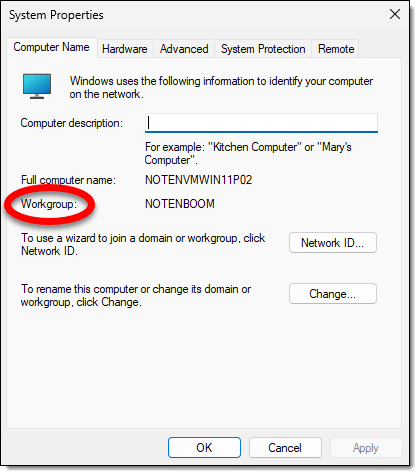
(You can find this setting by searching the Settings app for workgroup.)
I like to choose my own, as you can see. Since the default workgroup name is something different, I believe this provides a little obfuscation/difficulty when visitors connect to my network. To be clear, though, it’s not a true security measure.
There’s a good chance you may already be on a single workgroup if you’ve never changed yours. Most initial installations of Windows use a workgroup unimaginatively called Workgroup.
Network discovery
Make sure that network discovery is turned on. It’s off by default, though you’ll typically be prompted to turn it on if you try to do something network-related.
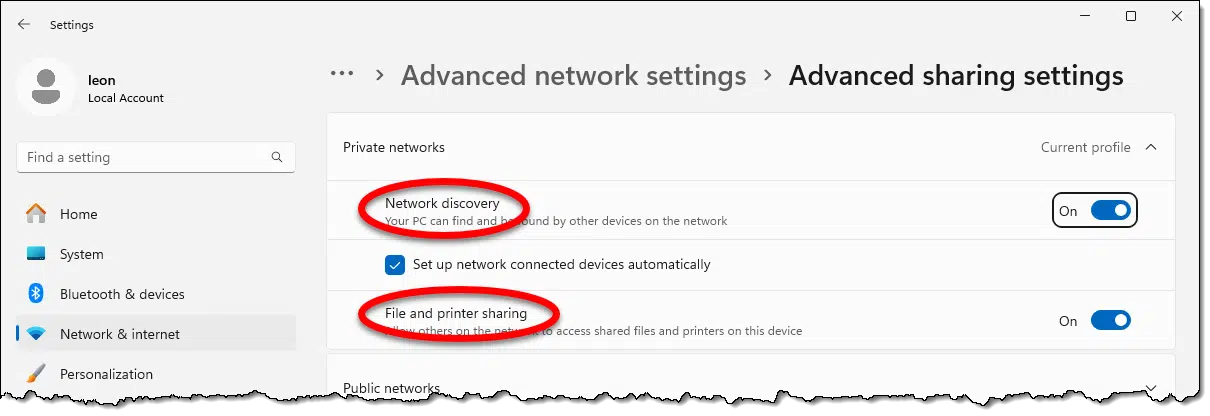
Search settings for “sharing” and click on “Advanced sharing settings” when it appears. Turn on both Network Discovery and File and printer sharing.
Use a private network
Even though we’re using the phrase “private network”, this has nothing to do with VPNs — virtual private networks.
Windows wants to what kind of network you believe you’re on.
- A Public network such as a coffee shop, hotel, or something else. In this case you should be protected from additional threats that may reach your machine via the network. Part of that protection, for example, is to prevent random machines elsewhere on the untrusted network from connecting.
- A Private network such as your home or workplace. Since you’re connected to a more trustworthy network, and therefore connections can be allowed more freely.
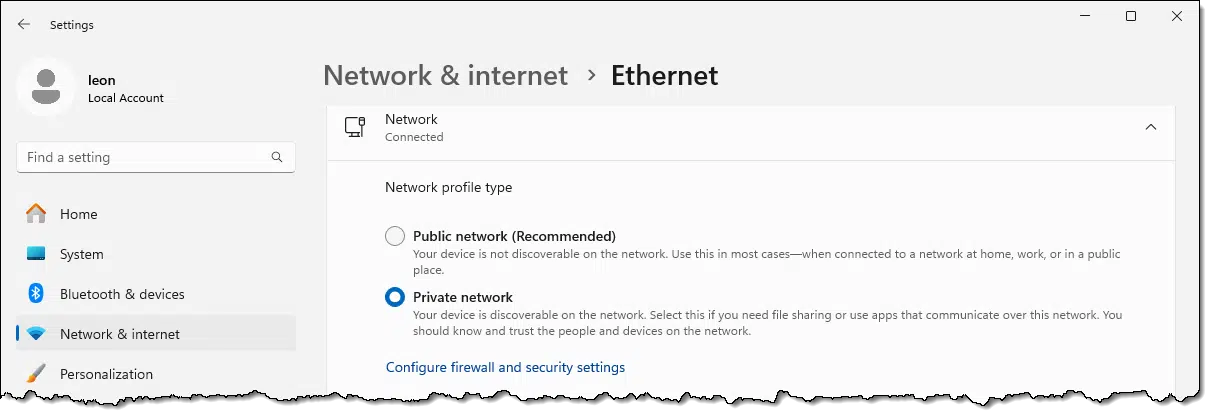
This is in the Network & internet section of Settings.
Have a common account
I recommend having an account with the same ID and password on all of the machines you want to connect.
In theory, this could be your Microsoft account. I say “in theory” because I’ve run into hiccups trying to use that account for cross-machine sharing. Instead, I set up an additional local administrator-capable account on all my machines with the same name and password.
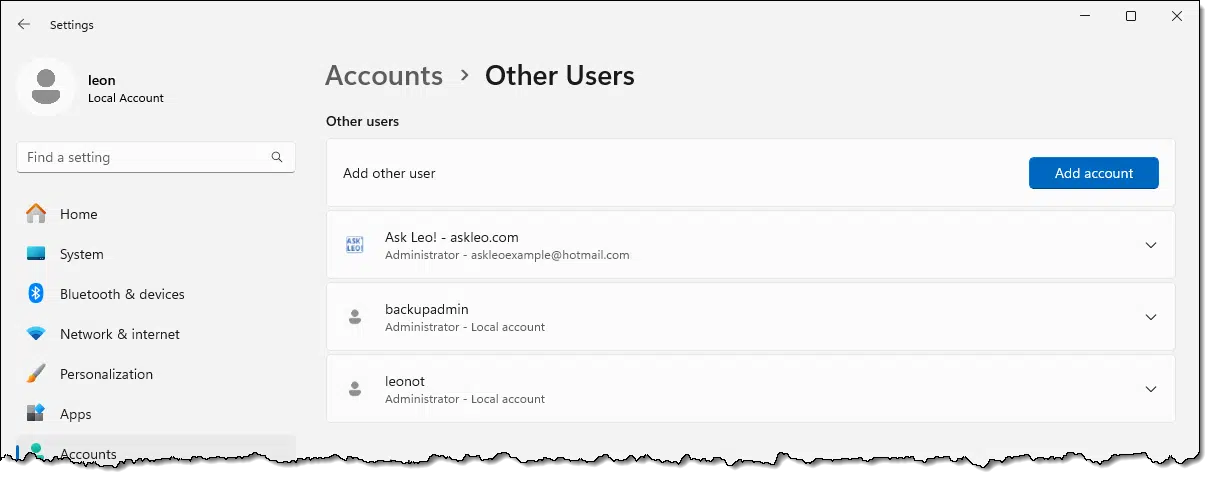
In the example above, I’m signed into a local account with an ID of “leon”; you can see it in the upper left. That account exists on all my machines with the same password on all those machines as well. In theory, I suppose this violates the “different password for every account” rule, but these aren’t online accounts. In some situations, using the same password apparently allows Windows to avoid prompting you for a password when a connection is made.
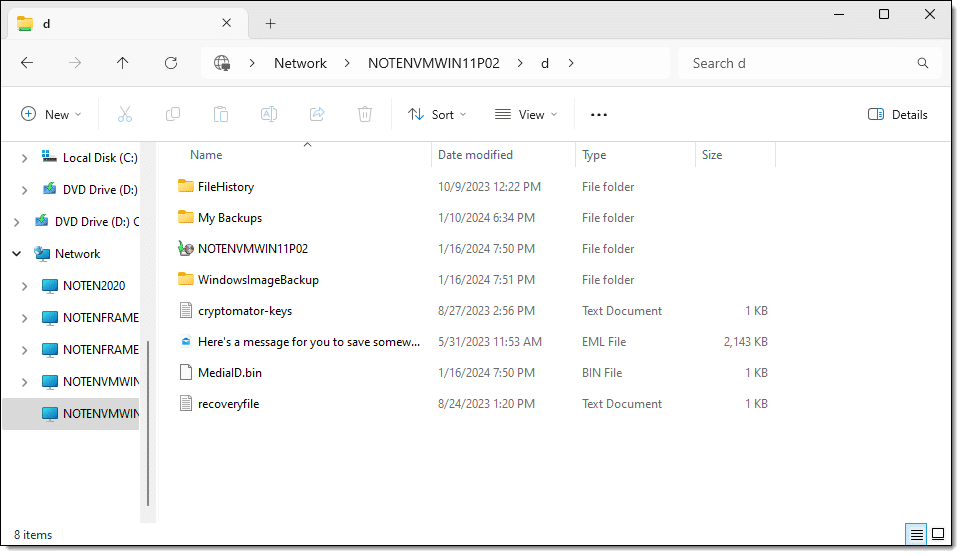
Create a share
Sharing data between computers works in two steps. First, on the computer containing the information you want to be able to access elsewhere, you create what’s called a share. Then you move to a different computer and connect to that share.
You can share any folder or an entire drive.
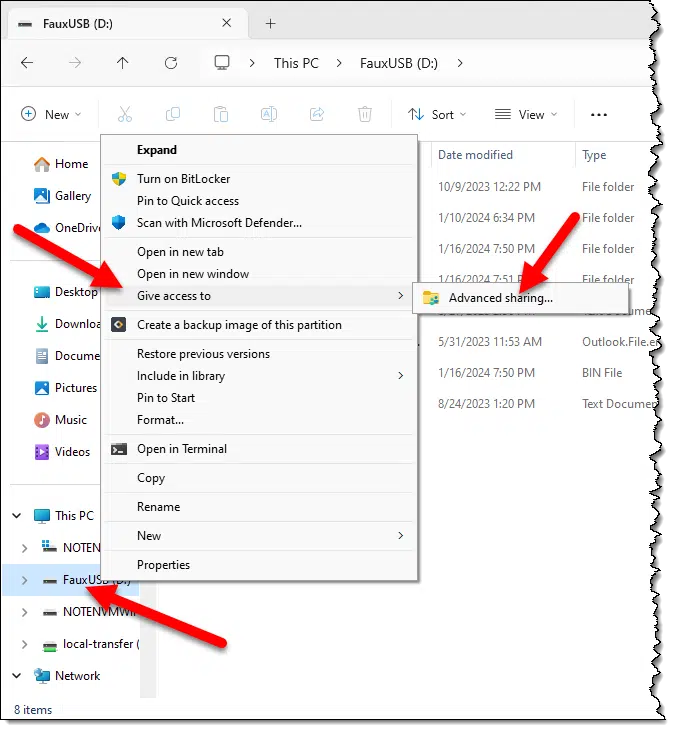
In the example above, I want to make my entire D: drive (FauxUSB) accessible to other machines.
- Right-click on the drive.
- Click on More settings, if present.
- Click on Give access to.
- Click on Advanced sharing.
From there, click on another Advanced sharing button. This will open the sharing dialog.
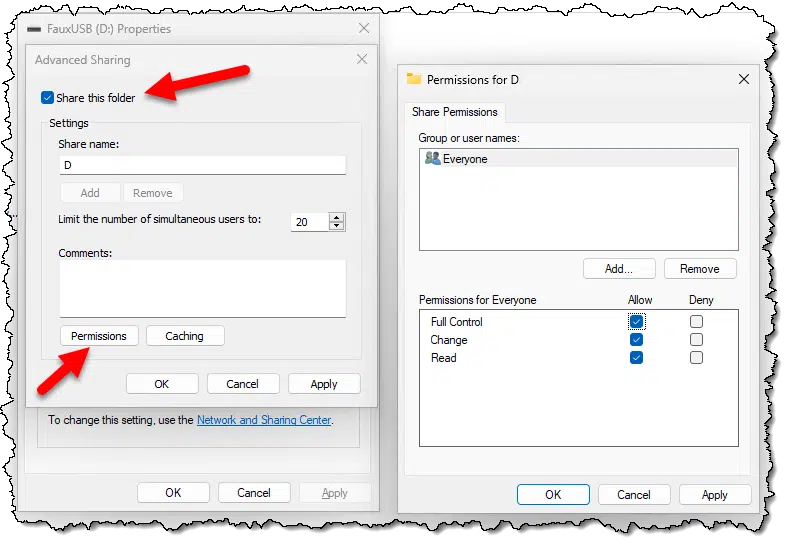
Click on Share this folder to create the share. Note (or change) the “Share name:”. In my case, it’s simply “D”, but you could give it a more descriptive name if you like. This is used when connections are made to this share.
Click on Permissions. The default is that “Everyone” can only read the information on the share. I’ve updated this to allow everyone to do anything. Since I control what happens on my network, I’m ok with this excessively permissive setup. It makes life easier in general. If you have concerns, you can fine-tune permissions by restricting access only to certain accounts or giving certain accounts or groups more or fewer permissions than others. Or, if you don’t need extra permissions, you can leave it at read-only.
Click OK on each dialog, and you’ve set up a share.
Connect to a share
The second step is to connect to the share you’ve created from a different machine. There are, naturally, several ways to connect to a different computer on your local network. This example will use the browsing capabilities of Windows File Explorer.
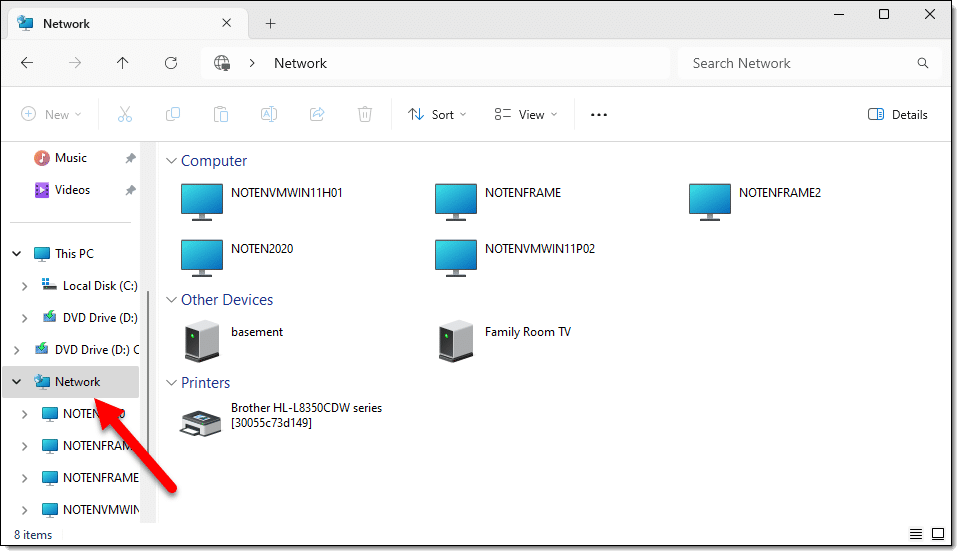
On a different machine, run Windows File Explorer and click on the Network icon in the left-hand pane.
It may ask you to:
- Enable network discovery and sharing if you’ve not already done so.
- Choose to treat that network as a Private network if you’ve not already done so.
The result, shown above, should include all of the machines you configured to be in your workgroup.
Double-click on the machine to which you want to connect. In my example that’s NOTENVMWIN11P021. You should see the share you created on that first computer.
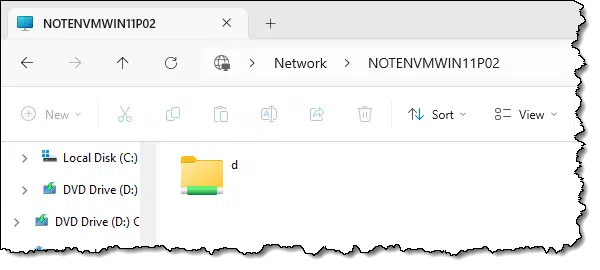
Here you can see the share we created called “D” (it’s case-insensitive, as you can see – ‘d’ and ‘D’ are treated the same).
Double-click on the share and Windows File Explorer will open its contents.
If you are asked to provide account credentials, use those of the local account you’ve created on all your machines.
That’s it. You can now access the files shared by the first machine on the second. Depending on the permissions you’ve set, you can treat it like any other disk drive.
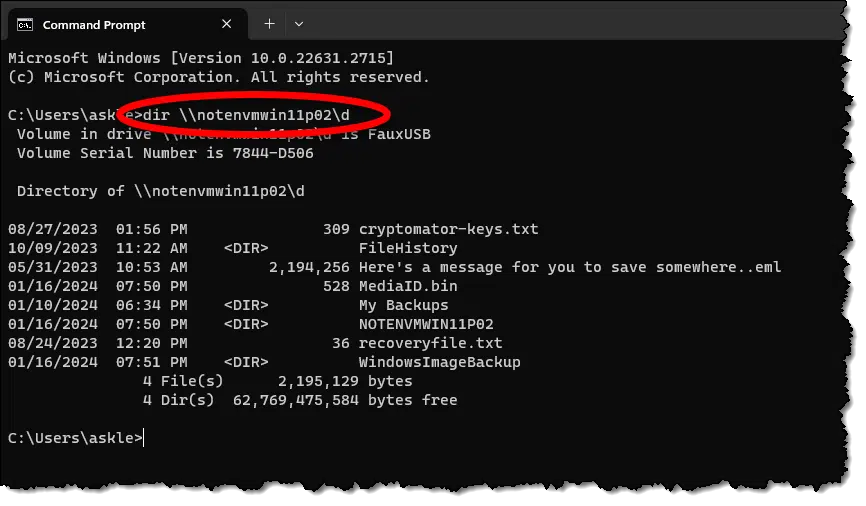
One shortcut: UNC syntax
There is one shortcut I want to share with you. UNC, for Universal Naming Convention, can often be used to reference a remote share without needing a separate connection step.
For example, the machine on which we created the share is NOTENVMWIN11P02, and the share is named “D”.
That means we can reference it in many places as “\\NOTENVMWIN11P02\D”. Here’s an example from within Command Prompt.
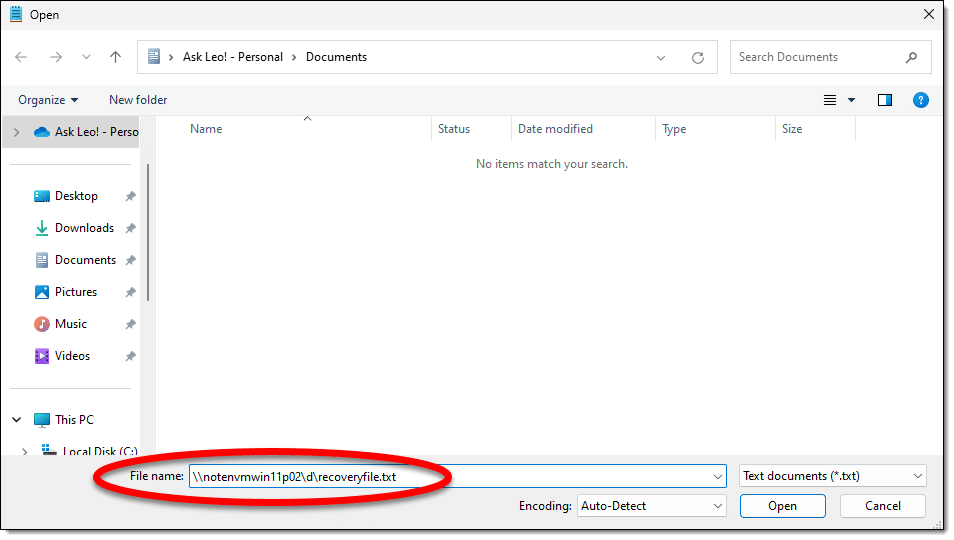
Similarly, you can reference specific files by treating that as a normal path to the file. For example:

This opens Notepad on the file “\\notenvmwinllp02\d\recoveryfile.txt”. Similarly, in Notepad (and many other programs) you can open or save files using this same syntax.
Do this
Honestly, when it comes to networking, I’ve only scratched the surface. But given how fragile networking in Windows2 can be, hopefully, I’ve given you a few tips and tricks that will help.
May the odds be ever in your favor.
Increase your odds further with this: Subscribe to Confident Computing! Less frustration and more confidence, solutions, answers, and tips in your inbox every week.
Podcast audio

Related Video


Footnotes & References
1: In case you’re wondering, yes, I have a naming convention. NOTEN is just me (pretty much everything begins with this), VM indicates that this is a virtual machine, WIN11P indicates that this is running Windows 11 Pro, and the 02 means that it’s the second virtual machine running Windows 11 Pro.
2: Don’t get me started about cross-platform connectivity. You’ll notice that my Mac and my Linux computers, which definitely exist, don’t show in Windows File Explorer.

I have no problem with my Win11 and Win10 sharing.
However, I can’t figure out how to get my Linux (Mint) machines to share or my Win network to access the Linux machines.
Any suggestions?
Yeah, I sidestepped that on purpose. It makes a bad situation worse. I have Windows, Macs, and Linux machines and sharing is … nightmarish.
What I’ve done on Linux is installed and configured Samba, which should allow for both sharing and access of Windows-based network shares.
Thanks for a great article. I need to trawl through my Win11 boxen and see if something up there helps…
I never had any trouble getting XP/98/ME to see each other. Do the obvious, works.
Along come Win7, and now one must activate the “hidden administrator account” to share the root of a drive. (Otherwise Sharing only works with folders.)
So all continues well through Win10 16xx (whatever the number is.) All the WinBoxen can mutually see each other and share files, no problem at all.
AND THEN….
They disabled SMB 1.x, and suddenly Win10 19xx (and later) can no longer see the XP box. Thrash around in Add Features, find SMB 1.x, enable it, and now Win1x can see XP (and other older WinBoxen) again. But XP still cannot see Win1x. One-way networking. And I still have not figured out how to share the root of a Win1x drive (as I wish to do with my data drives). It may even claim it’s shared, but it doesn’t work.
And oh, linux, madness lies that way… let us postulate that Samba is installed, and share my experience.
— Live ISO networks with any Windows just fine, without Samba. Same distro installed, with Samba, does not.
— iPhone can steal the PCLinuxOS box’s files. iPhone cannot see the Fedora box at all, nor any WinBoxen.
— PCLOS and Fedora can see each other but not communicate.
— The Fedora box cannot see any WinBoxen.
— Neither of them can see the iPhone.
— XP can see the PCLOS box, but can’t log in.
— Win11 can log into the PCLOS box and steal its files. PCLOS does not see the Win11 box.
— For a while PCLOS saw no WinBoxen at all, then one day I managed to convince it that smb://xpbox/shareddriveD was doable. But until recently it could not see any of the other dozen shared drives on xpbox. Then recently (frozen system so don’t say updates, weren’t any) suddenly PCLOS can see smb://xpbox, IF I go there from a bookmark. If I just type smb://xpbox (or even smb://192.168.0.n) into the location bar, the resource cannot be found.
Wall, head, dent, some kinetics required….
Thanks, I will have to research installing and configuring Samba.
OneDrive is my solution for file sharing. I used to understand how to configure Microsoft’s Network file sharing, until they changed thing up around the time Windows 10 arrived. At that point, I could share easily enough between my Windows OSes, but not between Windows and GNU/Linux (I dual-boot).
I found an Open Source OneDrive client on GitHub (https://github.com/abraunegg/onedrive), and I’ve used it for several years. Several distributions offer it as a binary package. There’s a list of distributions (and the version they offer) that do so, in the Documentation and Configuration Assistance section at “docs/INSTALL.md”. If your distribution doesn’t offer it, or offers an older version (with a red version background), you should build the client from source. Detailed instructions are included on the page mentioned above. The “docs/USAGE.md” page provides everything you could ever need to know about the client’s configuration options.
After you get everything set up (and signed into your Microsoft account), you’ll end up with a new folder named (of course) OneDrive, in your user’s home directory. It will contain local copies of all your files from OneDrive online. My distribution uses systemd, so I’ve set up the client as a system service so it syncs my local file store with the OneDrive server every 5 minutes. You can configure that time frame to most any duration you want, but 5 minutes is the default, and it has worked well for me. One thing to remember is that when you delete a file on your local store (then synchronize), it’ll be deleted (moved to the recycle bin) on the OneDrive server.
This is what works for me,
Ernie (Oldster)
I understand that there exists one of the machine on the network (elections anyone?) that acts as a sort of domain controller and maintains a list of the machines in the workgroup. Is that where to dig when sometimes the list of machines in the nework is not accurate. I found that sometimes the machines show up, sometimes not.
As you say, Windows networking is a mess. I have 6 machines, all Windows 11, the same release. They all could see each other and share files. However, the last Windows update has changed things. Suddenly I am being asked for a password. Which password, and what user name? Certainly not my Microsoft account name. Looking at Credential manager, I have changed the unknown password for a known one against each machine. That is not recognised either. Luckily I use Google Drive to store all my files, so I can get to them from any machine, but to recap, Windows networking is a mess.