It’s easy and free.

I frequently recommend creating an image backup prior to major events like a Windows upgrade, hardware replacement, or anything that might put your machine at risk of something going wrong. A backup image is a great bit of insurance.
Of course, the question I get then is “Great. How do I do that?”
It’s not hard. Let’s download EaseUS Todo Free, install it, and use it to make a backup image.

Creating an image backup
Creating a backup image is smart insurance before major changes (like upgrades or adding new hardware). Use EaseUS Todo Free to do this easily. Download it, install it with custom install option to avoid extras, and follow simple steps to select what to back up.
Downloading EaseUS Todo Free
Start by visiting https://www.easeus.com/backup-software/tb-free.html.
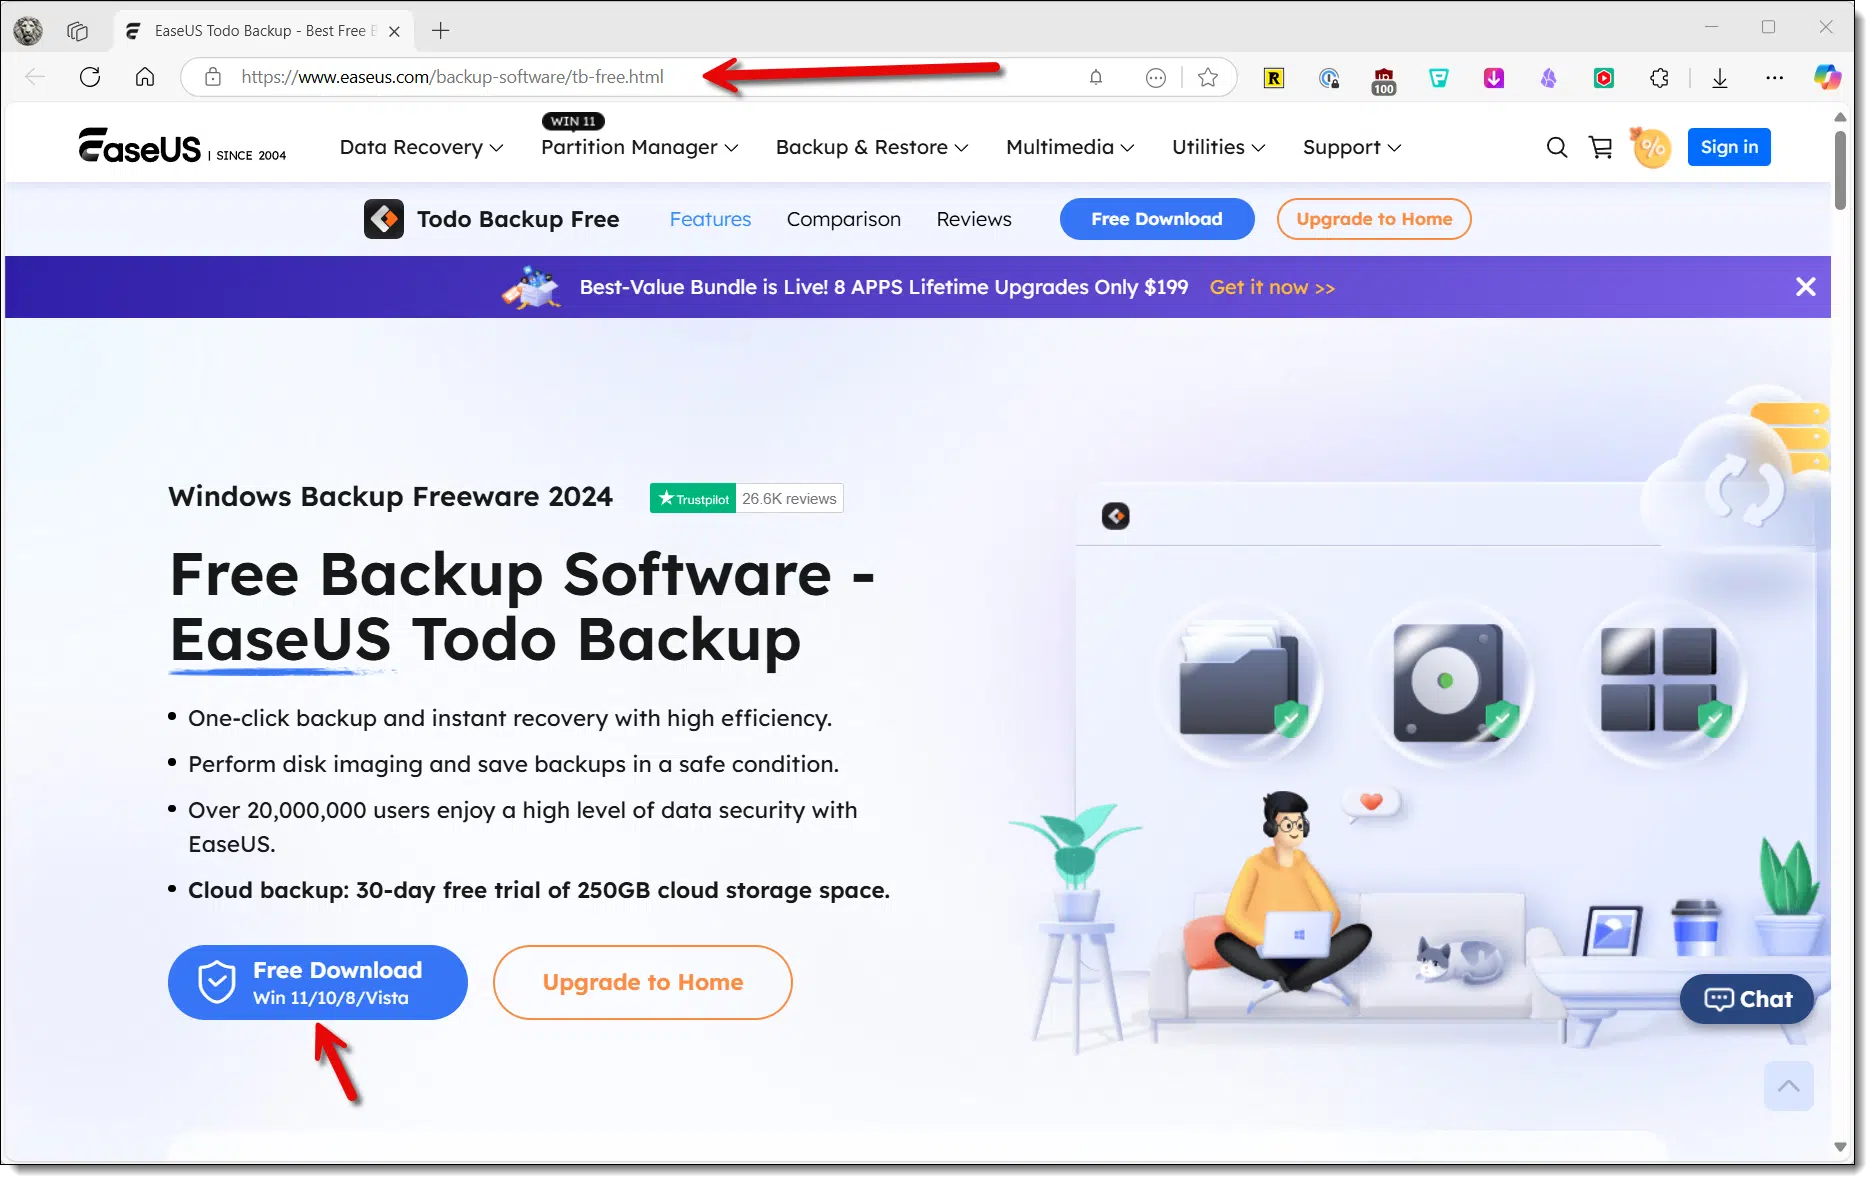
Click on the Free Download button to download and run the installer.
You may get several offers to upgrade. You do not need to upgrade. Choose the completely free version at each step of the path.
Installing EaseUS Todo Free
After running the installer, you’ll be presented with an Install page.
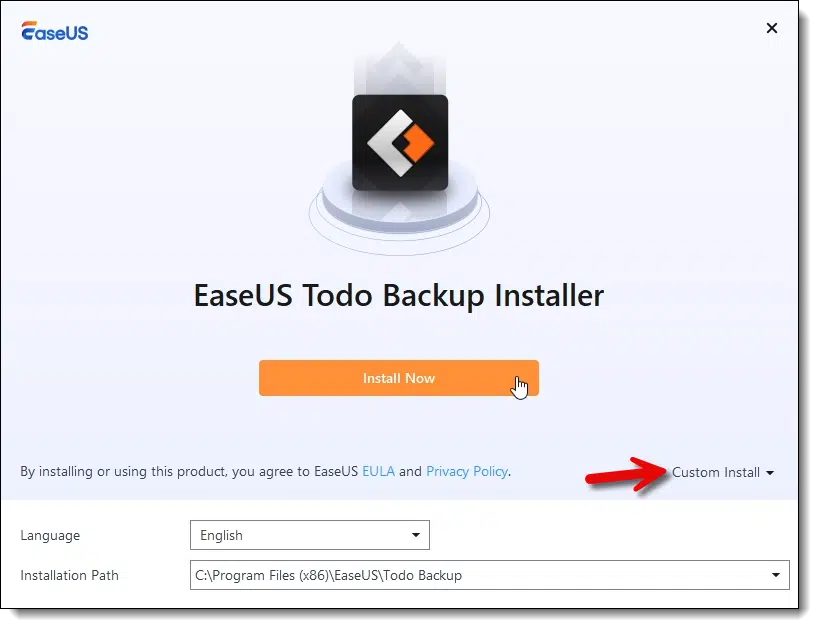
I’ve highlighted the “Custom Install” item in the image above. Regardless of what you’re installing, always choose custom. While it’s never been an issue with EaseUS products, sometimes the custom install option exposes additional choices (or at worst, PUPs) that you can de-select. It’s an important habit you should get into.
Click on Install Now.
When the program has been installed, you’ll be given an option to Start Now.
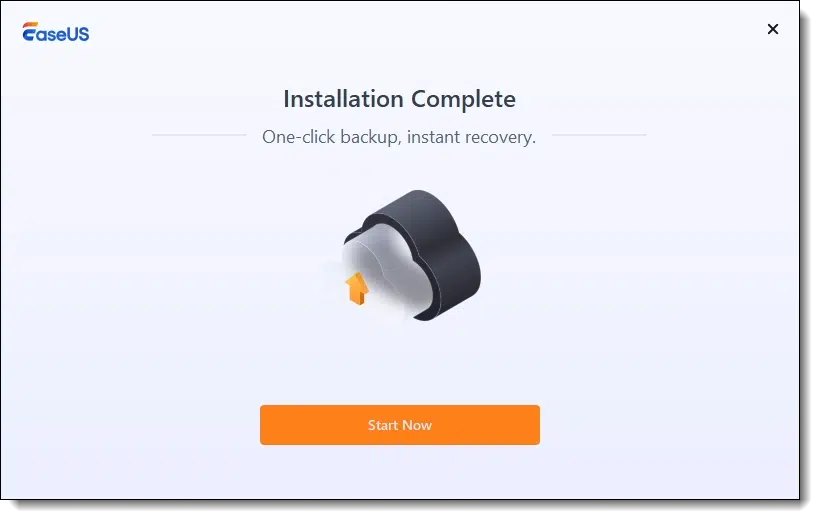
Click on Start Now. (Again, decline, ignore, or bypass any offers to upgrade to a paid version.)
Creating a backup image
You’ll be greeted by a welcome screen.
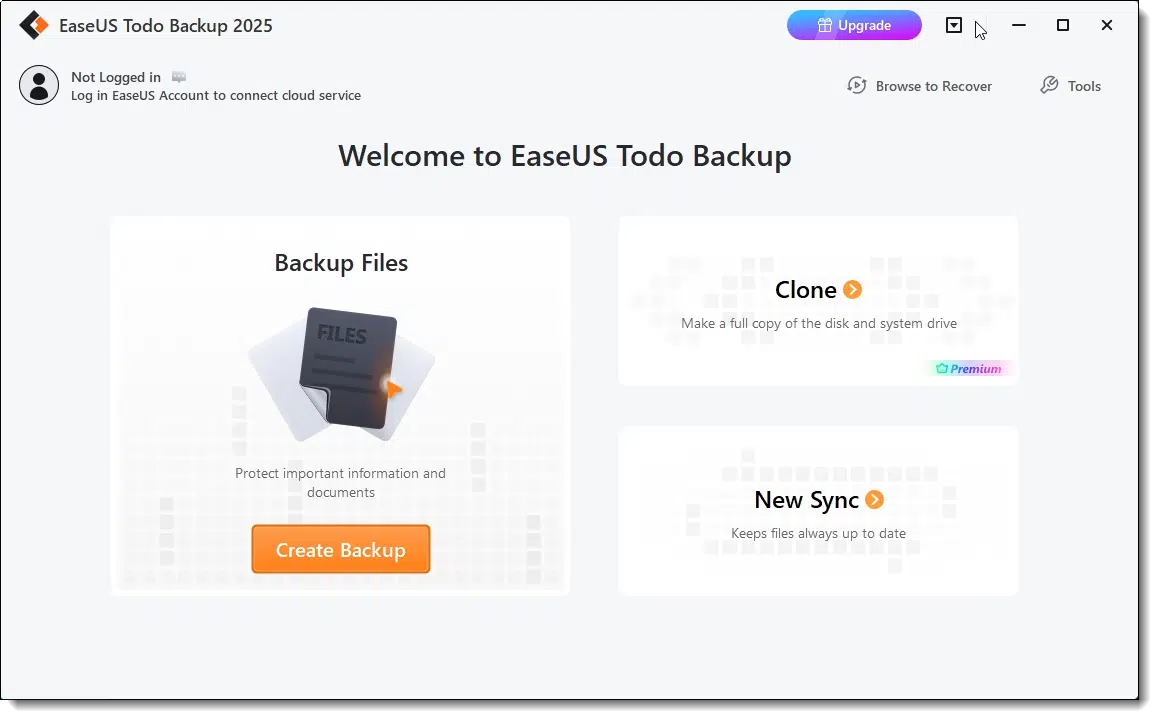
Click on Create Backup.
You’ll be asked what you want to back up.
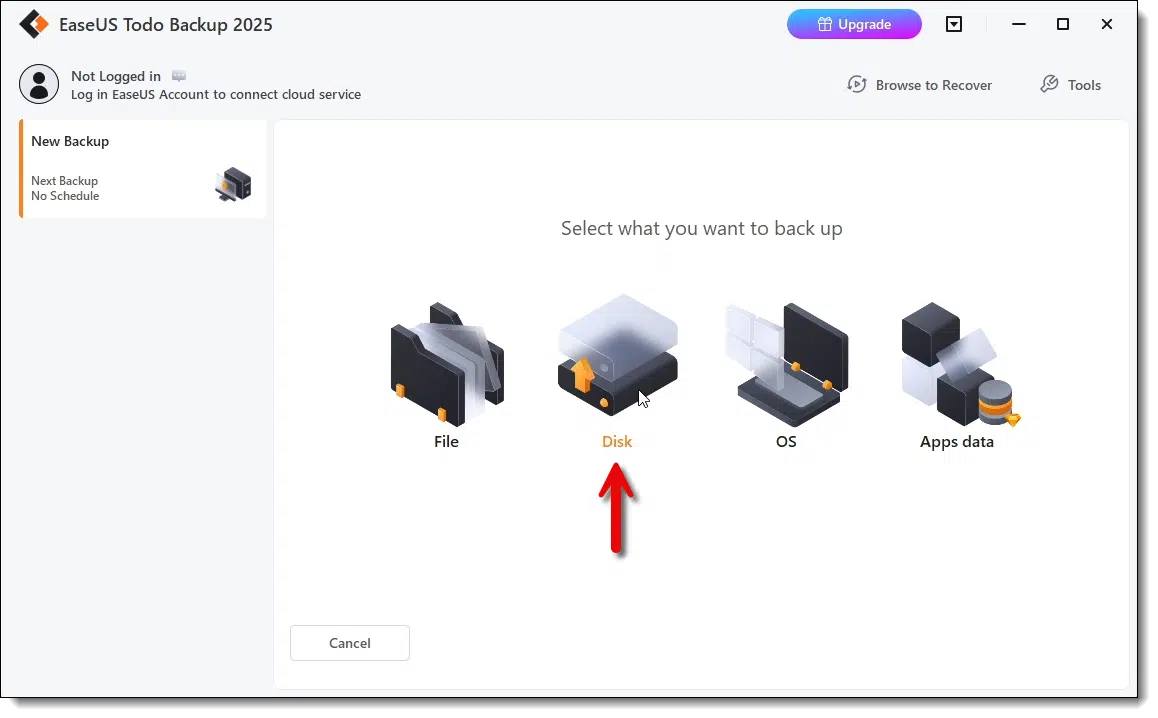
Click on Disk. An image backup is, by definition, the complete contents of a disk, including all partitions and overhead information.
You’ll be asked which disks to back up.
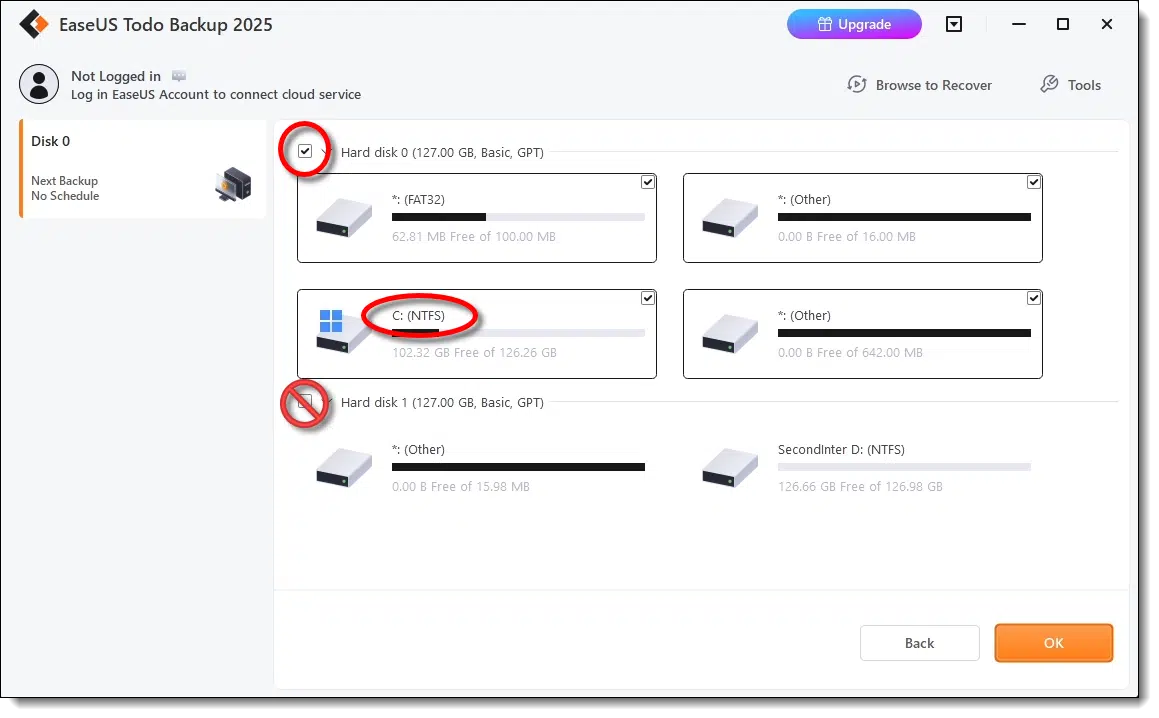
Click on the checkbox in front of the hard disk that contains your C: partition. This will cause the entire disk, including additional partitions such as EFI and recovery partitions, to be backed up. In my case, that’s “Hard disk 0”.
You may also click on any additional internal drives you have if you want to include them in the backup.
Do not click on the checkmarks in front of the disk (usually the external disk) where you plan to place the backup image.
Click OK.
You’ll be asked where you want the backup image to be saved.
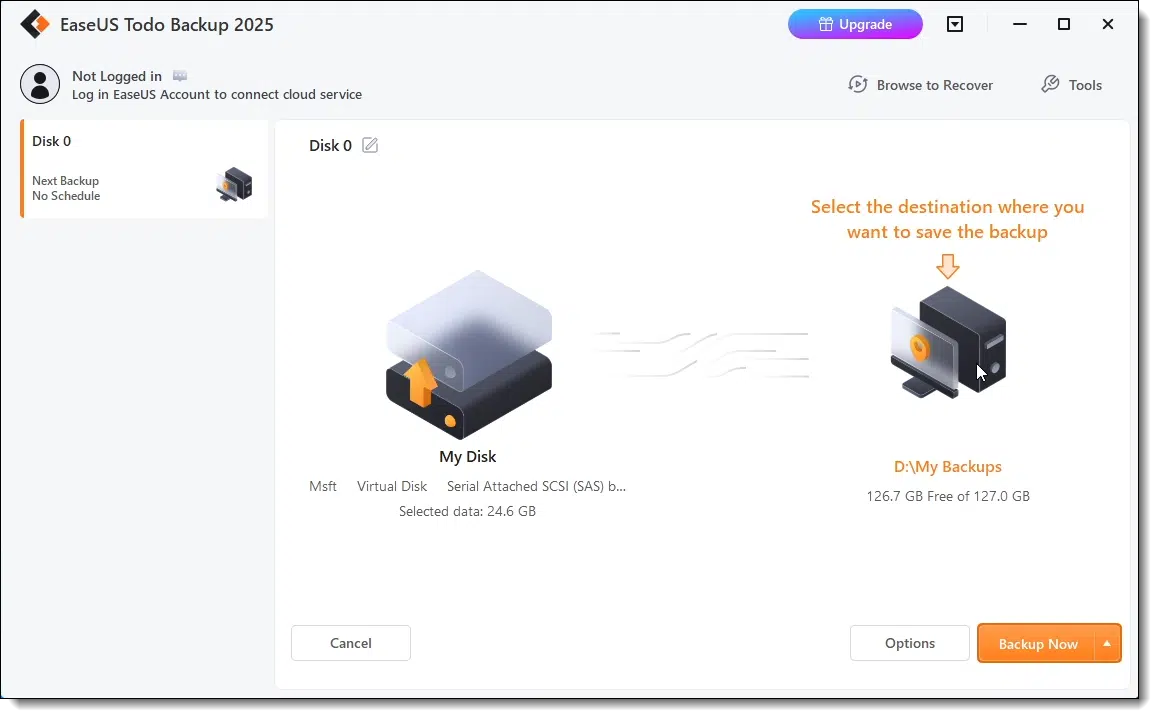
In the example above, EaseUS Todo has “guessed” that “D:\My Backups” is where I want my backup images to be placed. If that’s not where you want your image, click on the icon above the location and select a different location. Typically that should be the drive letter of your external drive. You cannot save to the drive you’re backing up (C:); it must be a different disk drive entirely.
Click on Backup Now.
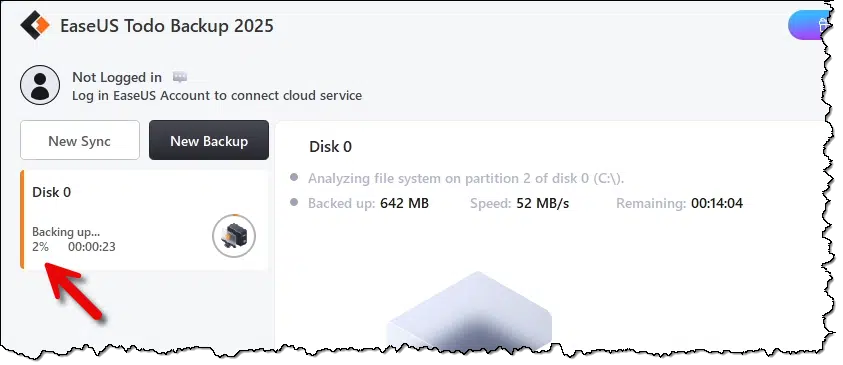
Your image backup
Once your backup is completed, you can examine the result. I visited “D:\My Backups” in Windows File Explorer.
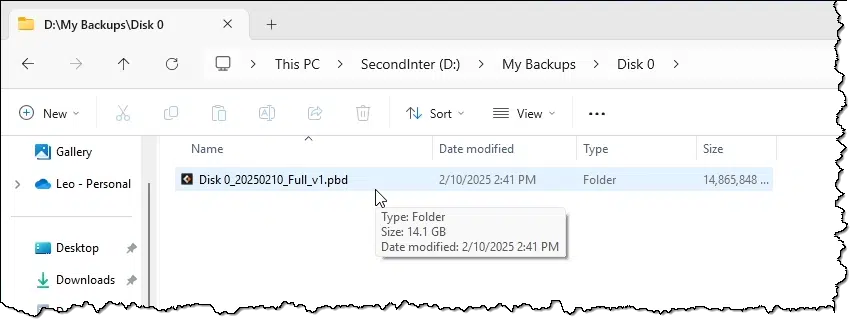
Within that folder, I found “Disk 0”, a folder representing the disk I backed up, and within that folder, “Disk_0_20250210_Full_v1.pdb”, the EaseUS Todo file containing the image backup.
Related

How to Back Up Windows
Don’t risk losing everything! I’ll show you how to back up Windows step by step, using free tools you already have. Protect your files, photos, and memories so you’re ready when, not if, disaster strikes.#30103
Now what?
“Great, so what do I do with this backup image? And how do I use it when I need it?”
Those questions don’t need to be answered right now. Why? Because you have your safety net. Come the time you need something from the backup, you can look for and get the answers then, but you don’t have to worry about this now.
As long as you have the backup image, you’re protected.
However, when the time comes, AskLeo! has your back. Each of those articles also includes a video explaining the process as well.
- Creating an EaseUS Todo Emergency Disk explains how to create a recovery disk.
- Restoring an Image Using EaseUS Todo shows how to restore a backup image created by EaseUS Todo.
- Restoring a File from an EaseUS Todo Image Backup. EaseUS Todo makes restoring individual files and folders from an image backup easy.
Do this
Now you know how to create a backup image using EaseUS Todo. Go do it! In fact, do it before you need it so you’re familiar with the process. Then, next time you’re about to make a major change to your system, take a backup image right then and there.
Just in case.
Subscribe to Confident Computing! Less frustration and more confidence, solutions, answers, and tips in your inbox every week.


On all my computers except for one laptop, the system drive is drive 0. In my Lenovo laptop, there are 2 SSDs and the system drive is drive 1. The data drive d: is drive 0. Check to see which drive is the system drive. You can do this by checking the drive letter which corresponds to the c: drive which is the system drive.
I purchased the lifetime subscription several years ago after reading Leo’s article. I have plenty of space on all of my drives and make a weekly image of my C drive, and daily incrementals of my D; all scheduled to run automatically. I need to learn how to upload to AWS for disaster recovery. EaseUS says it will encrypt and upload to cloud storage. Maybe there’s a YouTube video.
I’ll admit that there are many philosophies about backup strategies and I hope your approach works in case of a disaster. I just wanted to point out your approach is three levels removed from your raw personal data (if you’re making an image backup to also save your personal files). When a real disaster happens, things tend not to work out as expected.
A system image backup is the best way to protect your personal files.
I will be replacing my non-upgradable Windows 10 desktop computer soon. Am I correct in understanding that my image backup can then be used to transfer everything to my new PC?
No. An image backup can be used to restore backed up data or restore an entire system to a new drive on the same computer or a computer with very similar hardware. If, by chance, the restore works, you would have Windows 10 on your new machine which defeats the purpose of getting a new machine.
Either stick using your older machine with Windows 10 or install all of your programs on your new machine from their original installation files and copy the data from your backup.
How Do I Transfer My Programs and Data to a New Machine?
What Happens at Windows 10 End of Support?
Yes and no.
You cannot rely on just restoring the image to a new / different machine. That’s not what images are for. More here: Is an Image Backup Useful if I Need to Restore to a Different Machine?
You can, of course, use it to restore specific files as needed.
You can now upgrade Windows 10 to Windows 11 using methods detailed by Microsoft. A bit obscure to find and a bit of a fiddle, but it took me about an hour to do on a 5 year old Dell.
I can’t find the answer to this question: is the backup somehow compressed, or does it take the same space as the original? I’d like to know what size external drive I need to do this.
It’s compressed (there are advanced options to adjust the compression level / time tradeoff). Unfortunately there’s no great way to estimate the size, since how compressed things will be depends not only on the compression level you choose, but how compress-able the original data is.
I always choose maximum compression. The time a backup takes is not important to me as most of the time it happens when I’m away from my computer and even if I’m using it, it happens in the background and I don’t even notice it’s backing up.
I would go for a drive at least twice the size of you system drive.
Based on your YouTube videos, I installed EaseUs ToDo backup, and have set it to run a backup each day at 03.00, which means that it backs up when I switch on each morning. Up until last week, I just did a files and folders backup. Then, guess what, 2 days after installing EaseUs, my system got corrupted, I don’t know why or how. I had already created a rescue flash drive, and, within minutes, my system was back and running as it was the previous day. I am now going round all my friends and family and installing EaseUs! Thank you Leo so much for the advice.
In attempting to do an image backup on EaseUs ToDo free I get the following message:
Question
? Checking the partion found errors on 1 partitions without drive letter (Unkmown Partition). Click “OK” to create sector by sector bacup or “Cancel the backup”
I do not want to do this, how can I correct it?
In most cases, the partition a backup program wants to back up sector by sector are small system partitions. You can tell your backup program to skip that partition, but if you don’t copy that partition, the backup image might not work when it is restored.
Why Might a Backup Program Talk About Sector by Sector Backups?
In the instruction above you manage to copy EFI partition as well other partition in C: drive. I am using same tool but I get error saying EFI partition doesn’t have a drive letter. Do i have to assign driver letter to this partition?
Not sure why it’s complaining about that. No drive letter needed.
I got the same message attempting an image backup: ? Checking the partion found errors on 1 partitions without drive letter (Unkmown Partition). Click “OK” to create sector by sector bacup or “Cancel the backup”
What is the solution: Click OK or Cancel the Backup, and fix something?
Do what the warning messages says, “Click ‘OK’ to create a sector-by-sector backup.”
Why Might a Backup Program Talk About Sector by Sector Backups?
Leo – years ago you mentioned Macrium Reflect.
I currently have StorageCraft ShadowProtectSPX – although if I’m honest I dropped out of the habit of using it. I can’t even remember if I paid for it or if it was free.
Is there a reason you are suggesting EaseUS, other than simply an example that might encourage users to create image backups? For example, does it have any particular advantages over other programs?
I recommend EaseUS Todo (and Macrium Reflect) because I’ve tested and use them myself. There are other, similar programs, that could be equally good, but I don’t have the same level of confidence.
BE FORWARNED: The latest version of EaseUS Todo Free (V17.2.0, Apr. 2025) does not support the Compression feature (see: Options||Compression)…
I upgraded to V17.2.0_free and could no longer complete an Image Backup to the same destination volume I had always previously used—insufficient space…
I reached out (email) to EaseUS Support (they were very prompt and helpful) and ultimately got the following missive (straight from Support):
Dear M. O’Brien,
Thank you for your prompt response.
The Compression feature can be tested in our trial version, however, please note that the trial version is only valid for 30 days. Unfortunately, Compression is a paid feature and is not available in the free version. For your convenience, you can reinstall the free version 17.1.0 by clicking on the following link:
https://www.easeus-down.com/20250107/TodoBackup17.1.0_free.exe
Wishing you a great weekend.
———————-
Sincerely
I reinstalled V17.1.0_free from the given link and all was well again…
Why not do through Microsoft Control Panel, Security?
Windows built-in backup is a poor backup solution.
Don’t Use Windows Built-in Image Backup
What about Windows 10 backup?
Why Do You Prefer Macrium Reflect Over Windows’s Own Image Backup Program? – Because Microsoft told me to.
In Windows Explorer I have a folder 001 Elliot Pictures. This folder contains subfolders: Elliot 2013, Elliot 2014. Elliot 2015, Elliot 2016, Elliot 2017, Elliot 2018, Elliot 2019, Elliot 2020, Elliot 2021, Elliot 2022, Elliot Year 10, Elliot Year 11. Elliot Year 12
Each of these subfolders have subfolders of activities by date (i.e., 2024-12-11 Family Bday Party, 2024-10-10 School Photos, 2024-03-09 Florida Vacation, etc.)
I used Easeustodo to create an Image backup. When I look at the 001 Elliot Pictures folder I see the following subfolders: EL0EA3~1, El266B~1, EL37A8~1, EL9292~1, ELBCA6~1, ELD248~1, ELEC9D~1, ELF7CD~1, and Elliot 2018
Why is this happening and how can I fix it so the image backup matches what I see in File Explorer?
Thanks!
EaseUS Todo converts the longer file names to 8.3 format. When restoring files from a backup created by EaseUS Todo Backup, the original longer file names are typically restored — not the shortened 8.3 format names — as long as the backup contains the full directory information (including file names and metadata) and the restore process is done correctly
Before upgrading Win7 to win10 I followed this video and all went according to plan. My plan is to now attempt an upgrade to win 11 and once again backed up the drive. This time, however, Easeus is defaulting to a”Partitions Backup” in the left hand panel and the backup file is placed in “My Backups/Partitions backup” folder as “Partitions backup_20251013_Full_v1.pbd”
I’m confused. I want to backup all of my system drive C: (OS + programs + any other data on this drive) with EaseUS. I want to be able to recreate this system disk in case of a sudden death of that disk. I read that an Image is not the same as a Backup. Then I’m said to select Backup in order to create an Image. According to askleo I should choose “Backup Disk”, according to EaseUS I should choose “Backup OS”. From repeat reading I understand both approaches will eventually deliver the same. Why then would there be two different options to get the same result. Am I missing something?
OS or Disk?
I recommend disk because by definition it’s an image backup of everything on the disk.
“Backup OS” is unclear. They may not include all the hidden partitions or other things on the disk.
I have most of my files stored on a home NAS (with my laptop being backed up to it), accessed via wifi. It was set up as 2 2TB drives, mirrored, as a solution to seperate backup drives, which, if I understand correctly, you advise is not a safe backup. Will (or can) the image backup using EaseUS include my Network Drive? Or would you suggest a different solution?
Hi Leo,
I follow your suggestions and have been happy with the results but when I went to install thee EaseUS free downloads from their website on 01/03/2026 that you recommended, my ESET anti-virus blocked the download indicating it was a virus on it. Could the website now be infected?
Please check it out!
Thanks!
It’s not uncommon for antimalware software to get a false positive. Backup programs access the deepest areas of the system and that can trigger a false positive.
Antimalware programs use heuristic or behavioral analysis. If a program performs actions similar to ransomware (e.g., mass file access or encryption-like patterns), it can trigger alerts even if the program is legitimate.
Backup tools frequently create compressed or encrypted files, which can look suspicious to scanners that can’t easily inspect the contents.
I’ve been using the paid version of EaseUS backup for a few years, and do a weekly system image backup with no issues. A couple of weeks ago the image stalled. After a few failed retries I decided to run chkdsk and sfc scannow on my local and external drives and found no issues. I did a clean install and ran EaseUS and it is currently stalled after 30+ hours. At what point do I try to abort the backup, and what should my next steps be?
If there’s no obvious error being displayed or reported, I’d reach out to EaseUS support.
Yes. I’ve had a few issues with EaseUS Todo, and their phone support was excellent. I once even got an answer when I was using the free version.