How you avoid the nuclear option.
The big gun to repairing a Windows 10 installation is to reformat and reinstall. The problem, of course, is that doing so erases everything on your hard drive, forcing you to reinstall your applications and restore your data from backups.
If your copy of Windows is acting up in some fashion, there are a number of things worth trying before resorting to that extreme measure.

Back up first, then try:
- Disk cleanup
- Windows Update (fixing it if needed)
- System File Checker
- DISM
- A “refresh” install.
When all else fails, a complete wipe and reinstall might be your only option.
0. Back Up
It’s Step Zero of any process, particularly when we’re about to run some tools with the potential to make major changes to your system.
Take a complete image backup of your system before beginning. There are two reasons:
- You can recover your data from this, should you elect to proceed beyond Step Five and reformat and reinstall anyway.
- No matter what breaks in any of the following steps, you can always restore to this backup image and be no worse off than you were to begin with.
Backups are your safety net. Take one before proceeding.
1. Run disk cleanup
It may seem a little odd to start with disk cleanup, since on the surface it doesn’t attempt to repair anything — it just gets rid of unnecessary junk and files no longer needed.
Depending on what you’re experiencing, it’s not uncommon for all that junk to contribute to the problem. Browser caches, temporary folders full of old files, and more can all impact your system.
There’s an additional motive for doing this, however: disk space. Some of the steps we’ll perform next may require, or at least work more efficiently, with the extra disk space a good cleaning can provide.
Using Windows Disk Cleanup will show you how.
2. Run or fix Windows Update
Many problems can be resolved by making sure that Windows is, itself, completely up to date.
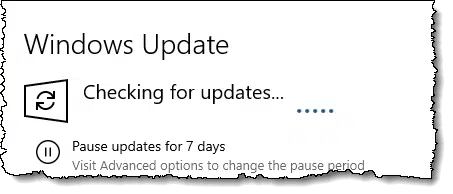
Visit the Settings app, click on Updates & Security, and click on Check for Updates to let Windows Update do its thing.
Of course, sometimes rather than being the solution, Windows Update is the problem, if it’s not working for some reason. The next step in that case is to attempt to fix it. How Do I Fix Windows Update? has the instructions.
3. Run the System File Checker
Run an administrative Command Prompt or PowerShell (right-click on the Start menu and click on the version that includes “(Admin)”). Then enter the following:
SFC /scannow
followed by the Enter key.
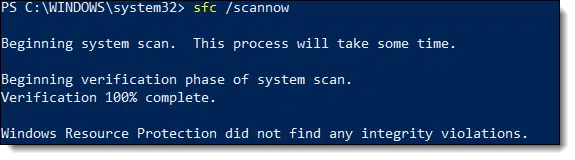
The System File Checker checks for damaged or missing system files and repairs the problems it finds if it can.
There’s more on SFC in What Is the System File Checker, and How Do I Run It?
4. Run DISM
The Deployment Image Servicing and Management (DISM) command is one I’ve not spent much time with, but particularly if SFC doesn’t resolve your issue, it’s the next tool in our arsenal.
Once again, in that administrative Command Prompt or PowerShell, enter:
DISM /Online /Cleanup-Image /RestoreHealth
followed by the Enter key.
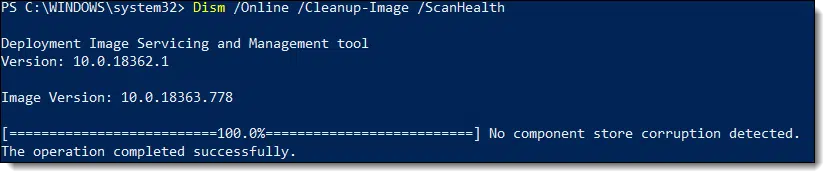
DISM checks a number of things above and beyond the file integrity SFC checked for us.
You can read more about DISM, if you like, at Microsoft’s documentation page: DISM – Deployment Image Servicing and Management.
Help keep it going by becoming a Patron.
5. Perform a refresh install
A refresh install reinstalls Windows “on top of” your existing Windows installation.
The approach is to pretend you’re upgrading your machine from a prior version of Windows. The upgrade tool doesn’t notice (or perhaps care) that it’s “updating” to the same version of Windows that’s currently installed. It goes through all the motions anyway, refreshing the entire Windows installation.
The downside to a refresh, besides the fact that it takes significant time, is that configuration settings are often lost. I can’t even tell you which, since exactly what is affected and how seems to change from version to version.
I demonstrate performing a refresh install in Refreshing Windows 10 Without a Re-install or Reset.
6. Give up
All of the steps above are intended to preserve what you currently have on your machine. Your installed programs, your data, and (most) of your configuration settings should survive everything we’ve done so far.
If nothing’s helped to resolve whatever issue you are experiencing, it might be time to bite the bullet and reformat and reinstall. Then you’ll need to reinstall all your applications (or at least the ones you use) and restore your data from the backup you started with, or elsewhere.
It’s harsh and it’s painful, but sometimes it really is the most efficient and effective way to bring Windows 10 to a truly clean state. How Do I Reformat and Reinstall Windows? will walk you through it.
Do this
Subscribe to Confident Computing! Less frustration and more confidence, solutions, answers, and tips in your inbox every week.
I'll see you there!


Regarding DISM, Tenforums has a tutorial available that explains different ways of repairing a Windows installation using DISM. I’ve found it to be a helpful resource when I’ve felt like deep diving into Windows.
I’ve found over the years that Ask Leo! and Tenforums to be be reliable sources for questions about Windows.
The step zero to do a backup is good advice, I suppose, but it’s pretty much locking the barn after the horse is gone. You may be just backing up the problem you’re having. Periodic backups, OTOH, give you the ability to restore a system to a time BEFORE problems surfaced. Rotating, incremental backups to an external HD are the way to go.
In a way, it’s locking the barn after the horse is gone. If you had been performing system image backups regularly, none of the steps in this article would have been necessary. That would have been step -1: Roll back to a backup taken before the problem occurred. Leo has written literally dozens of articles on backing up.
That Step 0 backup will still contain the original problem but it will also hold all of your data which you definitely want to keep. Leo recommends a system image backup over just backing up your data because there is often data hiding in places you might not think about.
Hi Leo
The DISM reference link in the article produces:
Fatal error: Uncaught PDOException: SQLSTATE[22001]: String data, right truncated: 1406 Data too long for column ‘referrer’ at row 1 in /home/go2/public_html/includes/vendor/aura/sql/src/ExtendedPdo.php:748 Stack trace: #0 /home/go2/public_html/includes/vendor/aura/sql/src/ExtendedPdo.php(748): PDOStatement->execute() #1 /home/go2/public_html/includes/vendor/aura/sql/src/ExtendedPdo.php(306): Aura\Sql\ExtendedPdo->perform(‘INSERT INTO `yo…’, Array) #2 /home/go2/public_html/includes/functions.php(897): Aura\Sql\ExtendedPdo->fetchAffected(‘INSERT INTO `yo…’, Array) #3 /home/go2/public_html/includes/functions.php(740): yourls_log_redirect(‘dism’) #4 /home/go2/public_html/yourls-go.php(21): yourls_redirect_shorturl(‘https://docs.mi…’, ‘dism’) #5 /home/go2/public_html/yourls-loader.php(37): require_once(‘/home/go2/publi…’) #6 {main} thrown in /home/go2/public_html/includes/vendor/aura/sql/src/ExtendedPdo.php on line 748
I checked the link and it works. I’ll suggest you start with this article that has steps to troubleshoot common browser-related issues.
https://askleo.com/dealing-with-browser-problems/
Clearing the browser cache would be the first thing to try as a corrupt cache is the cause of most browser problems.
This looks like your browser is attempting to pass an enormous “referrer” string for some reason. I’d clear cache to begin with. As Mark pointed out the link works for us.
Leo, back in the day of windows 95, 98, win 2k, XP, when re-installing windows on top on an existing install was called a “Dirty Install”. Yes many times it will resolve any current issues, whoever there may be times In which it doesn’t work. I always tried to restore back to a previous automatic check point, but you run the risk of that failing as well.
Thank you for the great work you’ve been doing in educating people.
As the article mentions, sometimes a clean install is necessary in Windows 10 but things have improved a lot since then and a clean install is rarely needed. The never Windows 10 people have forgotten how problematic XP was in the beginning. I remember sticking with Windows 2000 for a couple of years before upgrading to XP.
0. Back-Up true advice. Video and five steps helped me to repair my windows 10.