And possibly even an unsupported CPU.

Can you install Windows 11 on computers that don’t meet Microsoft’s published minimum requirements?
Yes. No. Sometimes.
The most commonly cited problems are the specific CPUs required (relatively new) and TPM 2.0. TPM stands for Trusted Platform Module and is a cryptoprocessor that provides a range of security features used by Windows 11 when present.
There have been a variety of workarounds to getting Windows 11 installed on machines not meeting those criteria, but they all seem to be eventually shut down by Microsoft… except for one. That one workaround, while not the simplest of approaches, could be around for a while (even Microsoft says so).

Windows 11 without a TPM
Microsoft’s documentation notes a workaround for installing Windows 11 on unsupported hardware. Using DISM, you can apply a Windows 11 image directly to a disk, bypassing TPM 2.0 and CPU checks. While complex, this method provides a viable solution. Beware that unsupported hardware may face future issues.
Installing on unsupported hardware
On a page titled Ways to install Windows 11, near the bottom, after all the “traditional” approaches, Microsoft includes this statement:

The key phrase in the important warning is:
An image install of Windows 11 will not check for the following requirements: TPM 2.0 (at least TPM 1.2 is required) and CPU family and model.
They call it a warning. I call it an opportunity.
Setting up an initial Windows 11 installation using an image install is complicated and somewhat arcane. But it’s certainly possible.
Let’s do it.
Help keep it going by becoming a Patron.
Getting started
First, you’ll need a Windows 11 installation ISO. You can download that from Microsoft.
You need to burn or copy it to something you can boot from. Typically that means burning it to a DVD or using a tool like Rufus to create a bootable USB drive.
Boot the target machine from this Windows 11 installation media.
The installer will start and present its initial screen.
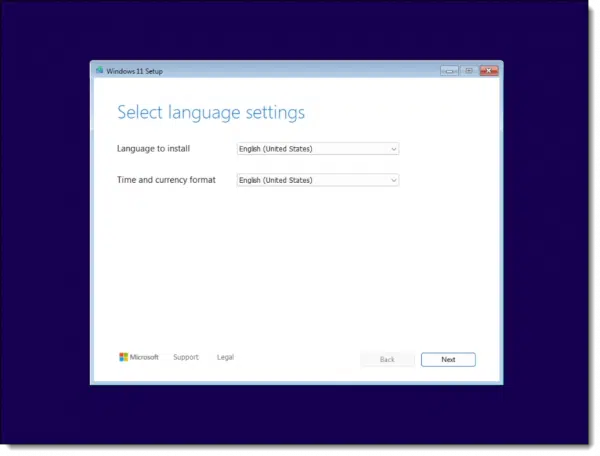
Don’t click anything.
Instead, type SHIFT+F10. This will bring up a command prompt window.
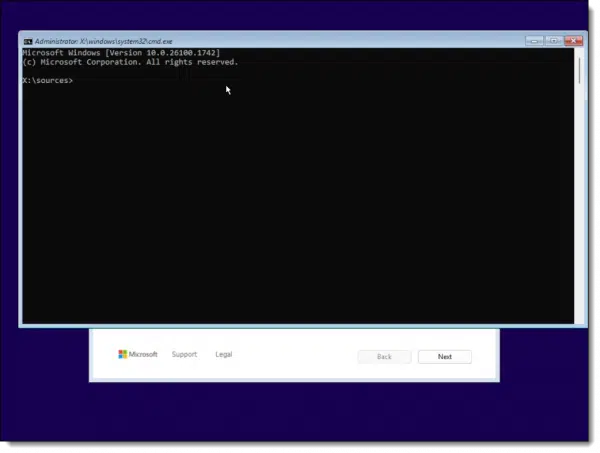
It’s here that all the magic will happen.
Formatting the hard disk using diskpart
Type the command diskpart (this and all commands below are followed by the Enter key).
Then type the command list disk.
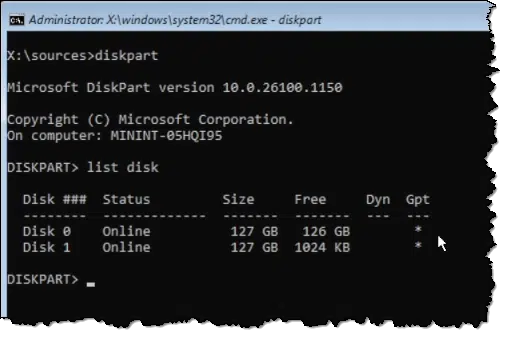
The hard disks in your machine will be listed by number. The example above has two disks.
Now type the following commands, each followed by Enter.
- select disk 0
- clean
- convert gpt
- create partition efi size=500
- format fs=fat32
- create partition primary
- format fs=ntfs quick
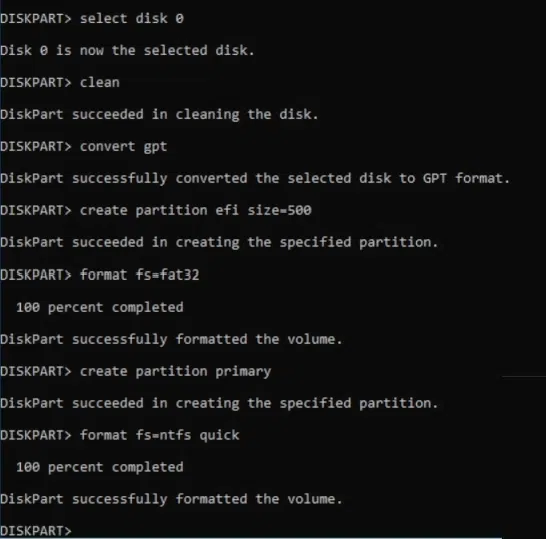
This sequence of commands:
- Removes all existing partitions.
- Ensures that the disk is of type GPT (as opposed to MBR).
- Creates an EFI partition (used in the UEFI boot process) and formats it as FAT32.
- Creates a primary partition, formatted as NTFS, on the rest of the disk.
Next, we need to assign our new partition a drive letter.
Still in diskpart, enter the command list volume.
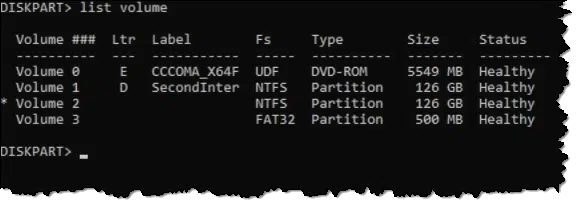
First, take note of which drive letter your installation media has been assigned. You’ll do this by looking for the label and/or type. While yours may be different, in the example above my installation media, a DVD, is drive E:.
Also note that there’s a volume with no label formatted as NTFS and 126GB in size. Yours will be close to the size of your hard disk. That’s the volume we want to install on. It’s also the volume we want to call “C:”. Note the volume number assigned to it. In my example above, it’s volume 2.
Now enter the following sequence of commands.
- select volume 2 (where 2 is the volume # you identified above)
- assign letter=c
- list volume
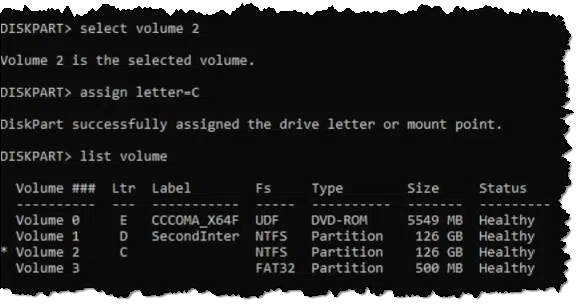
The resulting list now shows the drive with the assigned letter C.
You can now type exit to exit diskpart.
Now, with all the partitions ready, we can install Windows.
Installing Windows using DISM
Still in the command prompt, run the following command.
dism /Apply-Image /ImageFile:”E:\Sources\install.wim” /Index:1 /ApplyDir:C:\ /CheckIntegrity
Take note that the “ImageFile” parameter uses the drive we identified as being the installation media above. If your installation media appears on a different drive letter, use that instead.

As you might infer from some of the command line options, DISM applies the Windows image stored in “install.wim” onto your C: drive. This is a large file and will take some time.
Finally, run these two commands.
- mountvol z: /S
- BCDBOOT C:\windows /s Z: /F UEFI
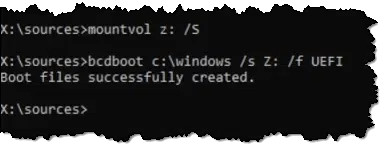
This configures the boot information on the disk.
And now we use it by rebooting. I believe CTRL+ALT+DEL may work, but it’s also completely safe to just turn the machine off at this point. We don’t want the Windows Setup program (which has been hiding behind the command prompt the entire time) to do anything, so a forced shutdown accomplishes that.
Reboot into Windows 11
Booting into Windows 11 may take a long time depending on how many updates are available and what other configuration work is necessary. My feeling is that using this approach results in a longer initial boot than had we used Windows Setup normally.
When presented, complete the post-boot Windows 11 setup.
The result? Windows 11.
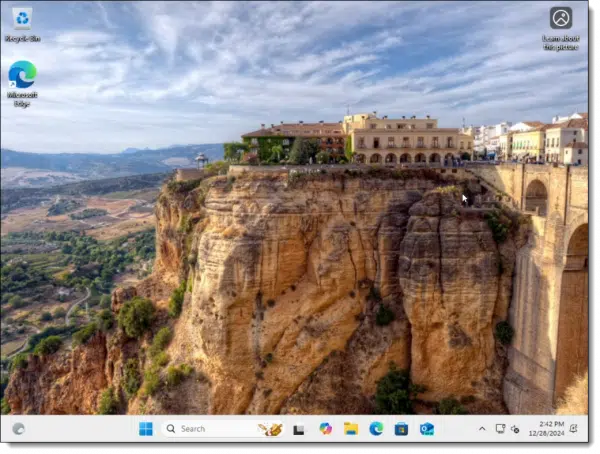
It’s running without a TPM. We can confirm that by typing +R and running tpm.msc, the Trusted Platform Module manager.
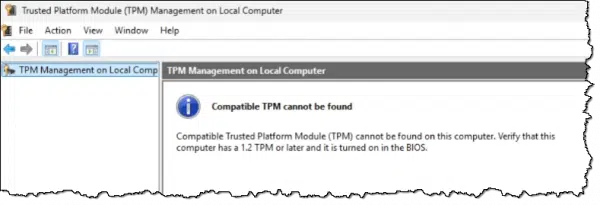
The “required” TPM is nowhere to be found.
Do this
My honest recommendation is that you avoid this process if possible. Microsoft’s warning of “issues” running Windows 11 on unsupported hardware may amount to nothing — or it may cause issues in the future. If you can, run Windows 11 on supported hardware or continue to run Windows 10.1
But if neither of those are options, you have another approach.
Another recommendation? Subscribe to Confident Computing! Less frustration and more confidence, plus solutions, answers, and tips in your inbox every week.


I installed Win 11 on a non-compatible machine. It worked fine but it ran too slow to be practical, so I restored Win 10 from the backup I took just before upgrading.
BACK UP BEFORE UPGRADING
How to Back Up Before a Windows Update
Sir, nice article. Will it work for pc’s having bios. My system has only bios. There was a mention of tpm 1.2 version on mobo manual intel q33, but i could not find any such item in bios and command check. Your article is sparkingly clear ,leo, sir,
Any machine still using a BIOS will almost surely be too old to run Win 11. If you do get it to run, it will probably be too slow.
I don’t know. Perhaps give it a try and let us know?
It can’t be slower than my little Asus netbook… 1.1GHz Celeron, 4GB RAM, and it *shipped with* Win11Home. It’s not slick, but it runs well enough. Tho I use it mostly as a portable word processor (it’s small, and has stellar battery life).
As minimal as that netbook is, I’m having a hard time imagining anything in the x64 era where Win11 can’t at least scrape by. Key is that when Win11 finds itself in reduced circumstances, it unloads a lot of the background junk. Even so, Win11 gobbles up 80% of its CPU and RAM, so there’s not much headroom.
Probably why the one place it really falls down… I needed an old-windows VM. VirtualBox runs fine, but a very minimal XP32 VM never finishes loading. However, Win2K VM works fine.
If you have a lot of patience, that’s fine. But waiting 30-60 seconds for a program to open is a dealbreaker for me.
Will this installation type receive automatic updates and features or security updates?
The threat is that it will not. I’ve not seen confirmation on that, and I suspect it’ll also depend on the specifics of just how the machine doesn’t meet the requirements.
I have an 8-year old HP desktop running Windows 10 and it will not update to Windows 11 due to CPU incompatibility. Everything else gets a green check mark of approval, including TPM.
Is it safe to assume that the procedure outlined in this video will be able to take care of the CPU issue as well? Thank you
It’s not possible to say without trying it. Perform a system image backup before upgrading so you can go back if necessary.
I installed Windows 11 on a machine with an incompatible processor that was only 5 years old. It ran and everything worked but it was too slow to keep using so I restored Windows 10 from the latest backup. I expect that to be the case for other too.
All I can say is, it MAY.
With the latest version of windows 24 h2 when booting with
USB I get a black screen with a cursor, I am trying to install
Windows 11 on unsupported hard hardware Compaq hp. Laptop
The laptop supports windows 10
Everything ran fine until I got to
mountvol z: /S
which resulted in
The parameter is incorrect
As there was no explanation for this command (although conceptually I know what it does) I am currently in limbo. The help text says
/S Mount the EFI System Partition on the given drive.
so I am at a loss as to the source of the problem.
Before running mountvol my system looked like
Volume 0 F RAW DVD-ROM 2048 B Healthy
* Volume 1 C NTFS Partition 223 GB Healthy
Volume 2 FAT32 Partition 500 MB Healthy Hidden
Volume 3 D W11-Install NTFS Removable 29 GB Healthy
PS: I got the help text from my production laptop. When I type “mountvol /?” in the command window of the computer I am trying to install on there is no “/S” option.
And one final PS – I can no longer boot from USB
None of the text cited is present in the MS support page this page links to.
“create an image install” is nowhere on that MS page, not is “will not check”.
So this method definitely seems to be non-supported by MS and will probably cause problems down the road, if you still use it. Microsoft tries to force millions of users to throw away perfectly fine hardware and waste resources and money for new hardware.
I have an older Dell Inspiron 5555 laptop that supports UEFI, and has a TPM module that can be configured as v 1.2 or 2.0 (I have it configured as TPM v2.0), but the CPU is an AMD A8 processor and is not on the supported CPU list, so I followed directions I found online, at https://www.zdnet.com/article/how-to-upgrade-your-incompatible-windows-10-pc-to-windows-11-for-free/
This process worked well for me, and maybe it will for you too,
Ernie
We also have a couple of articles on that:
Install Windows 11 Without a TPM 2.0 or on Older CPUs
Yet Another Way to Install Windows 11 Without a TPM and possibly even an unsupported CPU.