In previous articles, we’ve created a system image backup using Windows 10’s built-in tools, and we’ve created a Windows 10 recovery drive we can boot from in order to restore that image.
Now it’s time for the rubber to meet the road.
It’s time to restore an image backup.
What restoring an image means
Before we begin, it’s important to understand exactly what it means to restore an image backup.
Recall that an image backup is a copy of everything on your hard disk1 — the operating system, your installed programs, your data — everything.
The best way to think of an image restore is this:
- Erase everything currently on the hard drive.
- Copy the contents of the image to the hard drive.
Although it’s a side effect of the process, I can’t stress enough the importance of realizing that step one exists. The moment you begin a restore, assume that everything currently on your hard disk is erased. When the restore has completed, everything will be replaced with the contents of the image backup.
That’s the whole point of restoring an image backup: replace what’s on the hard disk now with what was there when the backup was created.
Step 1: Back up
Ironic as it seems, the first step to consider when restoring is backing up.
Because a restore will remove everything on the hard drive, anything that has been modified or created since the last backup will be lost forever. You may want to save that work first.
There are two approaches:
- Save the specific files and folders that have changed manually, by copying them to another hard disk, flash drive, external drive, or another machine.
- Create an image backup first. This guarantees you’ve captured everything. We’ll be able to extract individual files from it later, should that become necessary.
Of course, there’s a third option: do nothing. That’s OK, as long as you’re aware that any changes since the last backup will be lost.
Step 2: Boot from the recovery drive
Unfortunately, I cannot tell you the exact steps to take to do this. As detailed in How do I boot from CD/DVD/USB in Windows 8 & 10?, the exact steps vary depending on your specific computer.
In general, it involves first going into your machine’s BIOS or UEFI configuration to change the boot order to look for bootable USB devices before checking the internal hard disk.
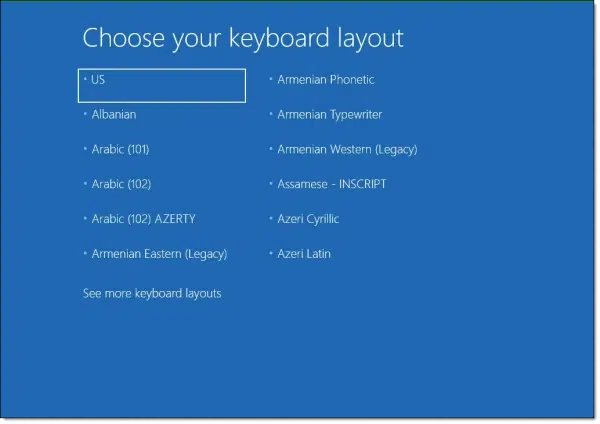
Once that change is made, insert the recovery drive made previously (usually a thumb drive), and reboot. When successful, the first screen you’ll see will ask you for your keyboard layout.
Step 3: Select the image to restore
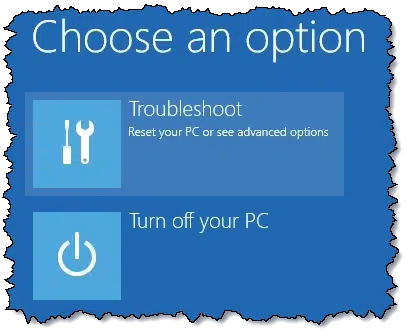
After choosing your keyboard layout, you’ll be given an option to either “Troubleshoot” or “Turn off your PC”.
Click on Troubleshoot.
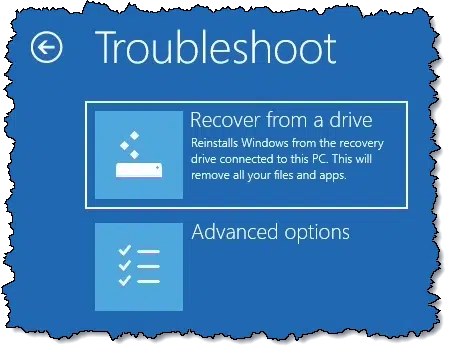
This will give you the option to either “Recover from a drive” or select “Advanced options”.
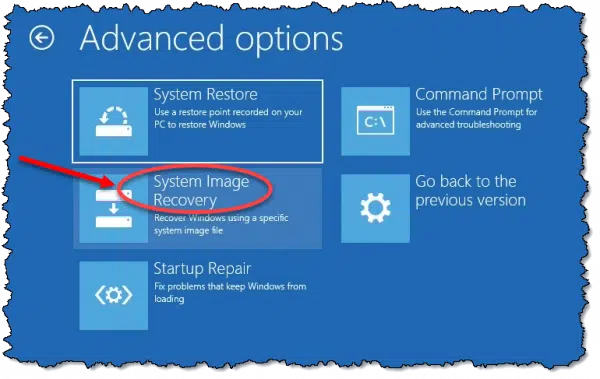
Even though the description for “Recover from a drive” might lead you to believe it’s what we want, in reality, this option reinstalls Windows from scratch, without restoring your backup. Instead, click on Advanced Options.
Click on System Image Recovery.
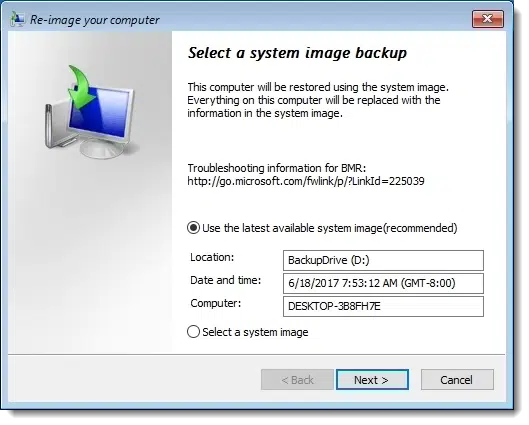
Next, you’re asked to “Select a system image backup”, suggesting that you “Use the latest available system image”.
While that might occasionally be the correct choice, it isn’t always. For example, if you took an image backup immediately prior to this, but need to restore to an earlier backup taken before that, you’ll want to make sure to select “Select a system image”.
Click Next.
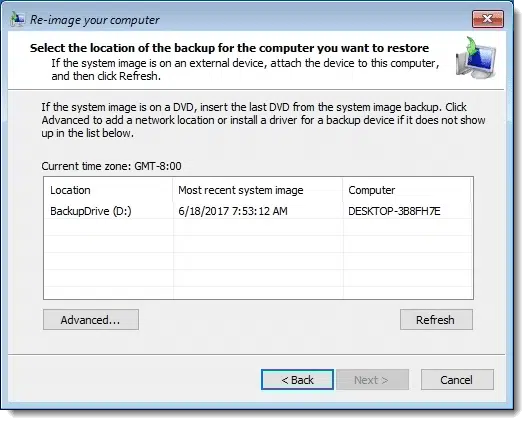
You’ll then be asked to select the location of the backup you want to restore. The first step is to select the drive that contains the image backup you want to restore. In the example below, there’s only one drive listed, but if you have multiple drives that could potentially contain backup images, click on the drive containing the image you want to restore, and click Next.
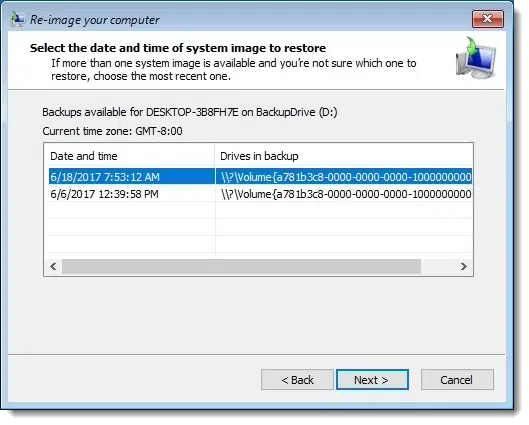
You’ll be presented with a list of the backup images contained on the drive you selected, listed by the date and time the image was created. Click on the image you want to restore, and click on Next.
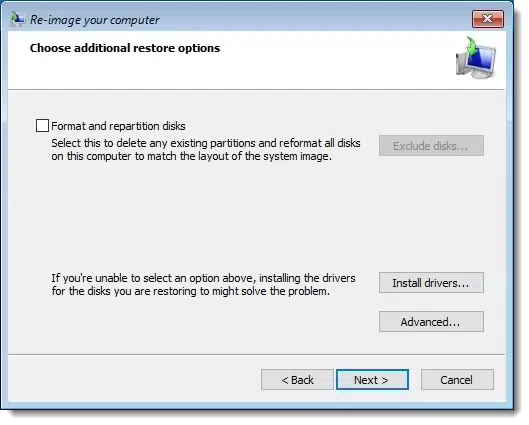
Next, you’ll be given the option to “Format and repartition disks”. Generally, if you’re restoring a backup image to the same hard drive from which it was created, there’s no need to do this, and you can leave it unchecked. If, however, you have replaced the hard disk, then check this option to initialize the disk properly prior to the restore.
Click Next.
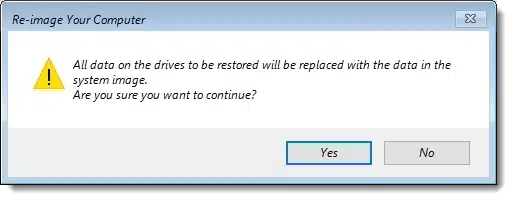
Windows will warn you that everything currently on the hard disk is about to be erased and replaced with the contents of the image. Click Yes, assuming that’s what you want.
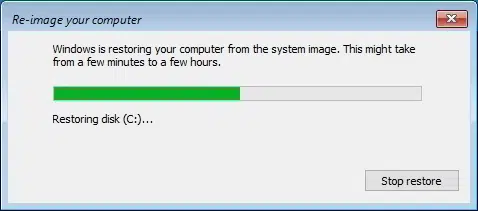
The restore begins.
Exactly how long the restore takes depends on the usual things: the speed of your internal and external hard drives, the speed of the interface between them, and the size of the backup image.
Step 4: reboot
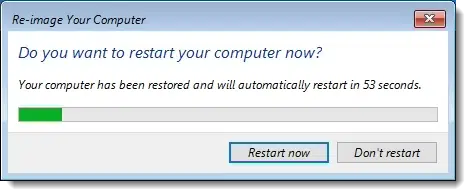
Once the restore is complete, it will automatically reboot your computer if you’re not around.
If your computer automatically reboots back into the Recovery Drive, simply remove the drive and reboot again.
You’ve successfully restored a backup image. The system should now reboot into your copy of Windows, just as it was at the time the backup image was created.
Do this
Subscribe to Confident Computing! Less frustration and more confidence, solutions, answers, and tips in your inbox every week.
I'll see you there!
Podcast audio
More for Patrons of Ask Leo!
Silver-level patrons have access to this related video from The Ask Leo! Video Library.


I always assumed that “creating an image of the primary system drive” would allow you to then install that new drive, replacing the original drive. It would be the same as having the “old” drive there. Is this not true? What I understand here is that you must “re-install” a “system image.” If that is true, then it would appear that a “system image” is not really an “image” of the “system.”
A system image is a compressed version of the system disk which would need to be restored to a hard drive on your computer using the rescue DVD or CD, or rescue flash drive. The recovery process will format the drive if it’s not already formatted
I don’t quite understand your question. Restoring an image to a replacement hard drive should result in the entire system being restored as of the time the backup image was created.
I should have worded my question better. My supposition was that the image was exactly the same as the original. In other words, the image should be a direct replacement for the original. Now I’m hearing that the “image” is a compressed version of the original and must be de-compressed before using it (i.e., “re-installed”). That makes sense now. Thank you.
Hi Leo,
I find that creating a “image backup” and restoring them is a pain, sometimes. I tried in Windows 8.1 and 7, but it takes lot of time. I feel that its better to take a backup of the PC from time to time and format the system when required. Sometimes, the PC becomes slow and we do not know what is the reason. Anyhow I did not test this in Windows 10 and so my remarks cannot be taken for granted.
Anyhow thanks for the tutorial.
Palla.
Would you want to format if you were restoring because you had a virus?
Restoring the system from a system image by definition formats the system drive. There is no restore option to keep anything that is on the c: drive.
A virus is a good reason to restore your image backup. If you don’t have a good image backup, then you may be facing a full reformat situation to get back to a safe operating system.
You would not have to. As long as the virus was not part of the image backup that you’re restoring, an image restore overwrites everything.
I have successfully restored from a Windows Image backup in several different use cases.
Once was when an updated driver resulted in an unbootable system. This was a Windows 7 system about three years ago.
Another time was after the first attempt to upgrade to Windows 10 on a Windows 7 system. Some sort of driver incompatibility with an add-in disk controller resulting in a continuous boot loop. I had purposely created a fresh image backup (to another system on the network) before the upgrade just in case this happened.
I’ve also restored to a new drive to replace a failing drive and / or to move to an SSD.
The biggest issue is that the new drive be at least as big as the old one. If it’s bigger, you can use built-in Windows tools to either expand the main partition (if it’s not blocked by one above it) or just create a new partition in the spare space. I did the latter when restoring from a 1 TB HDD to a 2 TB SSD.
You should delete enough files to get to the amount of data which would fit on the new drive, then partition the drive so that it’s the same or smaller than the new drive. Then back up. You then should be able to restore that to the smaller drive.
Once again, this is a very good article. I have never given it a thought about how to restore a backup from Window’s own integrated system image backup and restore. I didn’t even know that I have to use the recovery drive in the case of a restoring process. Most of the time, I ‘d use MR (Macrium Reflect). I backup once a week with Windows Backup just in case as a last resort.
One thing, though, which probably is a simple oversight on your part, is that you didn’t mention whether or not one should go back again to the BIOS or UEFI after the restore is done and put the internal HD as the first order of business. Or, does the system do it by itself after removing the USB stick on which was the recovery drive used to do the restore?. My guess is the system probably won’t boot normally until you put thing back the way they were before the restore.
Sorry for my ignorance on the matter.
This also varies based on machine. My experience is that on reboot out of the recovery media the installed OS is booted normally.