Learn which you want when.

One of the most confusing aspects of Windows networking is the concept of private and public networks. When you set up a network (typically when installing Windows or the first time you make a connection on a new network adapter), Windows makes an assumption about which you want.
Sometimes that assumption is wrong.
Depending on what you do later, Windows may offer to change it. Or not.
I’ll review what these network types mean and how to switch from one to the other.

Public versus Private network setting
Switching your Windows network between public and private is easy. A public network keeps you safer on coffee shop Wi-Fi, while a private one allows home devices to share files and printers. A quick PowerShell command changes the setting, helping you stay secure and connected depending on where you are.
Changing the network type
The easiest way to switch your network type is to use Windows PowerShell1. You must run it as an administrator. First, enter:
Get-NetConnectionProfile
and press Enter. This will display information about the current configuration of your network.
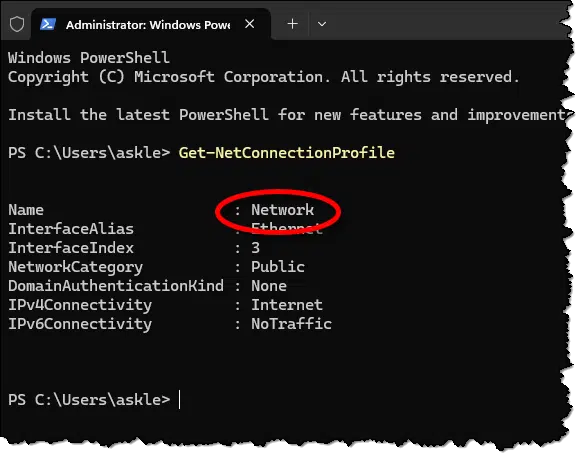
Note and save the name of the network. In the example above, the name is “Network”.
Note that in this example, the “NetworkCategory”, as Windows calls it, is “Public”.
To change it to private, enter:
Set-NetConnectionProfile -Name "Network" -NetworkCategory Private
If yours is different, replace “Network” with the name displayed by the previous Get-NetConnectionProfile command.

You can then re-run the Get-NetConnectionProfile command to confirm that the Network Category has been changed to private.
Of course, if the network is already private and you want it to be public, use “public” instead of “private” in the Set-NetConnectionProfile command.
Help keep it going by becoming a Patron.
Private versus public
Now that we know how to change them, let’s understand what they mean. This is important for making the correct choice.
Think of the terms as defining not whether you want your computer to be private or public, but rather defining what kind of network you’re on.
Related

Increasing the Odds That Windows Network Sharing Will Work
Networking is... tricky. Here's a process that works fairly reliably for me.#167701
Private network
When you’re on a private network, the implication is that you can more readily trust the other machines on the same network.
Your network at home is a good example. All the machines you have connected to the same router are on the same network, and you can usually trust that all are well-behaved. This is a good candidate for a private network.
Public network
When you’re on a public network, the implication is you shouldn’t trust other computers on the same network.
Connecting to a (literally) public network — say WiFi at the airport, a hotel, or a coffee shop — is a good example of a public network. You don’t know who else is connected to the same network you are, so you don’t know whether they’ve been practicing good security hygiene or even if they might have malicious intent.
Public/private differences
When Windows treats a network as public, the firewall blocks connections from external sources. This means that a random person can’t find and connect to your computer and, say, steal files from it.
When Windows treats a network as private, the firewall allows those connections.
The most common time this comes up is when trying to access a network share or network printer on one computer from another. If the network is configured as public, it won’t work.
Which do you want?
The choice is simple.
- Use a private network to connect devices on your home network, particularly if you plan to use Windows file sharing to copy files between them.
- Use a public network to connect to networks you don’t control, such as when you’re travelling.
Note also that if you have multiple network adapters — say an Ethernet and a WiFi connection — they can be of different network types. For example, if you connect your laptop via Ethernet at home and use WiFi only when out and about, you can set the Ethernet network as private and the WiFi as public. This allows you to share files and printers with other devices at home while keeping your computer more protected elsewhere. You don’t have to remember to switch between the two types.
Do this
If you’re not sure, in general you need do nothing. If you’re not having problems and the network is configured as public, leave well enough alone.
On the other hand, if you’re having difficulty with some networking operations like file and printer sharing, you may consider whether the network type — public or private — could be contributing to the issue. If so, now you know how to change it and what the implications might be.
Subscribe to Confident Computing! Less frustration and more confidence, solutions, answers, and tips in your inbox every week.
Podcast audio

Footnotes & References
1: There are ways to do this in the Settings app, but it’s different between Windows 10 and 11, and I have no faith that it won’t keep changing. The PowerShell approach just works.

Thanks Leo.
There are so many things I don’t realize I don’t know, and you have brought forward a solution to another computer thing that kind of baffled me.
I will be checking and changing and getting everything how I want it.
I certainly did not realize that ethernet could be set up differently to wi-fi.
Using the Public Network setting can give a false sense of security. It protects against people accesssing the files on your computer, but it doesn’t protect against packet sniffing. httpS (S capitalized for emphasis) conections protect agains that, and all websites that do security correctly use httpS. For everything else there’s a VPN.
Useful info Leo, after a major reorganisation of my setup prior to October 14, my network crashed, but after viewing your video re. Administrators, and this one, I am now a lot more knowledgeable and my network is up and running again, thanks, Duncan.
Thanks Leo. I am reasonably adept at using a home PC but always learn from your articles. Good job.
Thanks Leo:
I’ve enjoyed your guidance since about 2004 when I first “got into” computers. My son was my guru and we would clash often. I didn’t want to have to learn one more thing. I just wanted to use the “dog gone” thing and do some business. “Well Dad if you want to pay $35 per hour everytime something needs fixed. . . . ” “Dad you need to search the internet when something is not working, The answers will be there.” Me, “I don’t need on the internet. I just want to get a word processing program to type contracts to hopefully start my service busniess back up again!”
Yup the process continued and today I’m still irritated with the motivation of capitalism involving constant change and the need for more knowledge and more tweeks, and more, more more. etc. lol
Is there really no way to change between public and private through the settings, I’m thinking Windows 11?
I did mention that yes there is, but it keeps changing around, so I prefer the command line approach as a clear solution that’ll just work.
I’ve lost many a good night’s sleep over this one issue…thanks for clearing it up!!! You should be a college instructor or something, you know that???
I’m a little confused now, Leo, your advice seems to be the exact opposite of Microsoft’s. When setting up or re-installing Windows I’m sure Ms says ‘for a home network set it to “Public” for greater security’. Which does seem perverse but have I missed something?
I’ve heard that too. It’s because the ‘Public’ setting is the safer default—it blocks things like file sharing and device discovery. Microsoft makes the ‘Private’ setting opt-in so users don’t accidentally expose their system on an untrusted network
Interestingly, today I discovered that Windows 11 25H2 defaults to configuring Wi-Fi networks as Public during installation, because for some reason, after a recent update, I started to get two login options when I start my system, one was Windows 11 on partition [number redacted], and the other was listed simply as Windows 11, but that one didn’t load anything, it simply returned me to the login options dialog again. After more than a day researching this issue, I decided to re-install Windows 11 25H2 from the ISO image I keep on my Ventoy USB stick, after removing all my Windows related partitions (except the EFI one), and deleting the Windows boot manager from my EFI partition from within my Garuda KDE-Lite GNU/Linux system, and now the login options selection dialog is no longer displayed following system start or reboot, and as I read this item I decided to check how mt Wi-Fi Network connection is configured, and Windows set it up as a public Network, so I changed it to make file sharing easier.
Ernie
Rather than “public” and “private” network types perhaps they should have been called “protected” and “unprotected” types respectively.