Normally hidden files with a purpose.

Hiberfil.sys, pagefile.sys, and swapfile.sys are support files for two features in Windows. While you might be able to get rid of them, you might not want to.

Removing hiberfil.sys, swapfile.sys, and pagefile.sys
To remove hiberfile.sys, turn off Hibernation and you can delete the file.
To remove swapfile.sys and/or pagefile.sys, turn off Virtual Memory on your system. The files may be removed automatically on reboot. Do this ONLY if you have enough RAM on your system. Alternatively, consider moving them to a different internal drive.
Viewing the files
To view these files in Windows File Explorer, you’ll need to uncheck the option to “Hide protected operating system files (Recommended)” in File Explorer -> Options -> View.

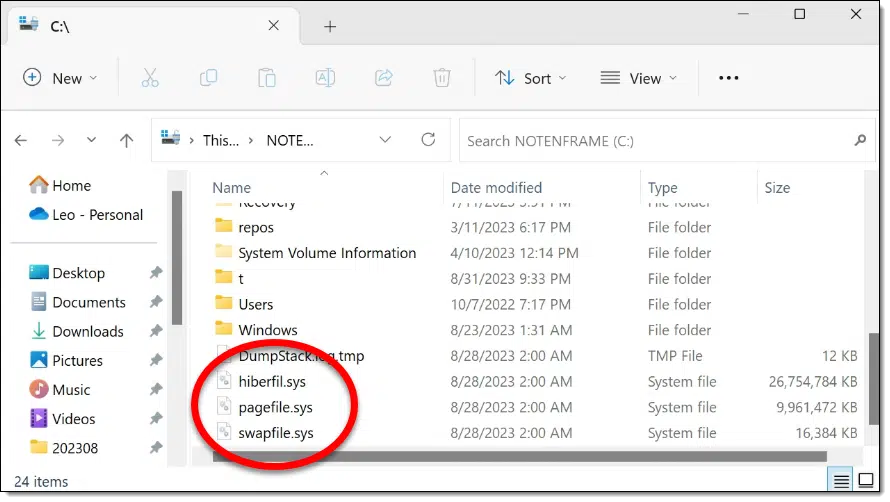
The files, if present, all appear in the root (top level) of your C:\ drive, as shown at the top of this page.
If you’re a Command Prompt user, then “DIR /A:H C:\” will show them as well.
Help keep it going by becoming a Patron.
Hiberfil.sys
Hiberfil.sys may be present if your hardware supports hibernation and the feature is enabled. When your system goes into hibernation, Windows writes a complete copy of RAM to the file. When you turn the computer back on, the boot loader notices the computer is resuming from hibernation, and instead of booting Windows, it simply reloads this single file back into RAM.1
The file is normally inaccessible. You can release Window’s hold on the file by turning off hibernation.
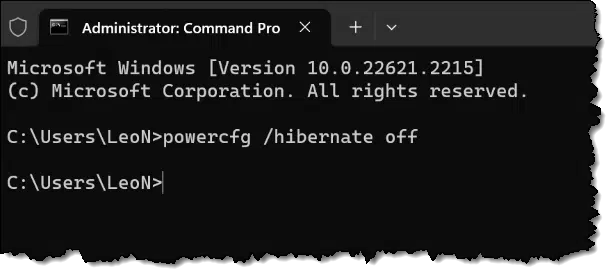
Run a Windows Command Prompt as Administrator (right-click on a shortcut to Windows Command Prompt and click on Run as Administrator). In that command prompt, type:
powercfg /hibernate off

Hiberfil.sys should now either be gone, or you should be able to delete it yourself.
You’ll no longer be able to place your machine into hibernation. You can turn it back on again by replacing the “off” with “on” in the command above.
Pagefile.sys & swapfile.sys
I’ve discussed pagefile.sys before. It and swapfile.sys2 are system-paging files — your virtual memory or “swap file”. It’s where Windows “swaps out” memory contents to make room for other things when the combination of software you’re running requires more RAM than you have.
The files are locked by the system as long as you have virtual memory enabled. That’s also a clue as to one way to get rid of it: turn off virtual memory (only if you are certain you have enough RAM to run all the programs you generally run; see below for more on this topic).
Or, if you prefer, move it to another drive.
In Windows 10 and 11:
- Right-click on the Start button and click on System.
- Locate and click on the Advanced system settings link.
- In the Performance box, click on Settings.
- Click on the Advanced tab.
- In the Virtual Memory box click on Change….
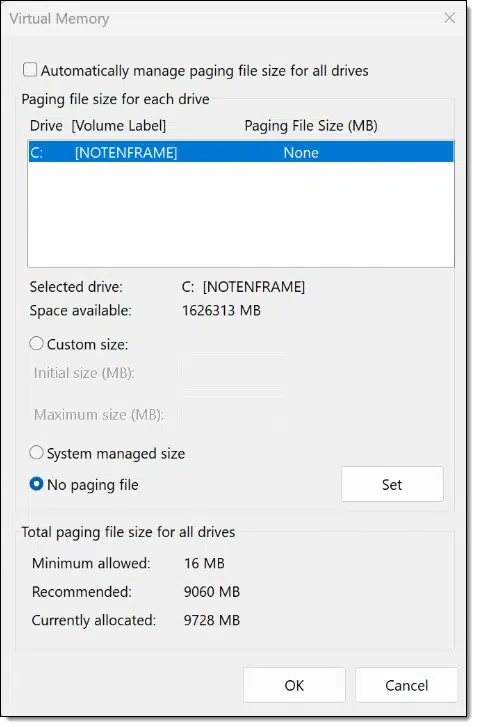
This will bring up the Virtual Memory settings dialog.

In this dialog:
- Uncheck “Automatically manage paging file for all drives”
- Click on the C: drive in the list if it’s not already selected
- Click on No paging file
- Click on Set
You may need to reboot for these changes to take effect. The files should disappear automatically.
Running with no VM
When you run with no virtual memory and your applications require more RAM than you have installed, they will fail. You’ll get “Out of memory” errors, the system may start to misbehave, and in the worst case, applications may crash.
If you have lots of RAM, that may not be a problem, but if you have little RAM and/or run lots of programs at the same time, you probably want a paging file.
One performance improvement is to move the paging file to another physical drive. Since Windows uses the system drive C: heavily, it’s often convenient to move the paging file to another drive. After setting C: to “No paging file”, click on a different drive in the list and click on System manages size followed by Set.
Important: Make sure the drive holding the paging file is fast, and a different physical drive, not just a different partition on the same drive. Moving the paging file to an external USB drive, for example, if even possible, could result in a very slow system. The paging file should only be placed on internal drives.
Do this
If you never use hibernation mode, feel free to disable it and delete hiberfile.sys.
My general recommendation for pagefile.sys and swapfile.sys is to leave them as system-managed. If you have an fast enough second internal drive, then moving the files to that drive may result in minor performance improvements.
Improve your own performance with tech: Subscribe to Confident Computing! Less frustration and more confidence, solutions, answers, and tips in your inbox every week.
Podcast audio
Footnotes & References
1: There’s a lot more going on, but that’s the gist for our purposes.
2: Swapfile.sys was added to a one or two versions of Windows ago. It appears that some applications and the system use swapfile.sys while others use pagefile.sys. Ultimately, they do the same thing; why they’ve been split in two is unclear.


I saw an article about a guy moving his virtual memory / paging files to a USB stick some years ago, for reasons.
The USB stick suffered complete and total failure (across all memory locations, due to the wear levelling algorithms) in approximately 8 hours.
Yup. USB sticks tend to have cheaper flash memory, and of course a few years ago they weren’t as resilient as they are today.
Today it’s quite OK (and common) to have your paging files on an SSD.
If you have an SSD system drive, there’s no need to have hibernate enabled. A system boots from an SSD nearly as fast as it does using hibernation. You can save a lot of disk space by disabling it. That can also prolong the life of your SSD by not writing to the hibernation file.
I’ve wondered why there is a Pagefile and a Swapfile. I still don’t know why, but I’m not the only one.
I also wonder why Windows places 32-bit programs in the Program Files (x86) folder and 64-bit programs in the Program Files folder. There doesn’t seem to be any technical reason.
Page versus Swap:
With the introduction of UWP programs, Microsoft introduced a ‘new to Windows’ storage management mechanism – swapping. A complete UWP program, when idle, can be ‘swapped out’ and back in again in a single I/O request.
Thus:
Traditional Windows code moves in/out one 4K page at a time – to/from the Pagefile.
UWP programs code moves in/out in one go – to/from the Swapfile.
Anyone who has worked on IBM mainframe systems utilising MVS will recognise this from that system; TSO sessions [terminal users] were typically swapped in and out as required during the user’s ‘think time’ …