My new laptop was capable of holding 32GB (gigabytes) of RAM, but for reasons I didn’t bother to pursue, I could find it only available with 16GB pre-installed.
I didn’t worry about it too much, knowing I could easily upgrade the RAM myself should I find it necessary.
I found it necessary. 
16GB worked fine, but it was clear that running virtual machines put a little too much stress on the machine, and RAM was the limiting factor.

- I purchase RAM upgrades from Crucial.com.
- Upgrading RAM, if possible, involves opening your computer and potentially removing components.
- Once accessible, RAM cards are relatively easy to swap.
Purchase
I’ve come to rely on Crucial.com for RAM upgrades.
The primary reason is that the process for selecting exactly what RAM you need can be confusing, and Crucial maintains an extensive database with an easy-to-use interface that leads you to exactly what will fit your specific machine. I entered the brand and model number of my machine and was shown all the options available to me, with a guarantee that they would fit.
Since I had 16GB already installed as two 8GB SODIMM (Small Outline Dual Inline Memory Module) cards, my only choice was to replace them with two 16GB SODIMMs.
I ordered them and they showed up a few days later.
Accessing the RAM cards
Now it was time to open the machine and gain access to the cards so as to replace them.
I have to stress that this is an example. While the steps I’ll describe are typical, they’re very likely to be different on your machine, unless you happen to have the exact same brand and model.
I did locate and download the service manual for my laptop, available from the Dell website, which gave detailed steps for what follows.
It all starts with screws. Lots of screws. Lots of tiny screws.
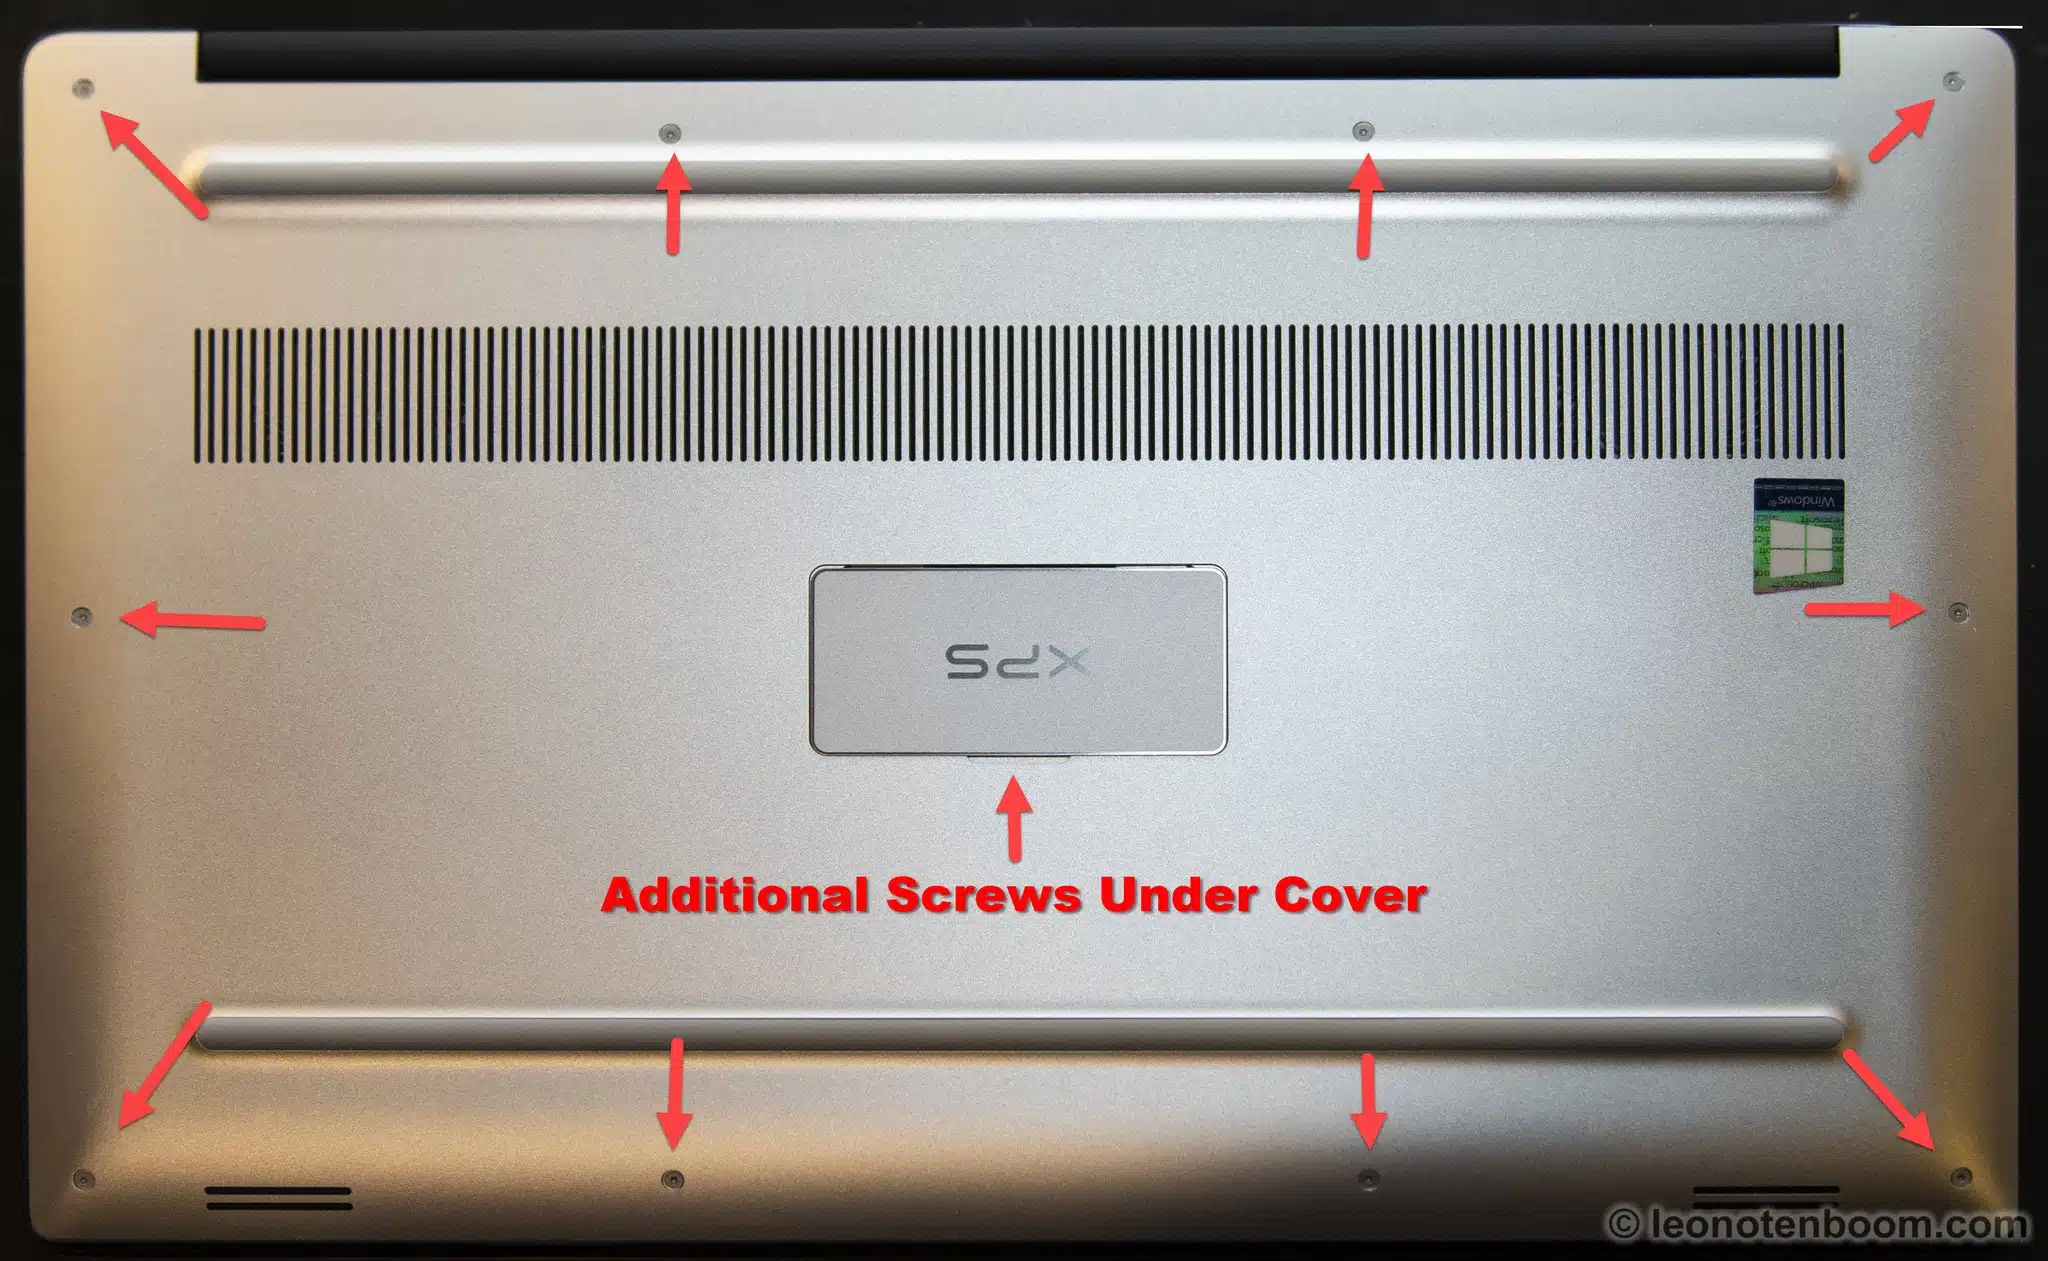
There were 10 tiny exposed screws and two more (of a different size, of course) underneath a cover. I happen to have a toolkit that includes screwdrivers specifically for these screws. I strongly recommend that if you’re faced with non-standard sized screws, you do not try to use regular household or otherwise ill-fitting screwdrivers. The wrong tool can damage or strip the screws.
After removing the screws and carefully setting them aside, I was faced with the inside of my brand-new laptop.
As you can see, there’s a lot packed in.
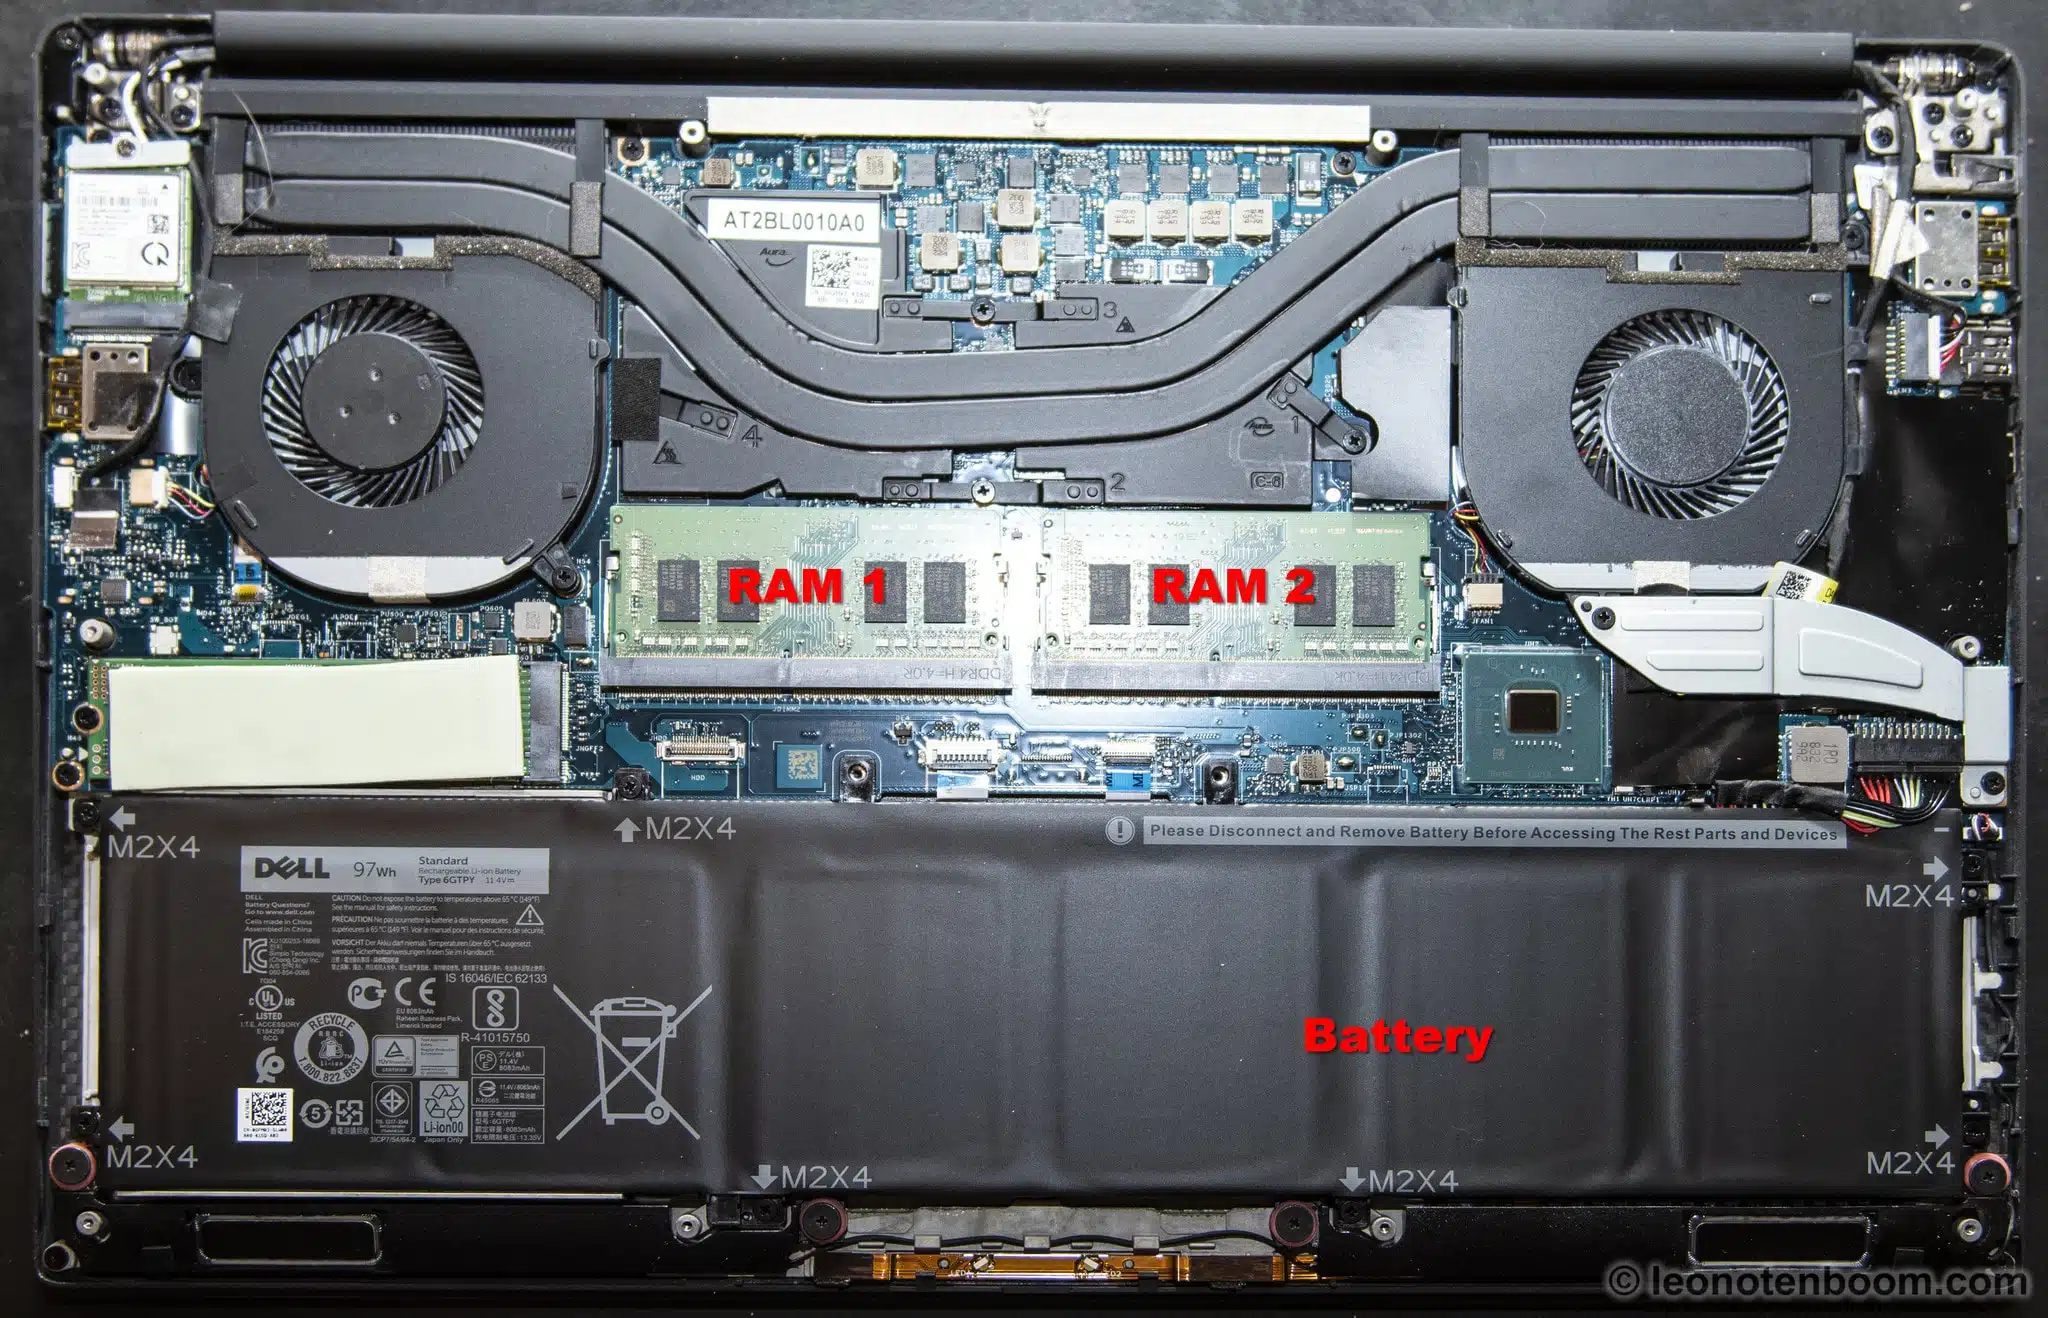
The instructions from Dell indicated that the next step was to remove the battery. Even though it doesn’t obstruct or interfere with accessing the RAM cards, I elected to follow instructions. Having power available anywhere creates additional risk of something as simple as a dropped screw accidentally damaging circuitry if it comes into contact with the wrong thing.
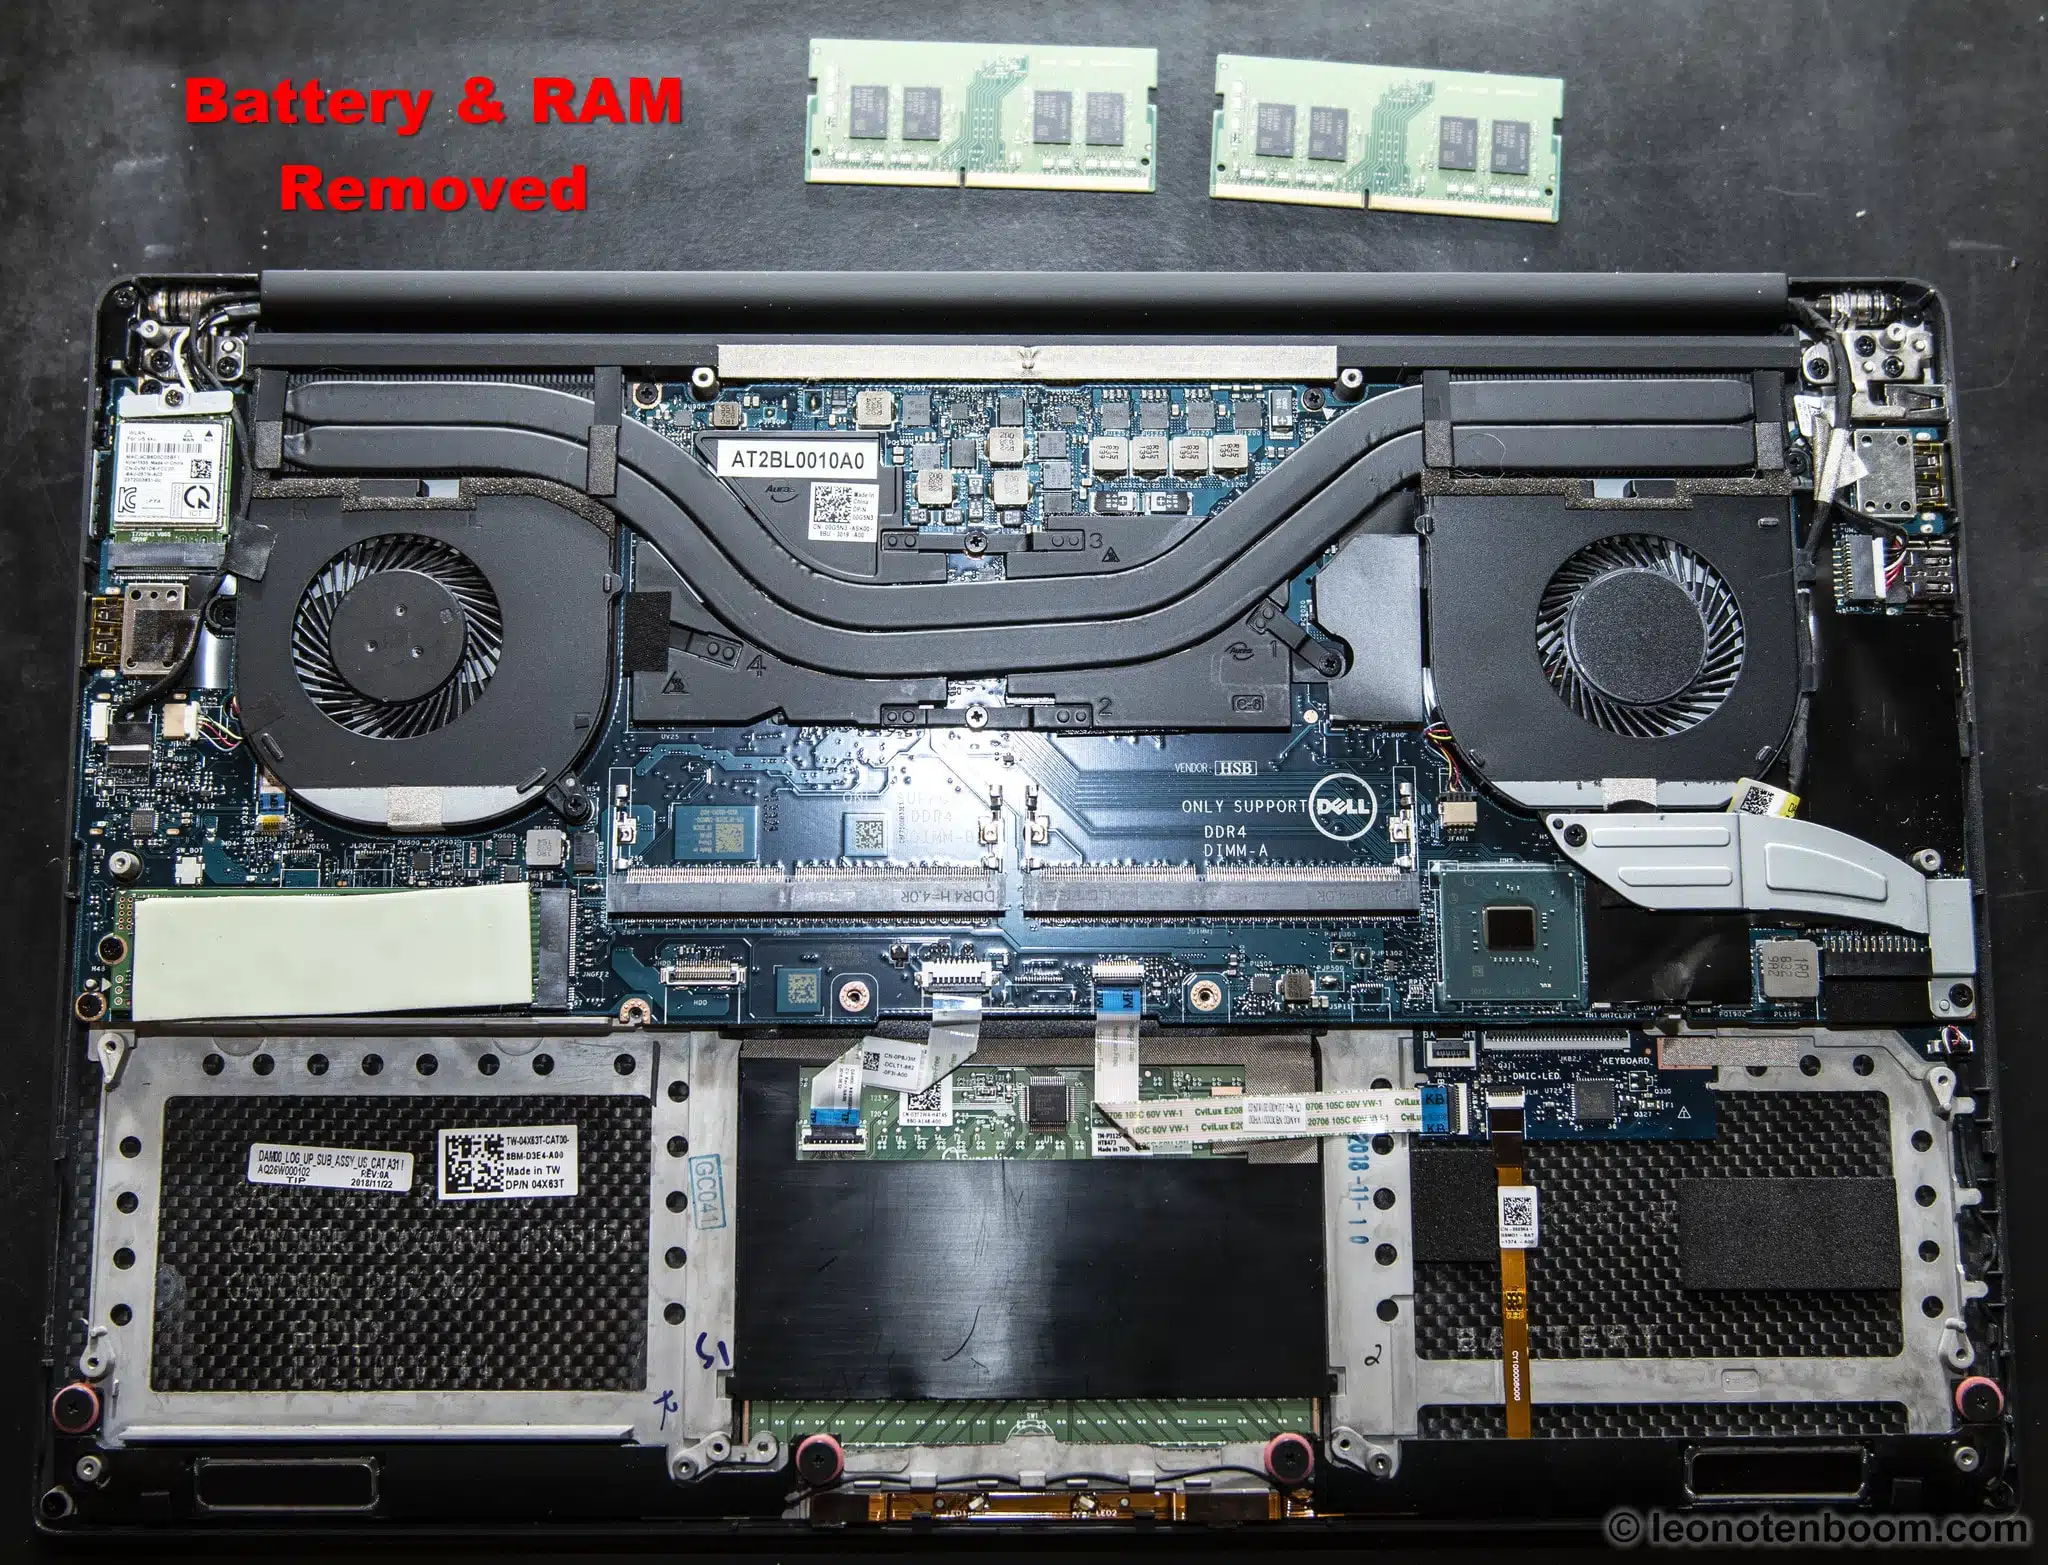
I removed the battery by removing the seven screws that held it in place and carefully disconnecting its connection to the computer’s motherboard. I then carefully removed the two RAM cards.
I’d reached my destination.
Help keep it going by becoming a Patron.
Replacement and reconstruction
Upgrading the RAM was a simple matter of inserting the replacement RAM cards.
Then it was time to reverse the steps I’d taken so far:
- I replaced the battery with its seven screws.
- I put the computer’s cover back in place, carefully using the 12 screws that held it in place.
I do want to reiterate the need for using the proper tools, as well as being careful when replacing screws so as to thread them properly and tighten them firmly but without over-tightening and potentially stripping the thread.
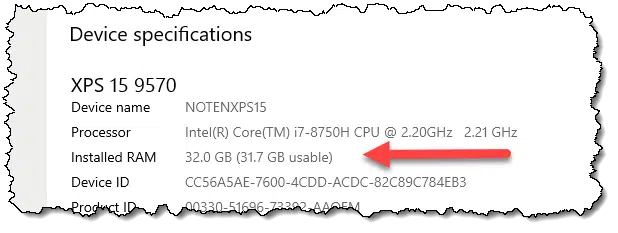
I flipped my computer over and rebooted. Windows dutifully reported my new capacity.
RAM matters
As I’ve said before, adding RAM is one of the simplest upgrades you can perform on most computers, and often one that has the most direct impact on your computer’s performance.
When purchasing a new computer, what matters is not how much RAM it comes with, but how much it can hold. You may only need a certain amount today to get your job done, but as with so many things, RAM requirements for software only grow over time. By making sure your computer has room for more, you’ll effectively lengthen its usable lifespan.
In my case, of course, that day came quickly because of my RAM-hungry requirements from the start.
Do this
Subscribe to Confident Computing! Less frustration and more confidence, solutions, answers, and tips in your inbox every week.
I'll see you there!
Podcast audio

Video Narration


How do I know how much RAM I can add?
You have to check with the manufacturer for the specifications for your specific computer. (Though, the tool from Crucial may also be able to tell you, as might Speccy, the tool from Piriform, but those would both require some “interpretation” to map what they report to a simple answer.)
Leo, did you use an anti-static-wrist-ground-strap while opening your laptop and switching out the ram cards? You would need a known ground source to do this, such as the screw on an outlet cover and verified with an ohm meter. Static discharge is the number one killer of sensitive electronics. If you do not have a wrist ground strap, simply hold your finger on the known ground outlet screw and touch the chassis with your other hand you will safely discharge yourself. This is just as important as keeping regular image backups for the day something goes horribly wrong!
It is a common misconception that one needs to be bonded “to ground” when working with electronics. You need to be bonded to the device you’re working on. E.g., the wristband should be connected (carefully, of course) to the chassis or motherboard of the device, not to the “cold water pipe” in your home.
Wait – you custom configured a new Dell laptop, and they wouldn’t let you upgrade the RAM? Or you didn’t bother to do so? That means you just threw away 2 sticks of new RAM for nothing, plus ran the risk of messing something up when you opened up your new machine!
Not sure I follow you on this one, Leo….
Well, I didn’t throw away the two sticks of RAM. They’re still here, available for re-use as the opportunity arises. 🙂
And I’ve done this type of thing often enough that I felt the risk was minimal.
I, too, was surprised the upgrade wasn’t more readily available in my original purchase, but it was what it was.
I always save my old RAM sticks, but just out of curiosity, have you ever repurposed any of the RAM sticks you took out?
Rarely, ’tis true.
Not surprising that Dell wouldn’t sell you the computer with all the RAM it can take. Dell sells upgrade RAM sticks for over $250 each. Crucial and other non-brand RAMs sell these for about $100 (for 16GB). It’s a good idea to buy the computer with the minimum RAM and then add what you need.
As someone I know that lives buy the idea of “protecting” your computer information, with backup, backup, backup, I was surprised, that you didn’t also protect your computer hardware by using an ESD strap kit. I would speculate that you use a surge protector, but the possibility of damaging sensitive electronic equipment working on it is more likely than needing your surge protecting outlet. Having been a Customer Engineer for IBM for 30 years, we were required to ALWAYS use an ESD wrist strap kit, and were reminded that electronics engineers could determine if a electronic component was damaged with ESC discharge, and if it was our job was in jeopardy if it was known we did not use the ESD kit. The comprehensive kits include a work pad to put your device on when you work on it, a wrist strap, a cable that allows you to snap it to the wrist strap, the work pad , and also contains a clip that IS supposed to be grounded to a true ground, water pipes and electrical outlets the most reliable. Not only should you be at the same static charge as the device your working on, you should be at the same static charge as your immediate environment. You need that grounding to bleed off any slight static charge between you, the device, and the area that the device is setting on. Things like that favorite wool vest you wear or the cat jumping up on the desk or even the rolling wheels of you desk chair create small electrical charges that can be very damaging. I think it might be prudent to obtain a good ESD kit and use it religiously according to the instructions. Also those strange looking bags that the memory were sent to you in are anti-static and you should store your old memory in those bags also.
I enjoy all the information you share with your readers, and yes I’ve started my backup, back, backup program that I purchased from you.
So how are you supposed to suppress differences of potential between the device, your body and the ground ? Wire yourself to the ground through the ESD wrist strap, then touch the metal case of the device ? What if there is no metal case ?
If the device is on the pad that comes with the kit the device will be protected, when the cable is snapped to your wrist and to the pad. and also a convenient ground. Yes all of it has a way to neutralize the small charges that might be present. Actually plastic objects are more vulnerable to static discharge then metal objects. Try running an aluminum comb through your hair, then try it with a plastic comb and notice the results!
I always put the old RAM into the antistatic bags, but seriously, I have a box in my basement with old obsolete RAM and other components I thought I might need someday. 😉
I understand you should never mix and match RAM sticks, even if you have available slots, and the specs are correct on paper. I’ve been told to always install a whole kit bought as a kit, otherwise compatibility problems might occur. Is that correct ?
I have a computer which came with 3 GB of memory, which means it has mismatched memory sticks. It has worked just fine for nine years.
Using unmatched RAM will generally work but the speed will be limited to the speed of the slowest RAM stick.
That depends entirely on the motherboard. Some let you, some insist that you only install matched pairs.
Thank you, Mark Jacobs and Leo. I think I will go with the safe option, and discard my faithful 4 GB entirely, since my motherboard is so old that compatibility instructions from the vendor (Asus) cannot be trusted.
Note : I don’t envision installing unmatched RAM. I was wondering whether supplementing existing RAM with more sticks, having the very same specs, could nevertheless spell trouble. All answers I got up to now are : it may, you never know, and it’s even possible that you could have some problems without realising it straight away.
I assume you do realize, of course, that by opening the computer case, you’ve voided your computer’s warranty…?
Technically, according to the Magnuson-Moss Warranty Act, opening your computer case does NOT void the warranty. But the manufacturer will probably give you a hard time anyway. 🙁
Did the additional RAM solve your screen “blinking” problem Leo?
No, and nor did I expect it to. The screen blinking was a problem with the docking station, which I’m currently not using in that manner.
Happily my laptop has a hatch for the RAM and hard drive, which would make this easy. Even better, it has a free slot. It is 6 years old however, and this sort of convenience seems to be disappearing. I found it very helpful when I upgraded the hard drive last year.
I am hoping that USB 4 might solve the problem. According to one report USB 4 will allow daisy chaining of screens. Perhaps get rid of TB 16 docks altogether
Clarification : by unmatched, I meant having different electrical specifications. Not being from a different brand or model, or even not part of a kit sold as such. That second sentence would obviously apply if you just added extra sticks to existing RAM.
It’s funny, because I was always under the impression that you could do that. It’s not until I recently researched the issue in an extensive way that I came across some warnings saying : no, you can’t add memory, just swap it for more. At least if you want to stay on the safe side. (Self-built PC here.)
@ Tim Barnes
Actually, I built my PC with an anti-static armband connected to the ground. I wasn’t even aware that anti-static pads existed as part of the combo. If you don’t have a pad, is it enough to touch the computer to ground it ? And what parts should you touch ?
I’m in the habit of touching the metal chassis or frame of any computer periodically as I work on it.