Don’t give away more than you should.
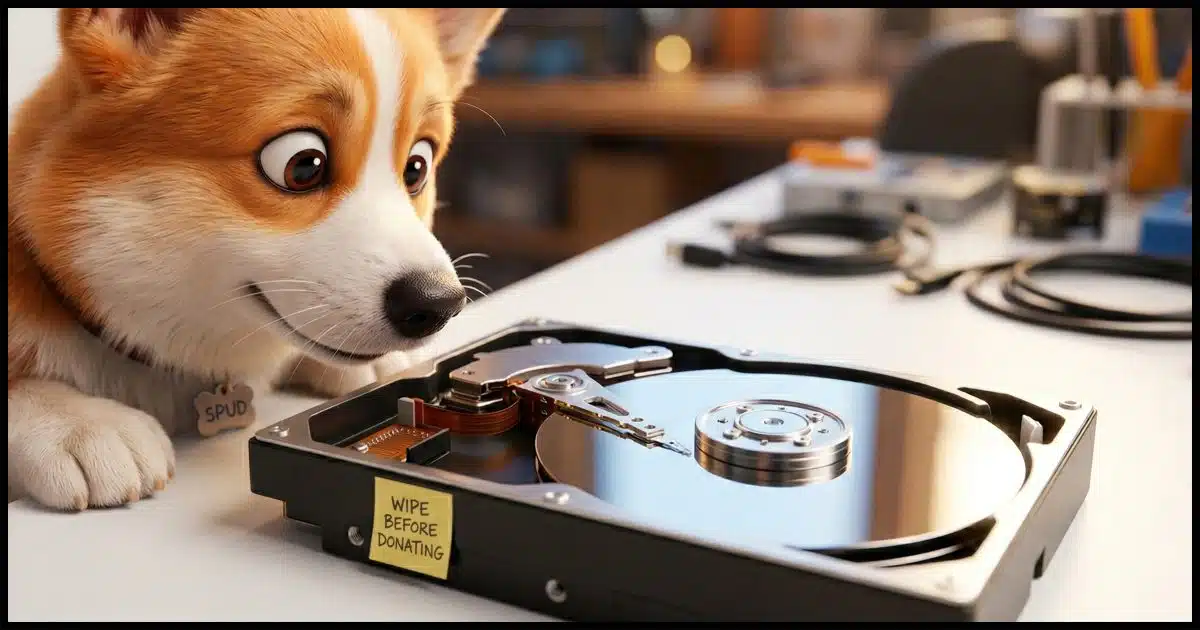
To begin with, good on you — not only for your donation, but for thinking to clean it before you do so.
All too frequently, we hear of computers being donated that end up exposing private information that should have been erased first.
The best way? Well… how paranoid are you?

Wiping a hard disk for disposal
Before you give away your computer, wipe it clean. A quick format won’t cut it. Your best options are a full reformat, full-disk encryption, or (for SSDs) the ATA Secure Erase command. Don’t just erase your data, leave Windows on the machine, and call it done.
Related

How Can I Securely Delete Everything Except the Operating System?
Before giving away a machine or returning a loaner, it's important to remove your personal information from it. That may be both harder and easier than you think. I'll show you where traditional suggestions fail, and what you need to do instead.#4716
Not an option: leaving Windows
Quite often, I get this question with an additional caveat: how to remove all of your personal information while leaving Windows installed.
You can’t.
Even if you remove every scrap of data you can and every application, some of your personal information will still be left behind.
There will be random information in the Windows registry. The files you carefully deleted could be recovered. There might be traces left in the Windows swap files.
What’s worse, of course, are the people who do nothing and leave everything on the machine. It’s not uncommon to hear stories of secondhand machines containing a wealth of personal and private information from the previous user.
Let’s not do that, OK?
Let’s look at ways you can safely and completely clean your hard drive.
Help keep it going by becoming a Patron.
Basic precaution: format the HDD
When it comes to hard disk drives (HDDs), the conventional wisdom is that reformatting your disk is the right thing to do. And I agree with that, if it’s done properly. (I’ll discuss solid state drives, or SSDs, below.)
Windows, and even MS-DOS before it, has the option to perform what’s called a “quick format.” In reality, a quick format does little except create an empty top-level directory and possibly add a label. The rest of the disk is left alone. That’s why it’s quick. That’s also why it’s insecure. Because the rest of the disk is left untouched, any data that was there will remain. Many disk recovery tools can recover data from a quickly formatted disk.
So the answer is to reformat the disk, making sure not to specify a quick format.
The best way to do that? Reinstall Windows, making sure to remove all partitions along the way, and fully reformat the resulting new partition.
That can be a bit of tedious work. However, there’s another, simpler approach that could work just as well
Encrypt the disk and throw away the key
This feels counterintuitive, but it’s a very secure approach.
Full-disk encryption securely scrambles all the information on the physical disk such that it can only be read if the decryption key is provided.
So, encrypt the disk and throw away the decryption key.
There’s one caveat: if you’re given a choice whether to encrypt only the files or the entire disk, always choose the entire disk. This will secure everything, even those deleted files that could otherwise be recovered.
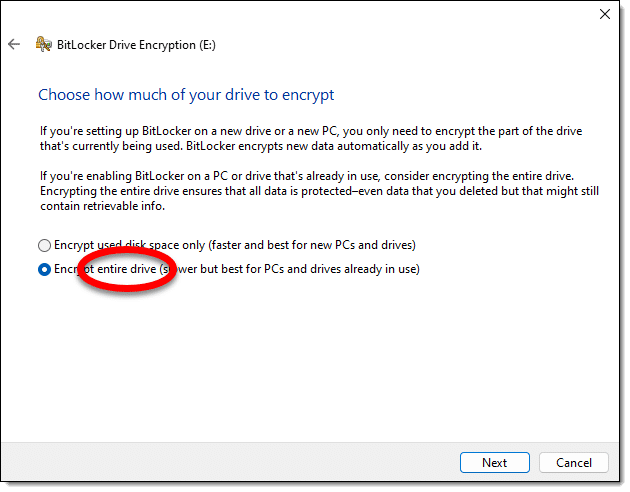
If you encrypt a non-system disk (meaning a second disk drive or external drive), BitLocker will ask for a password. Perfect. Forget the password and don’t save the recovery key, and the disk is as good as completely wiped.
System disks — the drive on which Windows lives — are a little more complicated. You can certainly BitLocker-encrypt the drive, but anyone with access to your login account credentials could conceivably sign in and see or recover the data.
There are two approaches for your system disk.
- Remove the drive, place it in an external USB enclosure, delete everything on it, and use BitLocker encryption as described above. This will result in a truly empty drive on which data is unrecoverable.
- Remove all but one account from the machine and change its account credentials (typically your password).
SSDs are different
Unlike HDDs, SSDs wear out the more you write to them. The techniques mentioned above — doing a not-quick format or using BitLocker — write to the entire drive. Since they only write to the disk once, it probably won’t impact the useful life of the drive at all, so I’m not worried if you choose to use those techniques.
But there are better alternatives for SSDs. Most involve a special command called ATA Secure Erase. It’s the least impactful way to erase an SSD completely and securely.
- Check with the SSD manufacturer. Many, if not most, have free maintenance utilities that include the secure erase command.
- Use Windows Disk Manager to remove all the partitions on the drive. Technically, this isn’t a complete erase or overwrite, but it does make any attempt at data recovery much more difficult. And it’s free.
- Use a third-party utility like PartedMagic. Most are not free, but in exchange, they often include additional partition-management functions that could be useful in other situations. Be sure to look for ATA Secure Erase (specifically for SSDs) functionality.
If you can, avoid treating your SSD like an HDD, and avoid a full overwrite.
Over the top: physical destruction
It’s a common recommendation to use a big, heavy magnet to erase a hard disk.
Don’t. It’s ineffective.
Any magnets you’re likely to have around the house, even those big speaker magnets, are unlikely to affect your hard disk in any significant way. I believe there have been studies that show even some exceptionally large magnets still leave the contents of hard disks in a recoverable state.
Related

How Do I Reformat and Reinstall Windows?
To reformat and reinstall is considered the "nuclear option" when it comes to dealing with Windows problems (or just cleaning up).#23277
Another approach to really, positively, absolutely, and permanently destroy your data is to physically destroy the disk.
Personally, encryption is more than enough for me, but if you care enough to go this far, perhaps drill a few holes all the way through the casing, through the disk platters or SSD chips, and out the other side.
Unfortunately, that level of destruction also makes your donation significantly less useful.
If you really want to leave Windows on the machine…
As I said before, it’s common to want to leave Windows installed as part of your gift.
That may or may not be legal (it depends on the terms of the license for your particular copy of Windows). Staying ethical means you would no longer keep or use that copy of Windows yourself.
The right and safe way to transfer Windows in this case is to reinstall Windows from scratch using your original or downloaded installation media. As part of that process, make certain to delete all partitions and have Windows Setup reformat/recreate the partitions it needs from scratch.
If you have a product key, include it as part of your gift, as you will no longer use it yourself. For Windows 10 and 11, digital activation is usually tied to the machine, so a key may not be necessary.
Do this
Regardless of the technique you use, wipe your hard drive before you donate your computer. It’s too easy to “give away” more than you think by skipping that important step.
Subscribe to Confident Computing! Less frustration and more confidence, solutions, answers, and tips in your inbox every week.

Question – my only concern is if passwords or keystrokes can be recovered from a hard drive after a factory reset of a Dell laptop using Windows 7. I want to donate the laptop in usable condition – as long as my previously saves passwords cannot be recovered. I performed the factory reset already and as I visit sites I had previously it appears my old usernames and passwords are gone – but therein lies my level of paranoia. Are they?
Run dban, or a full (not quite) format of the drive, as outlined in the article.
As an alternative to the drill press – In the past I have put all my old hard drives in the fireplace. Thy melt into a small puddle and later solidify into a nice round metal blob you can just toss.
Software obsolescence is a good argument for hanging on to an older computer with an older version of the OS to be able to run older programs to be able to access data otherwise inaccessible by a newer machine.
When I’ve had hard drives that were no longer needed and still functional, I did a full format of the drive then encrypted the drive using Bitlocker and tossed the recovery key. Then I took the drives to my local computer shop, letting them know that the drives were encrypted. This way, whoever got them had to format the drive before it could be used to remove the encryption. I’d guess that the same could be done using Veracrypt.
Failed drives get introduced to my drill.
A full format would be sufficient. Encryption would add no more security. Since there are no files on it, there is nothing to encrypt.
Hello, all;
Since I gave up on windoz & went linux I’ve learned a bit more.
To “securely” wipe a drive is pretty easy.
Download a linux distro, put the .iso on a flash drive, & make it bootable.
Stick the drive in a USB port, & reboot.
When you boot into most linux distros you’ll have the option to try the distro or install it.
So using the ‘try it’ option you can use the linux drive tools to format the drive.
Done properly that should completely remove all user data on the drive.
I’ve done this on several old computers.
I haven’t even bothered to try to recover any old data, mainly because its not worth the time.
That last bit is key.
If someone wants YOUR old data there must be a specific reason.
If it will take a lot of time (I mean really LOTS) so most simply won’t do it.
Remember, “paranoia will destroy ya'”.
If you are really intent on removing the user data its not too hard.
But usually its also not needed because hardly anyone could care.
I think for most people the drive is worth more than any data on it.
Have a GREAT day, Neighbor!
If you do a full format, the data will be, for all practical purposes, unrecoverable, except for an expensive recovery service. If you do a quick format, the data can be recovered by anyone with a data recovery program such as the free Recuva.
I tend to use ‘Secure Erase’ (using ‘Ultimate Boot CD v5.3.9’ from majorgeeks website which is free (it’s not straight forward to use though but it’s not hard once you know what to do)) to wipe a drive as it’s faster than DBAN and ‘good enough’ even though it’s more complicated than DBAN (DBAN is okay for regular hard drives but NOT for SSD’s) since it requires removing power cable with the SSD/HDD on and then plugging it back in etc to get it in a state the Secure Erase command can be issued.
but Secure Erase, like the article mentions, is needed for SSD’s and good news is it only takes a couple of seconds to finish on a SSD since it resets some sort of encryption key internally in the SSD drive itself from what I understand. so while the data is still on the SSD, it’s unreadable as it’s like it was wiped and explains why it works so quickly compared to a regular hard drive where it’s got to wipe the entire drive to erase it which takes much more time.
but issuing a Secure Erase command using that Ultimate Boot CD it does not give you a estimated time remaining but the drives I used it on take roughly 1-1.5hrs to finish and then it alerts you it’s finished. on regular hard drives… Secure Erase will always be faster than using DBAN given DBAN, like this article says, makes more than one pass, which like the article also says, many (including myself) consider to be a little overkill. although… DBAN is a safe option for securely erasing a hard drive is your not that concerned with time to erase it.
if I get a hold of a used hard drive I issue a Secure Erase on it before using as you just never know what the previous person had on it. plus, it’s something I run on my older hard drives for good measure once in a while to make sure anything sensitive that may have been on there 5-10-15 years ago is truly gone.
DBAN is fine for SSDs. You can set it to one pass and that will completely wipe everything securely. In fact, for the average user, on pass is enough on hard drives as it will cost a few thousand dollars to restore any data. Unless you have data someone will spend thousands to recover, stick with one pass.
As I understand it, that’s not the case. Not because of wear, but because of SSD’s “wear leveling”. You may not actually be erasing everything. Which I find odd, but I see referenced too many times to discount.
More on what Leo said: SSDs don’t store or delete data the same way as hard drives so the typical overwriting of data or reformatting doesn’t work to securely erase data. The controller on an SSD has algorithms to decide where and how to write data. These algorithms are different for different manufactures, so only the specific SSD controller knows where the data is and how it might have to be erased. Along with “wear leveling”, these algorithms shuffle data around and do garbage collection in the background. In other words, your typical OS disk management software doesn’t know where the data is on the SSD. That’s why defrag doesn’t work on an SSD. If you try to overwrite an SSD with 1’s and 0’s, it will not necessarily overwrite in the same physical locations as the files you’re trying to erase. Besides, if you do that too often you’re wearing out your SSD. Also, there is a difference between erasing an entire SSD and erasing some files or folders. On an SSD data is written in blocks and pages and you cannot securely erase just a few files within a page if there are still other used files within the page. The best approach to secure erase an SSD is to use an application provided by the SSD manufacture, which presumably should know how the SSD controller handles data. The physical method of “erasing” is to apply a voltage to pages to reset the transistors to the factory initial state (no overwriting). Some newer computers may have this reset feature built into the UEIF.
I have a laptop which originally had windows on it. I have subsequently installed Linux on it not once but at least three times (for various reasons). No dual boot but complete installation
There has been no usage of the machine after the linux installs – do I still need to worry about old data?
When you perform a format and install of a new OS, it performs a quick format. That only clears the file index, and ll of the data stays intact on the free space of the drive. A full format or free space wipe is necessary to remove all of the data from the drive.
No need to worry. Just do a free space wipe.
I already made a post from Sep 2021 ( https://askleo.com/erase-my-hdd/#comment-1116356 ) but I was playing with stuff some more recently in regards to ‘Secure Erase’ which I think I might as well mention it…
while I already mentioned the ‘Ultimate Boot CD’ stuff, and that’s fine to still use, I noticed it comes with a old Linux kernel and I am not sure if that would be a issue with more recent hardware with it properly detecting everything (as the computer I used was older than the kernel used in that Ultimate Boot CD). but I recently learned one can use a more modern Linux setup, I used a Linux Mint ISO (I used Linux Mint v21.0-Xfce) which comes with a 5.15 Linux kernel which is pretty much Oct/Nov 2021, so it should support a lot more hardware, and with that (one simply boots up to it like usual) one can manually issue the ‘hdparm’ commands as follows to issue a ‘secure erase’ to the drive…
1)sudo fdisk -l (that “-l” is a lower case L) and find the precise location of the hard drive you want to ‘secure erase’. it will be something like “/dev/sdx” (where ‘x’ is the location of your hard drive you want to ‘secure erase’) and then use whatever yours is on the commands below!)
2)sudo hdparm -I /dev/sdx (that “-I” is the capital letter ‘eye’ (I)) (and check under ‘Security’ section as if you see ‘frozen’ instead of ‘not frozen’, which will likely be the case, proceed to Step 3 (if not proceed to Step 5))
3)sudo hdparm -Y /dev/sdx (NOTE: make sure to use a capital Y, not lower case!) (which will power down your hard drive (the one you want to ‘secure erase’) and after a few seconds you can then physically remove the SATA power cable from the drive you want to issue secure erase on, wait 5-10 seconds, then plug it back in, wait for it to fully spin up, call it 30 seconds or so, then proceed to Step 4.
4)sudo hdparm -I /dev/sdx (“-I” is a upper case ‘eye'(I)) (under ‘Security’ section check to see if it says ‘not frozen’ now. assuming it says ‘not frozen’ proceed to Step 5.
5)sudo hdparm –user-master u –security-set-pass temp /dev/sdx (NOTE: you can set the ‘temp’ to whatever you want but make it something very easy to remember) (at which point it will probably show something like “/dev/sdx:
Issuing SECURITY_SET_PASS command. password=”temp”. user=user, mode=high” then it will kick you back to the usual terminal prompt, then proceed to Step 6.
6)sudo hdparm -I /dev/sdx (check to see under ‘Security’ that it looks similar to the following…
Security:
Master password revision code = 65534
supported
enabled
not locked
not frozen
not expired: security count
supported: enhanced erase
Security level high
(the ‘enabled’ and ‘security level high’ are the important things that should be showing)
7)sudo hdparm –user-master u –security-erase temp /dev/sdx (once you do this the ‘secure erase’ will immediately start and you will see that white icon just sitting there like nothing is happening (but it’s currently ‘secure erasing’ the hard drive and will return to normal prompt after roughly 1-2hours pass to maybe 10-12hours depending on the size of your hard drive (but you can check estimated time to complete on the menu’s a bit before this starts which should be a pretty close time estimate. on my 250GB 2.5″ Toshiba drive it estimated ‘secure erase’ to take 88min). but once you are back to the normal prompt where you can type again, do one last thing, go to Step 8.
8)sudo hdparm -I /dev/sdx (basically the ‘enabled’ and ‘Security level high’ (shown in Step 6 above!) should NOT be visible anymore. so as long as it’s NOT visible, you are done and hard drive has completed the ‘secure erase’ process. you can power down and use the hard drive like you normally would if you want to.
NOTE: as a possible/safer alternative to Step #3, which does not work on my ASUS A8N32-SLI Deluxe computer, but may work on other peoples computers, you can try “echo mem | sudo tee /sys/power/state” instead as it will suspend the system and then wait a few seconds and press a key on the keyboard to bring the system back to life and see if the hard drive is ‘frozen’ or ‘not frozen’ as if it’s ‘not frozen’ then you won’t need to physically remove the SATA power cable from the hard drive while the computer is on, otherwise you will need to do it to get the hard drive to a ‘not frozen’ state to proceed with the ‘secure erase’.
recently on a 250GB 2.5″ SATA hard drive (a laptop drive) connected to my old desktop, which is a ASUS A8N32-SLI Deluxe motherboard (high end 2005 tech but I had it since March 2006 and is my backup computer), it took roughly 1hr10min to finish and on a 6TB HDD it took about 10hrs to finish as this will give people a good estimate of the time that’s required to finish ‘Secure Erase’ depending on your hard drive size.
that’s pretty much what the ‘Ultimate Boot CD’ does except the Ultimate Boot CD is easier. but I just thought I would mention the manual way from the prompt in case someone can’t use that Ultimate Boot CD for whatever reason and needs something a bit more recent to issue the ‘secure erase’.
while that sounds complicated it’s probably the most proper way to securely erase a hard drive so no data recovery is possible. but I suspect DBAN is good enough for a typical hard drive and is easier to use.