From one comes two.
Partitioning is a way to divide up the space on a single physical hard disk into what looks like more than one disk. There are varying opinions on whether or not partitioning a hard drive is worth it. Some see it as unnecessary and even a potential waste of space. Others see it as a great way to separate data from the operating system for backup and update purposes.
Let’s say you’re pro-partition.
Let’s set that up. Let’s split the system drive (C:) into two.

Splitting C: in two
If you have enough free space on your C: drive, you can split it. Use Disk Manager to shrink C:. Then, create and format the new space as a new drive. It’s handy for keeping data separate from Windows, but make sure you leave enough room on C: to keep things running smoothly.
Ya gotta have space
Our first step is to make sure we have enough space to do the deed. You can’t create a partition and move data at the same time.
What this means is that you need enough free space on the existing drive from which to create the new partition. Here’s an example.

I can split this drive in two, but the “new” partition can be at most 90.7GB in size. Pragmatically, you always want some breathing room on the C: drive, so I’d never go that far, but the point remains: you need enough free space to be used for the new partition.
If you don’t have space, you’ll have to go about making some. That could mean running disk clean up, moving data to other drives, or deleting data you no longer need.
However you do it, freeing up space is step 1.
Resize the existing drive
Run Disk Manager by right-clicking on Start and clicking on Disk Manager. Then, right-click on the drive you want to split (probably the C: drive).
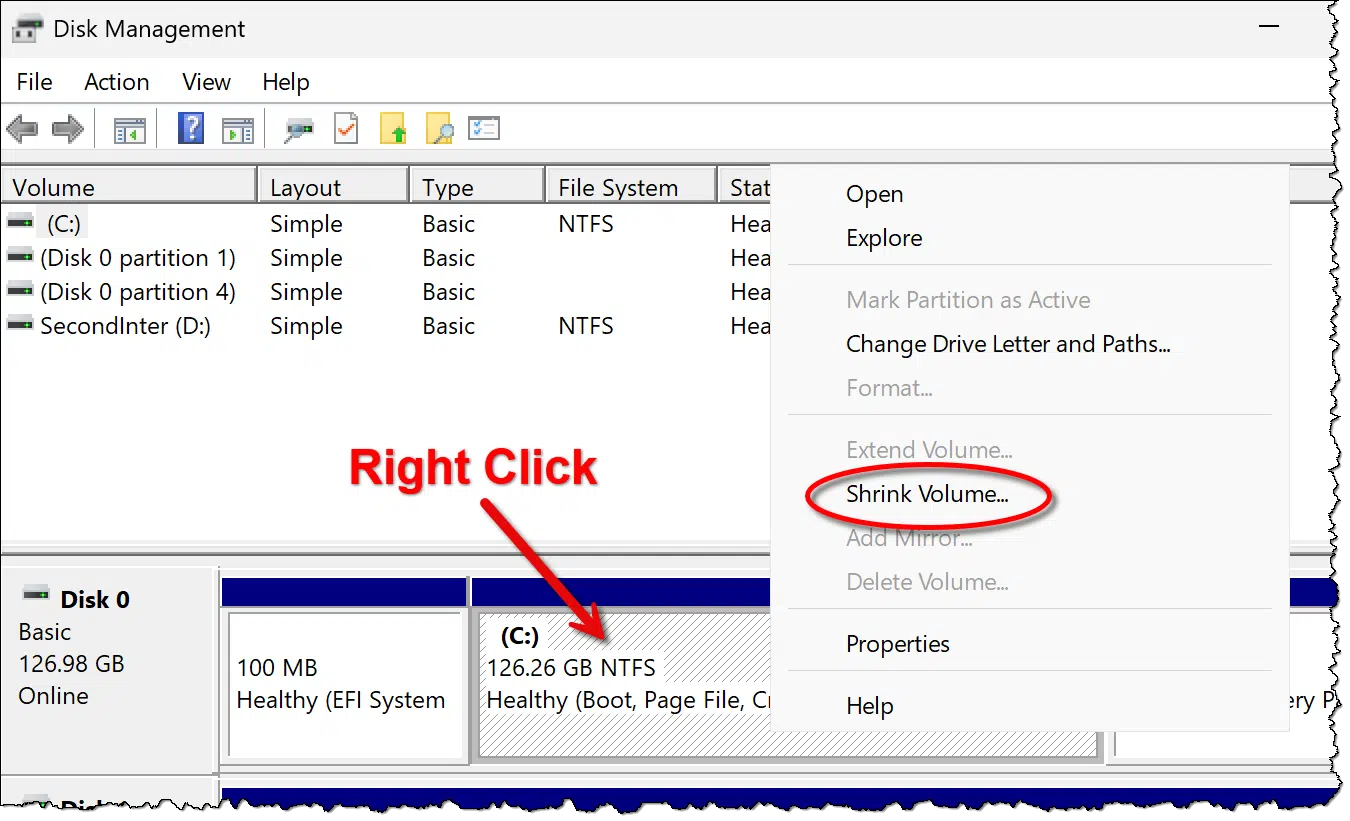
In the resulting pop-up menu, click on Shrink Volume.
You’ll then be shown a dialog in which to specify how much to shrink the drive.

In the example above, the maximum amount I could shrink this drive would be 87,361 megabytes, but that would leave the C: drive with almost no room. I’m electing to shrink by 64,000, which will become the approximate size of the new partition.
Click Shrink.
Disk Manager will take some time to perform the operation. When it’s done, you’ll see a new “Unallocated” partition next to the original, now-smaller one. It’s called unallocated because you haven’t yet formatted it, so it can’t store any data.

Formatting the new partition
Right-click on the unallocated partition and click on New Simple Volume. Click Next on the first page of the wizard. You’ll be asked to specify the size of the new volume.

The default is to use all of the available space, which is likely what we want. (If you wanted to split this unallocated space into multiple partitions, you might specify something less, but for our purposes, we’ll use it all to create a single partition.)
Click Next. You’ll be asked to assign a drive letter.
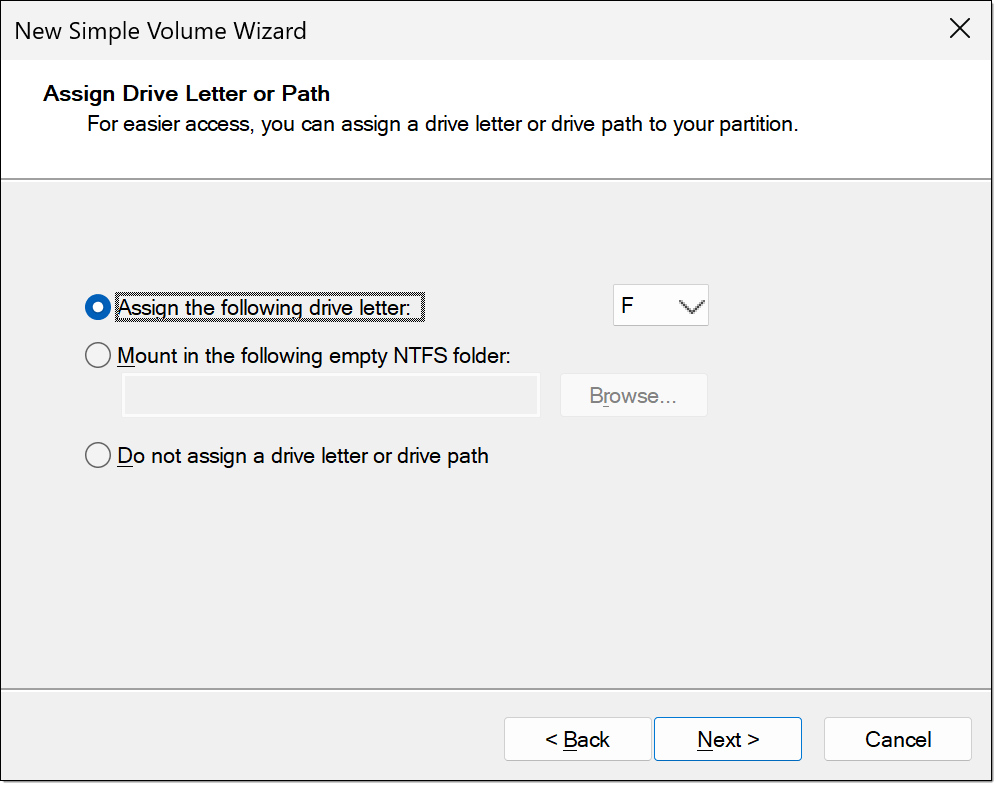
The default will be to assign the next available drive letter on your system. You can select any letter not currently in use. (You can change it later if you like.) Click Next, and you’ll be asked to format the new partition.

The defaults are typically appropriate. The only thing I’d recommend is naming your Volume label something that will help you easily identify the drive later. In the example above, I’ve called this “MyNewPartition”.
Click Next. You’ll be shown a summary of what’s about to happen. Click Finish. Drive Manager will format the drive, and you’re done!
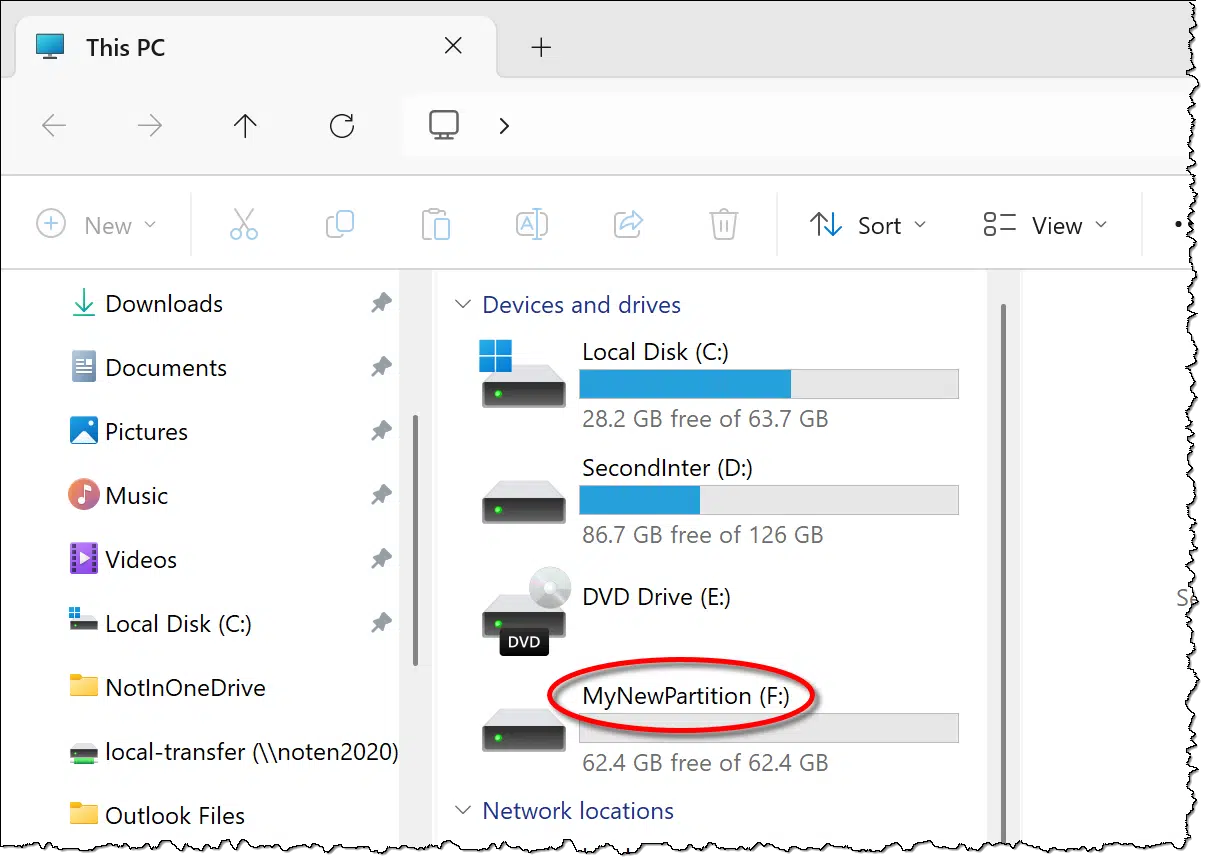
Your original C: drive remains, and your new partition is visible and ready for use.
Do this
Once you’ve got your new partition, you can move data into it or use it for whatever purpose you might like. It’s “just” a drive(empty to begin with), with no assumptions — unlike the C: drive, which, as your system drive, has many roles.
Subscribe to Confident Computing! Less frustration and more confidence, solutions, answers, and tips in your inbox every week.


” Pragmatically, you always want some breathing room on the C: drive,”
That’s why I don’t partition my c: drive. You never know when your system partition will fill up. I have that problem. My Lenovo IdeaPad has two physical SSDs. The c: drive is a tiny 128 GB drive. (I remember when I got a computer with a 1GB drive. It seemed huge at the time) I have to run CCleaner and Disk Cleanup regularly to keep it clean. I suppose I could swap drives and make the 1TB drive the system drive but that’s a big undertaking.
My Lenovo Legion 5 Gaming laptop PC has a .5TB M.2 SSD system drive that I’ve partitioned to dual-boot Windows with Garuda GNU/Linux so, before installing Windows, I created a 2GB EFI partition at the front of the drive, and a temporary partition at the end of the drive to consume half the remaining available storage space to prevent Windows from using the entire drive. Next, I installed Windows, and got it all set up as I want it to look and feel.
With Windows installed and set up as I want it, my next steps were to delete the temporary partition at the end of the drive so I could create three partitions for GNU/Linux – an 8GB swap partition (formatted as swap), a ~40GB GNU/Linux system partition (formatted as Betterfs), and the remaining space for the /home partition (also formatted as Betterfs) where my user space resides. I used Gparted to manage my partitions. It is one of the apps available on System Rescue, the utility set I use for emergencies and other system management activities. I keep the two most recent ISO image versions on my Ventoy disk so if the latest version refuses to load, I can use the previous version.
Dual-booting Windows with GNU/Linux is the only reason I partition my system drive, although I have also partitioned my 2GB external drive on my Lenovo laptop to store some data files on one partition, my Macrium Reflect image sets on another, and a set of rescue images for GNU/Linux from Rescuezilla on a third, so I suppose I use partitions to both provide for multiple OSes as well as to organize my data storage.
This is what I do, I hope it helps others,
Ernie
I partitioned my Hard Drive a few years ago. I only wish the “New Simple Volume Wizard” had an option to change the MB value to a GB value (or visa versa) to match the values in the Disk Management screen. I infrequently work with both GB’s and MB’s at the same time so I always have to look up the conversion factor. Even then, sometimes I multiply the wrong value by 1000.