Starting over is often a quick and easy fix.

Printers and printing are a special source of frustration in Windows. From the early days to the present, printers can behave oddly, and even occasionally stop working completely, for no apparent reason.
It’s gotten better — especially installation — but random and frustrating things still happen too often.
I don’t have a solution for every situation, but I want to share the first thing I do when a printer goes awry. I’d say it resolves between half and 80% of the problem cases I’m asked about.
Become a Patron of Ask Leo! and go ad-free!

Fix printer problems
Use the Windows settings app to remove your printer from Windows and then add it back again. Doing so reinitializes much of the printer’s configuration information. While this approach doesn’t solve all problems, it’s a safe and easy first step to fixing printer issues.
Note: most images below are from Windows 11, but the same technique applies to Windows 10.
Uninstall the printer
As counterintuitive as it sounds, the first step is to uninstall the printer from Windows.
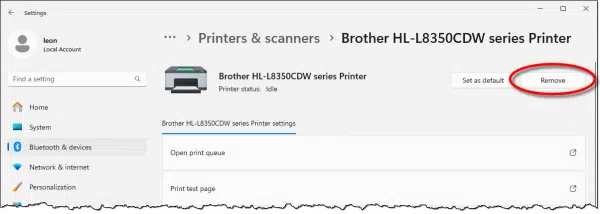
Find your printer in the Settings app.
- In Windows 10, click on Devices, then Printers & scanners.
- In Windows 11, click on Bluetooth & devices, then Printers & scanners.
Click on your printer and then on Remove or Remove device.

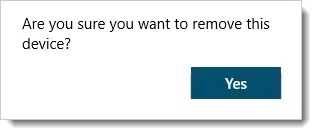
You may be asked to confirm.

Click on Yes, and the printer will disappear from the list.
Re-add the printer
Return to the Printers page in Settings and reinstall the printer.
- In Windows 10, click on Add a printer or scanner.
- In Windows 11, click on Add device.
Windows will scan your local network for printers as well as any physically connected to your computer.

When your printer appears, click on Add device. Windows will reinstall it.
Try to print what you were having trouble printing. Hopefully, your problem has been solved.
Adding a printer that’s not found
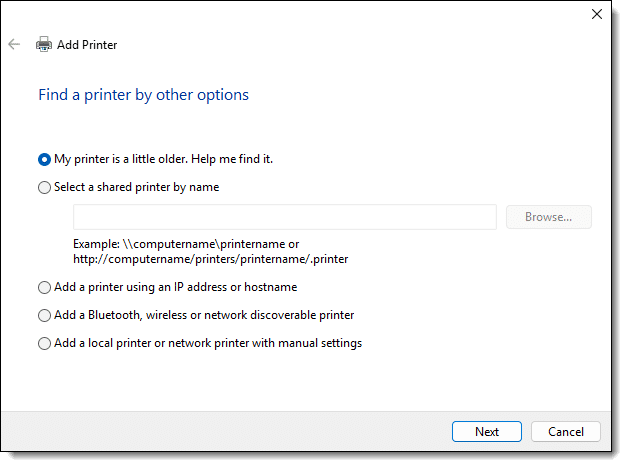
If, Windows does not find your printer automatically, click on Add a new device manually (Windows 11) or The printer that I want isn’t listed (Windows 10) for a list of alternative ways to install the printer.

These are more advanced techniques and may require that you have additional information (such as specific printer names or IP addresses) or skills (understanding manual settings).
There’s an easier approach that is not listed: visit the printer manufacturer’s website for the latest drivers and/or installation program for your specific printer. If available, it’s as simple as downloading the file, running the program, and answering a few questions (remember, never choose default installations).
Do this
What did we just do?
I liken it to a “reformat and reinstall” of your computer except limited to the printer. Uninstalling and reinstalling reinitializes most settings to their default state and configures the driver for the current state of your machine.
It doesn’t fix everything, but it can fix a surprising number of problems. It’s a good and safe first step when tackling printer issues.
Also good and safe? Subscribe to Confident Computing! Less frustration and more confidence, solutions, answers, and tips in your inbox every week.


I don’t know if this applies to more recent printers, but I’ve found that downloading the installation file often installs a more featured version of the driver which gives more control over printing options when printing. That might be unnecessary for most people as the options given in the basic driver installation are usually enough. This is especially true for scanners.
The advice in this article also applies to most installed devices. Often, (probably, most of the time) uninstalling them via the device manager and scanning for attached devices solves the problem.
I used the remove/reinstall approach way back with Windows 95 and every versions since then. It usually work great for your printer problems. I also found that this also work very well for most other devices.
My successful uses include : misbehaving keyboard, non-responsive scanner, apparently dead mouse, dial up modem randomly disconnecting and timing out, video card problems, …
I often combined this with the installation of drivers coming directly from the device maker’s web site.
did it fix the provision HP has in the printer to not allow other than HP cartridges??
That’s not a fixable problem. That’s a design decision on HP’s part.
It’s a feature not a bug. A feature designed to transfer your money to themselves. I bought exactly one inkjet printer. Never again. They sell the printer at cost to be able to rip you off on cartridges.
Well I thought this item was timely. But No. My win 10 computer has stopped seeing my epson sx218. The first thing I did was uninstal and reinstall computer and software. No good. I ran the trouble shooter interesting enough that saw the epson printer.??but couldn’t repair the fault. Yet in settings not only does it not see it it can’t find it when I tried “can’t see my Printer”. On the epson web site this happening is not covered. The printer is OK because it works on my spare computer so something has gone wrong with win 10, but what. Probably something simple that I should have seen but failed. Any idea’s welcome please.
Try Leo’s idea of getting the installation program from the Epson website.
https://www.epson.eu/support?productID=3838#drivers
Don’t just uninstall and reinstall. Uninstall, then switch the computer and printer OFF, disconnect the printer cable if such is used. If WiFi is used switch the router off. Wait 10 seconds. Switch the computer, router and printer back on, let all of it boot completely. Then connect cable to computer (if used), get the latest driver from the manufacturer and install.
So many people say ‘it doesn’t work’ but the only problem is that they are impatient and want to start something while there is still a previous operation is in progress. Installation makes deep changes to the system. Don’t do other things while installing something (although you can e.g. download drivers).
I have found that when the printer doesn’t work I run windows troubleshooter on the printer and all of a sudden it is fixed and printing. Easier than a uninstall and then reinstall
That’s a good first step. If that doesn’t work, uninstalling and installing the driver almost always works.
I have used an HP OfficeJet 6958 printer for years but have always had issues with trying to Scan documents. I have sent requests to HP for help but to no avail. I read your article and thought I would give it a try. I am very pleased to say, Your recommendation worked. I am now able to Scan documents. Thanks.
I have had problems with my wifi hp printer not printing due to the computer randomly switching from my guest setting on the router that it is set up for, to the non guest setting that it will not connect to. This may seem obvious to some, but to the less tech savvy such as me, this may be of some value.
What about making sure to run the drivers from the manufacturer instead of the Windows drivers? Aren’t they generally more up to date and have more features?
That’s an additional step, yes, but this one is enough probably 80% of the time.
In the old days, it was more common to need the driver instalation files for printers to take advantage of all the features. Now, every printer I’ve used is plug and play, or at least can be installed from the drivers provided by Windows. In most cases, drivers are provided to Microsoft by the device manufactures.
Over the years I’ve owned a number of ink-jet printers, each of which returned varying levels of longevity/quality/dependability. In my experience, most have been essentially throw-away devices, where the printer either works correctly, or it fails, and when it fails, the cost of repair is usually greater than the cost of a new printer. This situation led me to purchase a higher quality device (at a considerably higher cost) and my current printer/scanner is my Epson ET-2800 Network printer (ET is an acronym for Eco Tank), one of their printers with four large ink tanks (1 for black ink, 1 for yellow ink, 1 for magenta ink, and 1 for cyan ink). On the Amazon website, they say that each ink bottle is about equal to eighty ink cartridges, and that the printer comes with a two year supply of ink, and that each refill of the Eco Tanks should last for about another two years.
After more than a year, I still have plenty of ink in the tanks, and I’ve encountered no issues (yet). I’m very happy with this printer, and I look forward to seeing how long the ink actually lasts in the normal course of how I use my printer, not to mention how long the printer itself lasts.
My recommendation is to purchase the best quality printer you can afford. This is essentially the same advice I give for any hardware purchase. When you get the best quality equipment you can afford, you save a lot of money in the long run.
My2Cents,
Ernie
Read up on “Vimes’ boots”, or, as my granny used to say “I’m not rich enough to buy cheap stuff”. You might not get better quality for a higher price, but you won’t get better quality for a lower price 🙂 .
I have a Samsung laser printer that cost me $50 about 10 years ago (half price ecause it was the previous year’s model). I get reconditioned cartridges for about $20 which prints over between 1 and 2000 sheets of text. My first non-impact printer was an inkjet. Never again.
I often get a new device of the previous year’s model for big savings.