When you don’t have (or don’t want) CDs or DVDs.
Sometimes, such as when your computer won’t boot, or you’re attempting to install a new operating system, you need a bootable thumb drive from which to start the machine. But you can’t just copy an ISO file to your thumb drive and expect it to work.
ISO files1 contain a media image: a complete copy of a disc’s contents, including the information needed to boot. If you were installing a new operating system, for example, you’d download the ISO file, burn it to optical media, and boot from that CD or DVD.
Downloading ISO files onto USB thumb drives is the replacement. But just like you need to “burn” an ISO to optical media, there’s a process to putting an ISO onto a USB thumb drive so it will be bootable. While it’s also often referred to as “burning”, it’s something completely different.
There’s an app for that. Rufus to the rescue.

Creating a bootable thumb drive from an ISO
Just copying the ISO onto a thumb drive won’t work. Use Rufus to “burn” an ISO onto a USB thumb drive so it can boot your computer. Rufus sets up the thumb drive with the structure needed to boot. Download Rufus, select your thumb drive, pick the ISO, and click START. Beware: all data on the thumb drive will be erased.
You can’t just copy
One of the first mistakes people make is to copy an ISO to a thumb drive they have lying around.
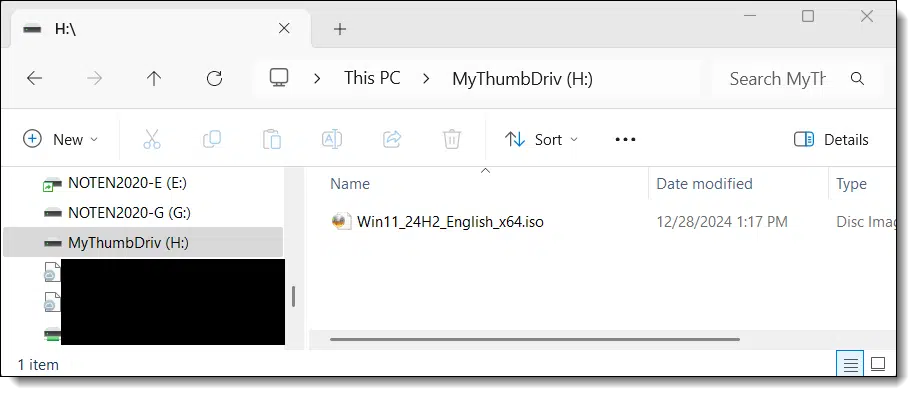
The problem is that copying a file from disk to a thumb drive (or from anywhere to a thumb drive) doesn’t set up the additional overhead to make that thumb drive bootable. It’s just a disk with a large file on it, nothing more. It’s a fine way to copy the ISO file to another machine, but it’s not something you can boot from.
That requires an additional step.
Rufus
Rufus is available from https://rufus.ie.
Important: Ignore all the “Download” buttons. The vast majority are ads and will not download Rufus. (This is unfortunately true for many sites.)
Instead, scroll down until you find the list of “lastest releases” installation links.
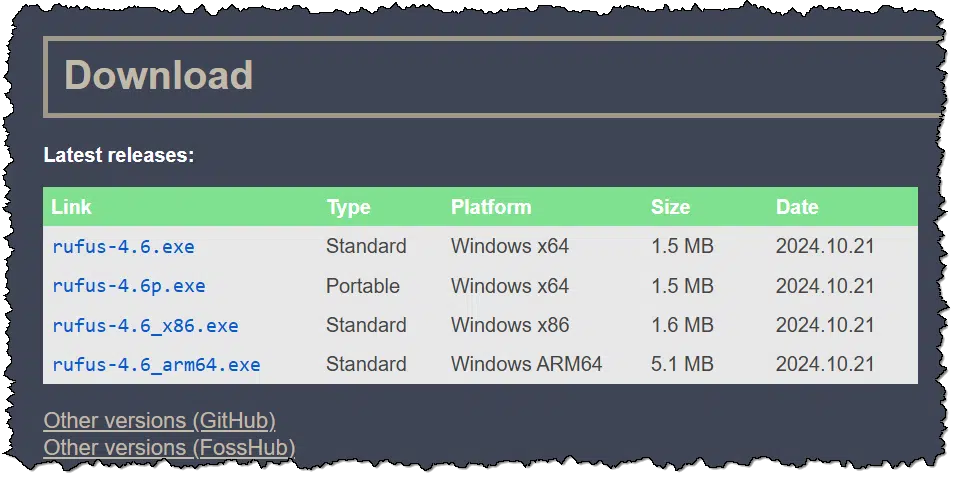
In most cases, the first one — Standard installation for 64-bit Windows — is all you need.
Download and run it.
Using Rufus
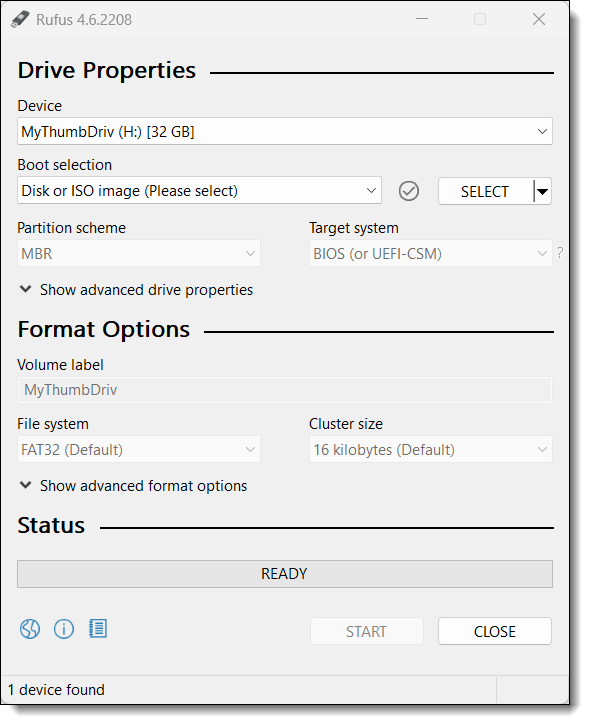
Under Drive Properties, click on whatever is listed under Device (if anything).

This lists all of the USB thumb drives Rufus has found that it could write to. In my case above, there is only one. If you do not see your thumb drive listed, make certain it’s inserted. The list should update after you insert the device. Note that Rufus writes to thumb drives, not to external hard drives. The latter will not appear in the list even if an external drive is connected.
Select the thumb drive you want to write to.
Leave Boot selection unchanged as “Disk or ISO image (Please select)”. Click the SELECT button.
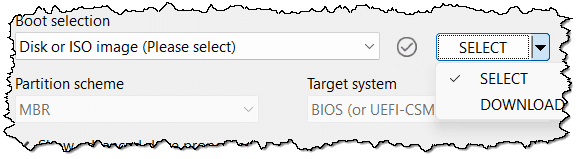
Your choices are SELECT and DOWNLOAD.
- SELECT opens a standard file-open dialog box that allows you to select the ISO you’ve previously downloaded to be burned.
- DOWNLOAD gives you a list of common ISOs you can have Rufus download for you. It’s always been a very short list for me.
I recommend you download the ISO you want separately before running Rufus so you know exactly what you’re getting.
You’re ready to start.
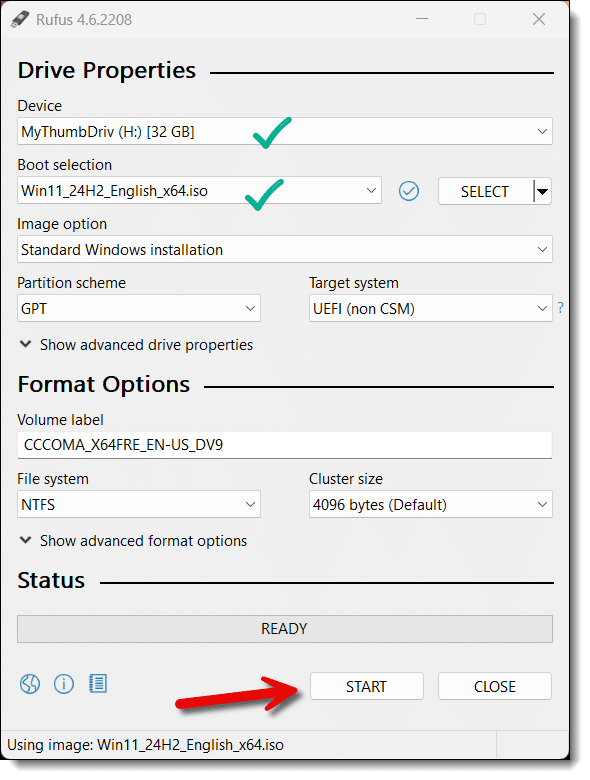
You have a thumb drive selected to write to and an ISO file selected to write. Click START.
Windows 11 tweaks
If you’re burning a Windows 11 ISO, as I show above, you may be presented with a dialog of enticing tweaks you can make to the installation.

Many of these options are commonly requested changes for Windows 11 that can be difficult to accomplish after installation. Whenever you use this thumb drive to install Windows, these customizations will be made automatically.
Note that each of these changes the ISO as it’s written. And, of course, Microsoft may change Windows 11 such that these stop working. As always, use such tweaks at your own risk; you needn’t choose to use any of them.
If anything fails on the eventual Windows installation, repeat this process and deselect all the items before trying again.
Everything will be erased
You’ll get a warning.
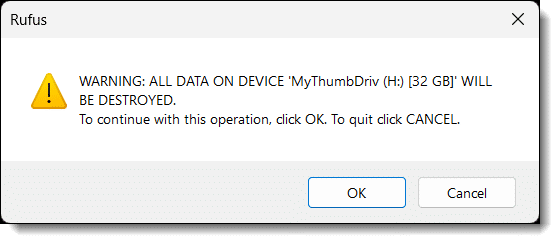
Make certain that the correct device is displayed and that there’s nothing on it you need to save elsewhere. The entire thumb drive will be erased.
Click OK to begin the process. When complete, you’ll have a bootable USB thumb drive based on the ISO you selected.
Check your thumb drive
A quick view of the thumb drive’s contents should show you what you would expect to find on normal installation media: lots of files.
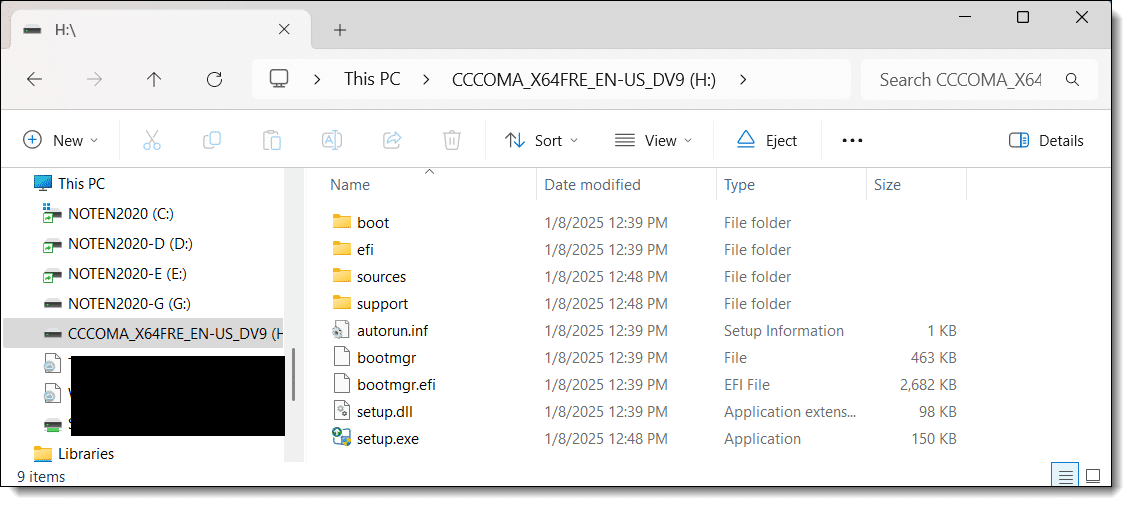
You can now boot from this USB thumb drive.2
Do this
Particularly if the machine you want to install something on has no CD or DVD drive, you can now easily use a USB thumb drive in its place.
And if you’re dealing with Windows 11, you even have some nifty tweaks you can make along the way.
Subscribe to Confident Computing! Less frustration and more confidence, solutions, answers, and tips in your inbox every week.
Podcast audio

Related Video


Footnotes & References
1: ISO stands for International Organization for Standardization. Even though it’s a very generic term, and is used in many other places and ways, “ISO” has become the standard way to reference a disk image in an ISO-specified format.
2: Exactly how you do that varies based on your machine. It’s typically a UEFI or BIOS setting called “boot order”. You can change it, if needed, to check USB devices for bootable operating systems before checking the hard disk.

Your footnotes and associated links aren’t fully working. Toward the end of the article have a footnote #2, but there is no footnote #2 in the bottom list of footnotes – only a footnote #3, which doesn’t have a corresponding reference in the article. You probably meant to use “#2” in the list instead of “#3”.
Thanks. Good catch. Fixed now.
Rufus is also available through the Microsoft Store, along with Sysinternals Suite.
Two points:
1. HP laptop Touchpad was not recognized during attempted clean install using Rufus. Unable to click the box acknowledging that SDD would be wiped clean. Resolved by installing a wired mouse. (did not try wireless mouse)
2. Rufus USB must be removed before Windows restarts after installing. If not, you’ll get to do the install all over again ; )
Understand that it’s not a “Rufus USB”. Rufus is simply a tool to create a bootable USB from an ISO. Presumably this is a Windows installation, so the issues would be the Windows setup on that USB.
The reason you need to remove the Windows installation flash drive is because you have the boot order set to boot order set to boot first from USB. You can change that to default to youd system HDD by pressing F2 several times after turning on the machine. (It only takes one press of F2, but to catch it at the right time I keep pressing F2 till the UEFI screen appears. Click the “Boot” tab and move the system drive up to the top as per the instructions on the screen.
I keep my default set to boot into the system drive and I press F12 on startup to get to the Boot menu where I cah choose which drive to boot into.
I stopped using Rufus after I found a much better and practical ISO boot utility, it is called Ventoy.
It is a free and a very useful utility.
The reason is that it allows a user to use many ISO files on just one single USB flash drive instead of wasting many drives for all your ISO boot programs needed as Rufus does.
I installed Ventoy on a large USB drive so I can copy all my needed ISO programs on the root of this drive and when I boot up Ventoy I can select any of my ISO programs very easily and fast.
I also created with Ventoy a second large USB flash drive for all me different Windows versions, it makes life so much easier.
Give this utility a try, you will like it a lot, just like I have.
Better to use VENTOY as it allows you to use more than one single ISO to boot instead of RUFUS which can only create ONE single ISO boot.
VENTOY will help you save many USB flash drives.
I’ve been using Rufus for as long as I’ve been creating boot-able USB drives to install various GNU/Linux distributions (my first was Mandrake Linux circa about 1997-8). I’ve never used any of the special options it offers (such as dd-mode). When any of them are required, Rufus tells me, and enables the appropriate feature(s) itself. Rufus is easy, that’s why I choose to use it over other USB-disk-writers that are available for doing the same job. Balena Etcher (https://etcher.balena.io/) is an alternative I’ve used when a distribution recommends it. It offers a simpler user experience, but I prefer Rufus’s overall.
Ernie
My preference is still Rufus. A friend recommended Balena Etcher as the Rufus replacement, I find Rufus to be easier for me. In regards to using a multi choice USB, it’s just another option to concern with at time of install, instead, I bought a USB adapter for SD cards and bought many SD cards and color coded them in a small sac that is light weight and fits in my laptop case. I used colored markers but nail polish works even better.
My biggest problem with bootable (& ordinary) USBs compared to DVDs, is that they are painful to label (compared to using a sharpie on a DVD).
I know you’re half joking but I use a piece of stick on label for that.
If I recall correctly from a past bad experience, when I tried to boot from a USB that I had configured AND ALSO HAD BITLOCKER ENABLED, I ran into a very scary period where I could no longer access my machine until I provided the Microsoft access code which I had failed to write down anywhere. U real nightmare until i was able ultimately find and use my MS access code (which has now been written down!!). Does the “Windows 11 Tweak” option above where it says to disable Bitlocker get around that?
Will this Rufus work for any ISO file, no matter what tool was used to create the ISO file? Reason for asking is, Leo N. has discussed EaseUStodo a few times and that users can make an ISO file of their computer hard disk. So can Rufus be used for making the backup ISO from EaseUStodo, bootable? Onto a usb-flashdrive?
Rufus doesn’t create ISO files. Rufus should be able to burn any ISO file to a USB Flash drive. The EaseUS Todo rescue disk ISO is downloaded. There are other apps to create ISOs, but that’s not what this article is about.
You can create an ISO of your system drive, but that’s not something we’ve ever recommended. The process is too convoluted, and there’s no real use for it unless you just want to play, in which case you can search to find apps.
This article is about downloading an ISO of the rescue disc and burning that to a CD or USB Flash drive.
Yes, but you don’t need to. EaseUS will create a USB flash drive directly.
Can I copy driver or any other setup files in the USB drive once I create the bootable drive using Rufus?
Copying any file on the bootable thumb drive will create any issue in installation?
Also Is there a way to put the exe files on path like update which will be picked by Windows installer after installing Windows?
You can copy other files to a bootable USB drive. I’d create a separate folder or folders so you can see that they are not part of the installation files.
I tried Rufus to makes bootable Windows 11 flash drive and I upon boot on a new computer, there were three warnings listed first:
Buggy AMI NTFS driver detected.
This driver may produce unexpected checksum errors.
For details, see https://github,com/pbatard/AmiNtfsBug.
It listed two checksum errors, one for install.wim and mediasetupuimgr.dll
Naturally, I did not want to continue although it did give me the option.
Windows 11 Media Creator will not run which is a known problem and now I can’t use Rufas either!
Do you have any suggestions?
Thanks
After I “burn” the .iso file onto my thumb drive and boot my computer through that drive after accessing the bios, will it delete all of the data including any current operating systems off of the computer I am trying to boot up? I have an issue where mine will not boot so this is why I am using this method. I would like the computer to be completely reset so if this method will delete and replace the OS on the current machine that is what I am looking for.
If you mean a Windows installation disc, it will first go to a menu that lets you decide whether to do a Repair installation, a complete installation keeping nothing, a complete installation keeping only your data files, or a complete installation keeping programs and data.
Nothing is deleted until you click on an option. What your asking would be the complete installation keeping nothing.
This is a very helpful video, but it ends where they all do….. without info about what to do with the bootable usb. Is it now a permanent fixture? Do I have to change the boot sequence? How to do that?
Suppose I want to create a bootable Linux thumb drive solely to run a web browser. Nothing processor intensive. Can I do that using Rufus? And will a light Linux package be fast enough to run from if all I have is USB 2.0 ports on my old machine?
If you mean use Rufus to install a Linux distribution to a USB flash drive, then yes. USB 2.0 is slower than modern standards, but for basic browsing it’s workable. It would help to use a faster, higher quality USB drive.
Puppy Linux or Lubuntu are light and easy to use.