You can usually get access by taking a couple of steps.

In one of your articles on recovering files after a hard disk crash you stated: “Another alternative is to take the old drive and place it into an external USB enclosure…”
I’ve done that. Even though all my old files are on the HD, I can’t access them due to Windows file permissions. Is there a simplistic command I can execute to change all file permissions on the ext hard drive so I can finally access them? Thanks in advance for your time and response.
Yes, there are a couple of approaches. I’ll touch briefly on the Windows GUI (Graphical User Interface) approach, but then I’ll show you how I really do it, using the Windows Command Prompt.
In recent versions, Windows has apparently tightened some file-level security. This scenario comes up more frequently when sharing hard drives and removable media across machines than just when recovering files from a damaged hard drive.

Gaining permission to access this folder
Windows GUI:
- Folder properties, Security tab
- Edit permissions
- Give Everyone Full Control access
Admin Command Prompt:
- takeown /F <folder path> /R
- icacls <folder path> /grant:r everyone:f /t
Different scenarios
Before I start, I want to point out that there are different scenarios resulting from the different levels of security that might be getting in your way. The simplest1 looks something like this:
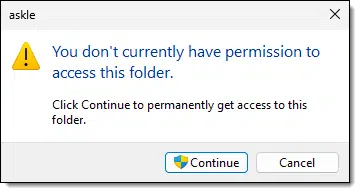
As the message states, the solution is as simple as clicking Continue to permanently get access to this folder. Sometimes you’ll need to respond to several of these as you navigate whatever device you’re attempting to access.
Sometimes, however, that’s not enough.
Help keep it going by becoming a Patron.
Using the Windows GUI
In this example, I’ve taken the system disk from a machine that was running Windows 10 and attached it to my current machine, which is running Windows 11.
The “Windows Way” to respond to this error message is to locate the folder in Windows File Explorer, right-click on the folder containing the files you want to access, and click on Properties. That’ll bring up a properties dialog. Click on the Security tab.
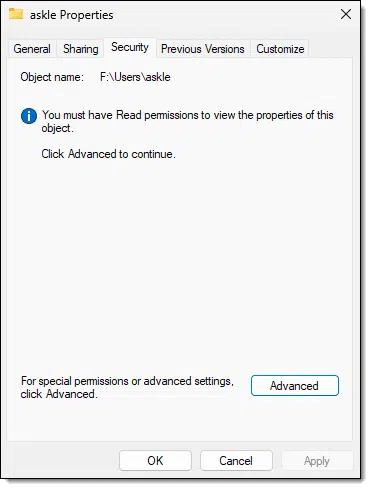
Click on Advanced, and, if necessary, click on Continue (not shown) to perform the operation with Administrative permissions. You’ll then be shown a list of which accounts have permission to view the folder.
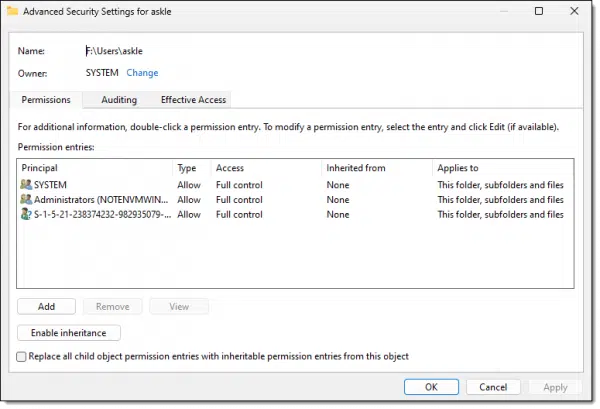
If you’re having problems, it’s not uncommon to find odd entries in the “Groups or user names” field. In the example above, S-1-5-21-238374232-982935079-4276070274-1001 represents the original user account on the original machine that doesn’t exist on this machine (and hence has no name). It’s those users or groups that have permission, not you. That’s often where recovery efforts are stymied.
Click the Add button.
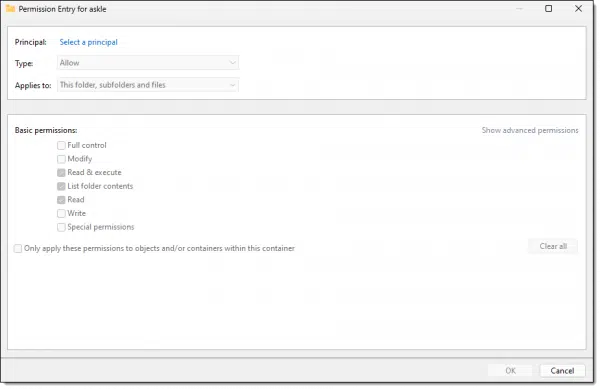
Click on Select a principal. (A “principal” is just a fancy, generic term for an account or group or anything else Windows lets have permissions.)
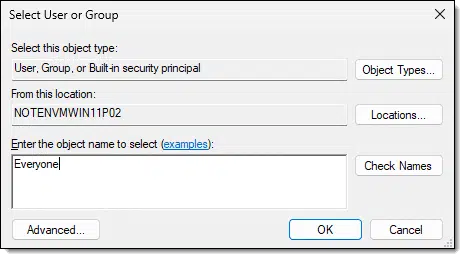
In this example, I’m taking the sledgehammer approach and have typed in Everyone. Click Check Names and it’ll become underlined, indicating that a valid choice.
Click OK, and you’ll be returned to the Permissions Entry dialog.
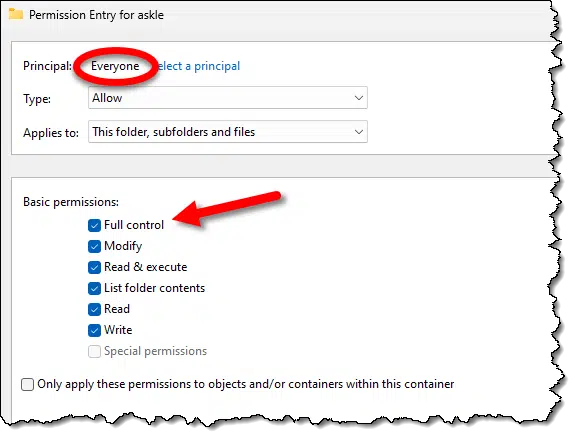
Click on the “Full Control” checkbox, and then click OK.
You should now be able to access the files.
All that being said, it’s not what I do.
Windows command line
I’m a command-line kinda guy, and thus I use the Windows Command Prompt.
The first step is to get a command prompt with Administrative privileges. Right-click on the Start menu and click on Command Prompt (Admin).2
In my example, the files I want to access are at F:\Users\askle — the user’s folder on the hard disk taken from the other machine (keystrokes shown in blue).
There are two commands that are extremely useful in this scenario; often either one alone is sufficient, but both pretty much guarantee access.
C:\Windows\system32>takeown /F f:\Users\askle /R
This should result in a series of
SUCCESS: The file (or folder): "{file or folder name}" now owned by user "{Your username}".
If you get an error such as this:
You do not have permissions to read the contents of directory "f:\Users\askle\AppData\Local\Application Data"
Do you want to replace the directory permissions with permissions granting you
full control ("Y" for YES, "N" for NO or "C" to CANCEL)?
The answer is, of course, “Y”, followed by Enter.3
The “takeown” command takes ownership of the named folder, or, in this case ,”/F *” means all files and folders in the current folder. Ownership is assigned to the account you are currently logged in as. “/R” means to also recurse into any folders and keep assigning ownership to everything found in any and all subfolders. You’ll see a long list of “SUCCESS” messages as ownership is reassigned.
“takeown /?” will display a full list of options.
The other approach is to use a more complicated program called “icacls”. Icacls is a command line utility for managing access control lists (i.e., file access permissions). It has a plethora of options that are fairly confusing.
Here’s what I use:
C:\Windows\system32>icacls f:\Users\askle /grant:r everyone:f /t
processed file: f:\Users\askle
...
Successfully processed 66 files; Failed processing 0 files
The icacls “/grant” option means we’re granting permissions; “:r” means we’re replacing any existing permissions; “everyone” means that everyone gets the permission we’re about to grant; “:f” indicates that we’re granting full control; and finally, “/t” means to perform the operation on all subfolders as well.
“icacls” without any arguments at all will print the lengthy list of things you can do with it.
Icacls should be used with caution. It’s very easy to accidentally remove or assign permissions that boil down to no permission at all. If you do that to the wrong files or folders, you could cause some serious problems.
Everyone?
Caveat: I’ll reiterate that I’ve used “everyone” in my examples because 99 times out of 100, it is a fine thing to do. It gives quick and easy access to files you’re attempting to access from some kind of media that’s been transferred from another machine. However, depending on your situation, you may want to choose another account or group if you have other login accounts on your machine, or other machines on your local network that might gain access via networked shares.
And a final note: everything here applies to drives that are formatted with the NTFS file system. This level of permission and ownership does not exist on drives formatted as FAT, and thus none of this applies. (FAT file systems are the equivalent of “full access for everyone, everywhere, all the time” by default.) But then you also shouldn’t have had any problems accessing the files in the first place.
Do this
You now have a couple of tools to help you gain access to files for which Windows might complain you don’t have access to.
It’s also worth pointing out that on-disk permissions don’t really protect you if someone steals your machine. They, too, can do all of the things I’ve outlined above to easily sidestep Windows file permissions. If you need that level of security, make sure to enable Bitlocker or some other form of encryption.
Interested in more answers like this one? Subscribe to Confident Computing! Less frustration and more confidence, solutions, answers, and tips in your inbox every week.
Podcast audio
Footnotes & References
1: I believe this can happen when the account you’re signed into is administrator-capable and there’s a matching account or group (such as “Administrators”) on the target device. In this case, clicking “Continue” is just invoking administrative access, not unlike a UAC prompt.
2: Or PowerShell or Terminal.
3: In my experience, I might also get a series of “The filename, directory name, or volume label syntax is incorrect” for some malformed filenames. Reasons are unclear, but I believe you can safely ignore these, as they likely don’t contain anything worth recovering.


Leo –
On an external hard drive with NTFS, I would like to remove any and all restrictions on it so that anyone can use the external HD (open files, read, edit, save, etc.) regardless of which Windows computer the HD is connected to and which user account is used (even a non-administrator account).
1. Can I use the above GUI method to accomplish this?
2. Can I execute the GUI method starting on the external HD root directory (ie., the highest one with the volume label, such as “(E:)”)? Or does it need to be on the next lower folder(s)?
3. Before I even add any data to it, can I use the GUI method to “condition” the external HD so that anyone can later easily access whatever data I put on it?
If I should pass before my wife, I don’t want her to have to deal with stuff like ownership, permission, access denied, and read-only hassles on files I leave behind on my external HD’s. As much as possible, I want to provide a headache-free experience like the one you get when using a USB flash drive with FAT32.
Thanks.
1. It should work for external drives, but generally, all users have full access to external drives by default.
2. Yes. Right click on the drive in the left-hand column and right-click on the drive letter and click Properties.
3. Yes
As Mark said, yes to all. Wanted to add that I’ve done this explicitly on external drives when that external drive is a formerly internal drive that I’ve wanted to get files from.
Thank you so much, I’ve looked at 15 different posts most of whom were trying to sell me something and of course not 1 of them had the simple statement “right click on Icon and choose Run as Administrator” which is all I needed.
Hi Leo,
I love your YT talks, BTW
I have a partition in FAT 32 that wish to copy my EFI boot files to. I cannot open it due to “Access Denied”. The properties popup does not have a security tab. So I decided I would take ownership as I had entered the registry tweak for this. However the command “Take Ownership” does not appear in the context menu for a drive/partition.
The partition appears in My Computer and Disk Management, but neither will let me in.
Can you suggest a way of getting in without reformatting to NTFS?
Many thanks
Brian
Not offhand. It’s possible that it’s protected/formatted in such a way as to prevent exactly what you’re attempting.
Thank you for this topic If I were to subscribe to every essay source, I would go broke in one day.
I use SnagIt 2023 as the easiest way to copy anything. Tip 2: When copy & paste results in one long run-on essay (no paragraphs breaks), I take the time to edit it into readable form. Tip 3? I copy after the essay header then fresh type the headline, author, & date-time groups in with the link to give credit where credit is due.