You don’t have to live with the default settings.
Honestly, the computer mouse is an underappreciated piece of technology. It enables a level of interaction that would be difficult at best with just a keyboard.
Unfortunately, the mouse can cause problems for people as well. It might be difficult to see or hard to maneuver.
Fortunately, there are settings for that.

Making the mouse easier to use
Options to control mouse behavior and appearance are distributed across three different areas:
- Accessibility settings
- Hardware or Device settings
- The legacy “Mouse properties” dialog
Options exist to control mouse appearance and behavior. Given how heavily the mouse is used, it only makes sense to tailor it to our needs.
Pointer appearance
Not being able to see the mouse pointer, or cursor, is perhaps the most common problem. There are several possible solutions.
Run the Settings app. In Windows 11, click on Accessibility; in Windows 10, Ease of Access. Then, in Windows 11, click on Mouse pointer and touch in the right-hand pane, or in Windows 10, click on Mouse pointer in the left-hand pane.
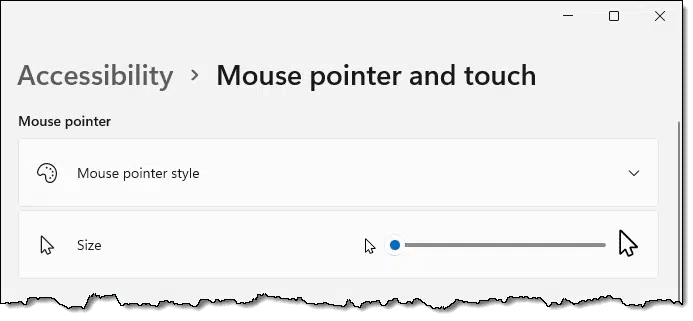
The most basic change is to make the mouse pointer bigger. The pointer size control lets you click and drag the indicator right or left, changing the size of the pointer as you do so.

For another alternative, click on Mouse pointer style to expose some more settings.
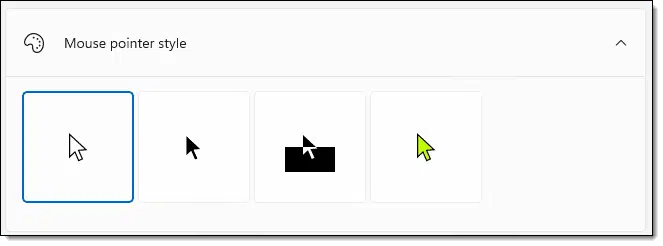
From left to right, you can choose:
- The normal white-with-black-outline mouse pointer.
- A solid black mouse pointer.
- A mouse pointer that inverts whatever it happens to be floating over.
- A mouse pointer using the color of your choice.
Help keep it going by becoming a Patron.
Additional settings
Scroll down in the Accessibility mouse settings to find “Related settings”. Click on Mouse. This takes you to the non-accessibility mouse settings, which provide a number of additional items to control.
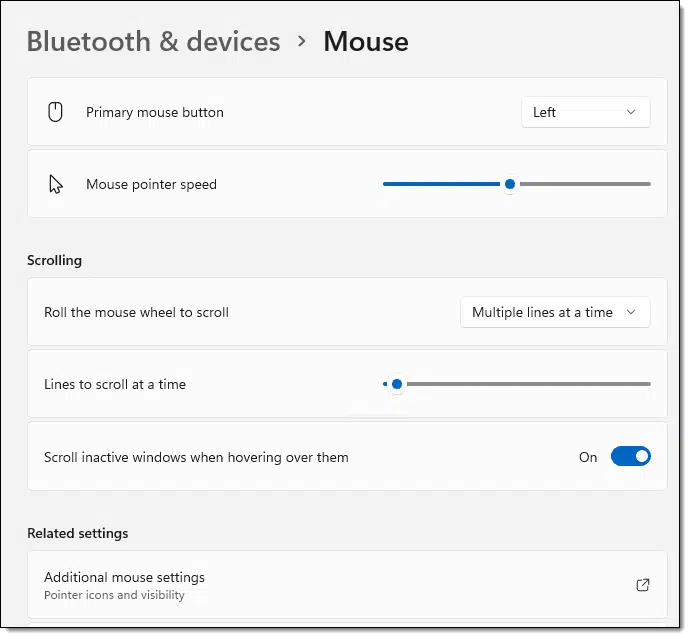
Primary mouse button lets you swap the right and left mouse buttons. This can be particularly useful if you’re left-handed.
Mouse pointer speed (also referred to as “Cursor speed” in Windows 10) controls how far the mouse pointer moves on screen in relation to how far you move the actual mouse. If you find the mouse moves way too much on even a small amount of movement on your part, this would be the setting to experiment with. It’s one that I play with frequently, as it’s different for every machine and mouse combination.
Roll the mouse wheel to scroll controls how quickly things scroll on screen when you use the mouse wheel.
Lines to scroll at a time further controls how quickly the mouse wheel scrolls if it’s set to scroll multiple lines at a time. If you feel that using the mouse wheel is too slow or too fast, these two settings allow you to adjust.
Scroll inactive windows when hovering over them determines which window pays attention to mouse scrolling. When this setting it On, simply having the mouse over a window and using the wheel will scroll that window (if it’s scrollable, of course). With this setting off, the active window scrolls regardless of where the mouse pointer is. If you want to scroll a different window, you must click on it first to make it active.
Still more settings
Under Related settings, click on Additional mouse settings. This will bring up a dialog that looks familiar if you’ve used earlier versions of Windows.
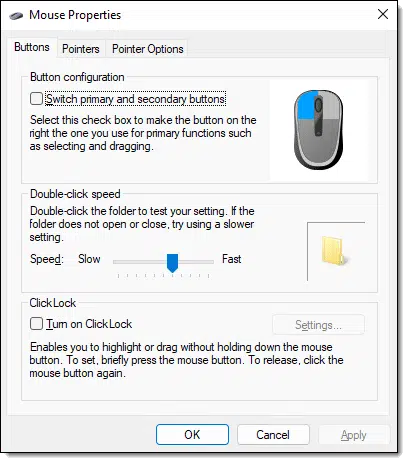
This is the older interface for many of the same settings we’ve been looking at above. While I expect it’ll go away some day, for now there are a few additional controls worth understanding.
Double-click speed controls how quickly you need to click the mouse twice in order for it to be recognized as a double-click. The nuance of this timing can be frustrating for some folks. If you find you just can’t click fast enough for a reliable double click, or that casual single-clicks are being misinterpreted as double-clicks, this is the setting to experiment with.
ClickLock (on the Buttons tab) is intended to make click-and-hold easier. Normally, to click and hold you click and hold down the mouse button. You might follow this with a drag (moving the mouse while still holding down the button) to move something, or select a region, or something else. When this setting is enabled, a click and release acts as a click-and-hold. You can then simply move the mouse to perform the drag operation. Click again to release the hold.
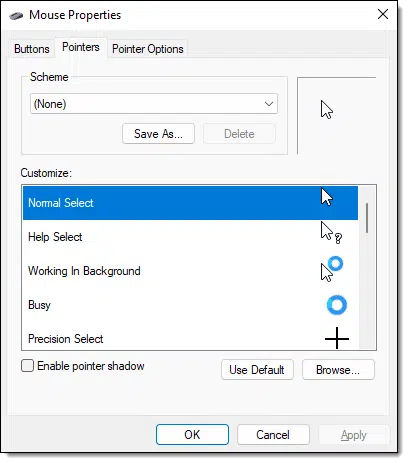
Scheme (on the Pointers tab) allows you to choose from various predefined collections of mouse pointers used for different purposes. You can also import your own mouse pointers and create and save your own schemes.
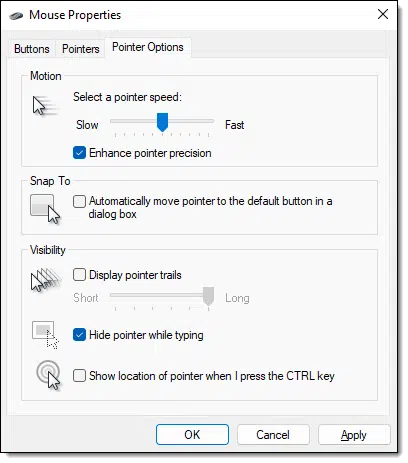
The Pointer Options tab has several additional settings.
Pointer speed is the same setting we saw earlier.
Snap To attempts to make clicking buttons and controls easier by automatically “snapping to” the center of the control when you approach it with the mouse pointer. Honestly, I find this setting more annoying than it’s worth.
Pointer trails, on the other hand, are one of the first settings I turn on when I set up my computer. These are the afterimages of the mouse pointer as you move it around the screen, and can make it much easier to see where the mouse is.
Hide pointer while typing does exactly that, so that the pointer doesn’t obscure or interfere with what you’re typing. The pointer comes back when you move the mouse.
Show location with the CTRL key is another that I almost always turn on. Press and release the CTRL key, and the system draws a series of concentric circles around the mouse pointer.
Note: you may have additional tabs in the Mouse Properties dialog provided by the mouse driver to give you further control over more features offered by your specific mouse, such as additional programmable buttons. Be sure to investigate what’s available.
Do this
Honestly, this is one area where I really encourage you to spend a little time and experiment with the various options related to mouse usage. We use it so much that it makes sense to do everything we can to make it as useful and as usable as possible.
Do this too: Subscribe to Confident Computing! Less frustration and more confidence, solutions, answers, and tips in your inbox every week.


I find it easier to press the Windows key and type “Mouse” without the quotes. Then I click on “Mouse Settings”. I use that Windows search feature for everything that’s not on my Taskbar. The other two setting pages that Leo mentions are linked to on this page
Thanks so much for this article! I never really thought about my mouse settings before. Now that I have things set to inverted there’ll be no more losing the pointer on light colored screens.
If Windows doesn’t offer mouse pointer styles or sizes that you like you can change your pointer by downloading new types. The mouse pointer styles are the files in the directory C:\Windows\Cursors. Here your find sets of files with the extensions .ani and .cur. Both types of files are graphics files (similar to ICO icon files). The ANI files are for animated cursors and the CUR files are for static images. A set of files for a given pointer encompasses the style, size and color. To change any of these attributes you’ll need another complete set of files.
In order to install a new custom pointer you would download a set of files and put them in this folder. There are some quirky details in getting a new pointer to work, but it’s not technically prohibitive.
Within a set of files you’ll see a separate file for each different state of the pointer, such as for the busy circle, the resize arrows or text bar. You can also create your own custom set from existing files by mixing up specific files from different sets. The way windows knows that a group of files belong to a set is by the filename prefix.
As always, check out the sites from which you download these cursor files and run them through a malware scanner before using them.