Still possible, just well hidden.
Microsoft has been pushing us to use Microsoft accounts to sign in to our Windows computers for some time. In recent versions of Windows 11 setup, it appears as if there’s no choice.
While it may be well hidden and obscure, the choice is still there. And it’s not even that difficult.
I’ll show you how.
Become a Patron of Ask Leo! and go ad-free!

Windows 11 with only a local account
To set up Windows 11 with only a local account, select “Set up for personal use” during setup and then “Sign in” at the Microsoft account prompt. Enter “no@thankyou.com” (or the email address of any locked Microsoft account) as the email, type a random password, and proceed despite the error. You can then create a local account with a username, password, and security questions.
The magic incantation
Run Windows Setup (or Reset This PC) normally. At some point in the process, you’ll arrive at the following screen.
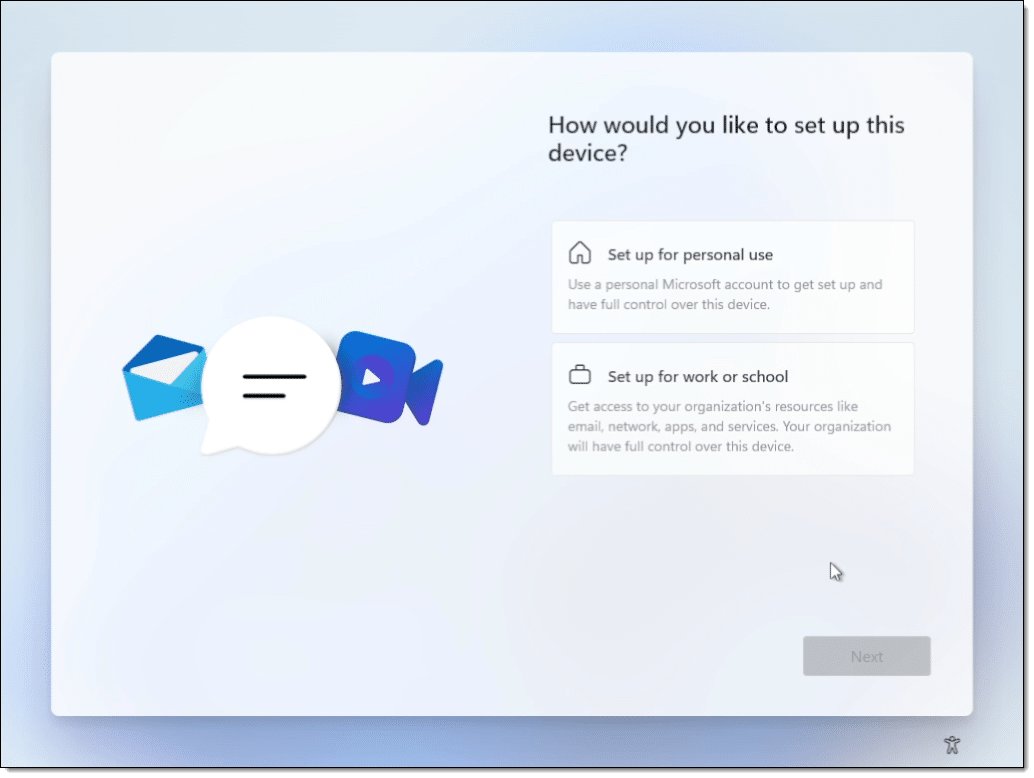
Click on Set up for personal use and then click Next. You’ll be invited to “Unlock your Microsoft experience.”
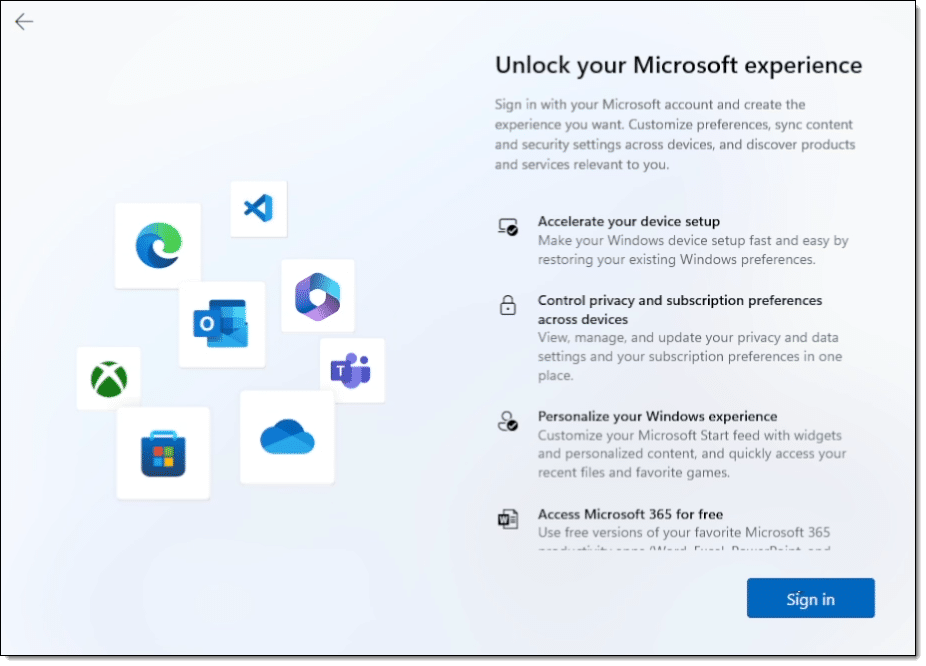
Even though this appears to be all about Microsoft accounts, click on Sign in anyway. You’ll be asked to sign in using a Microsoft account.

“Let’s add your Microsoft account”? Let’s not.
The catch is that the email address has to correspond to a Microsoft account; it just doesn’t have to be yours. In fact, it should not be. Do not enter your email address here.
Instead, enter “no@thankyou.com”. Seriously. Then click on Next. You’ll be asked for a password (not shown here). Enter a few random characters and then click on Sign in. Now you’ll get an error.
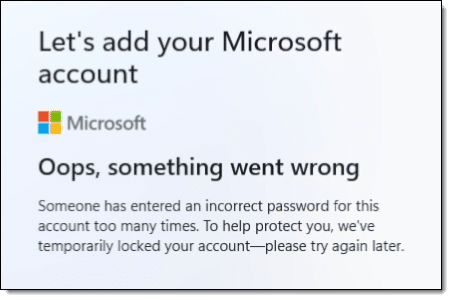
The “something” that went wrong is that the account no@thankyou.com has been locked1 because too many people — people like us, perhaps — have entered an incorrect password.
Perfect. Exactly what we want. Click Next. You’ll be asked for a name.
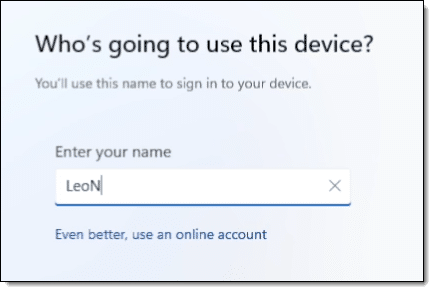
Here’s the magic. This is the username for your local machine account. Enter your desired username — I typed LeoN, as I typically do. Click Next.
You’ll be asked for a password. Enter a password for your new local account.
You’ll then be asked to set up three security questions for possible future account recovery. While I don’t like using security questions, it’s the only option we have here, and I recommend you set them up properly and record your answers somewhere secure.
Next, you’ll select an assortment of privacy settings, after which the setup will complete, possibly rebooting a time or two along the way.
The result? You’ve set up your machine with a local account.
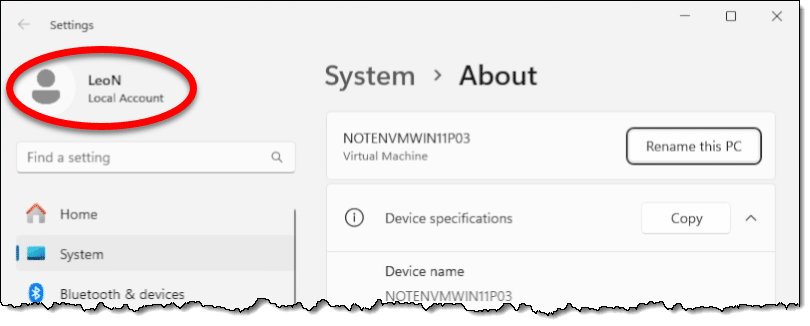
And, like any initial account on a fresh setup, it’ll be administrator-capable.
Why? Why not?
Why would you want a machine with only local accounts and no Microsoft accounts?
Most of the time, you probably don’t. Using a Microsoft account gets you access to several different features, of course, but my favorite is that account recovery doesn’t require access to your machine. If you lose the password to your Microsoft account, you can reset it from any machine. Once reset, you can sign in to any PC on which you use that Microsoft account to sign in.
However, not everyone feels that way. Some feel that Microsoft is too intrusive and that using a Microsoft account gives them more access to your activities. Some feel that there’s just no reason to tie your machine to an online account of any sort just to use it. Some find local accounts simpler and easier to comprehend.
Either approach is good. (Unless, of course, you’re Microsoft with an agenda to push Microsoft accounts.)
Do this
If I had a recommendation at all, it would be this:
- Set up your machine using a Microsoft account.
- Add a local user account that is also an administrator.
Use whichever makes the most sense for you for your day-to-day work, knowing you have the other as backup.
But if you want to set up a machine completely Microsoft account-free, now you can.
Another recommendation? Subscribe to Confident Computing! Less frustration and more confidence, plus solutions, answers, and tips in your inbox every week.
Podcast audio

Related Video


Footnotes & References
1: To be clear, any account that has been locked in this manner will do. If no@thankyou.com doesn’t work, you can create a new account on another computer, fail the sign-in enough times such that the account is locked, and use that here instead.

Theres an easier way to do a local account on Windows 11 Pro Just do setup for Work select Domain Setup then do Local Domain join under options that will force a local Account to be created first. without hammering the email address
This is useful information to know. I set up the church computers with local accounts because multiple users will need to use the machine but they don’t need access to the church’s Microsoft account and everything else that comes with it.
We’re still on Windows 10 and I’ve been able to set up these “Other Users” local accounts with no password to make it easy on those who need to get in and type a letter or browse the internet. Will Windows 11 allow a local account with no password?
This is a new one on me, if it works I imagine Microsoft will soon cotton on and remove the loophole.
I’ve found the easiest way is to just play along with them, make up a new MS account to set up the pc, then immediately switch to a local one and remove the online account completely.
I have a username “RockFox” that I have used since Windows 95. I want to keep it. But Microsoft in their arrogance creates a username using part of your Microsoft email account. UGLY. I have found workarounds thru Windows 10 to keep my preferred username on a clean install. I want to do a clean install of Windows 11 and I was stumped on how to keep my preferred username. Thank you for this tip.
This is the inelegant way to do it! There’s a ‘proper’ way, that’s even easier.
At the Country screen, hit Shift & F10 to get a Command Prompt box.
Enter oobe\bypassnro [no spaces] and the PC will reboot, start again and give you the ‘I don’t have Internet’ option that’s missing on a ‘standard’ install when you get to the ‘Let’s connect you to the Internet’…
Honestly, this alternative feels even more “inelegant”, but whatever works for you.
I use Linux Mint so I don’t have to generally deal with this. but thanks for the info as I do have Win11 Pro setup in a QEMU/KVM virtual machine on Linux (‘activated’ with a certain program with HWID method which the activation is tied to the UUID of the VM it seems given on clean installs it loses the automatic activation until I restore the previous UUID at which point it’s automatically activated with no further action required) as it emulates TPM v2.0 and on my 3rd gen i5 (which is not even a officially supported CPU but it works with official Win11 ISO with no further action needed for it to work) and I dislike online accounts for Windows as a general rule as there is no need if you ask me as we have went without them for ages so no real need to start now as it’s just more stuff tied to you they don’t need to know (which Leo already briefly mentioned).
I generally don’t use Windows, but on that rare occasion/limited use (certain things ill occasionally use it for), it can be nice to have as a backup. but with this forced online account junk, all the more reason I am glad I dumped Windows for Linux Mint 5 years and 1 month ago now. there is a bit of a adjustment period when I changed, but after a while it feels normal as things tend to be snappier on Linux as Windows seems to load a lot of junk after boot up etc. but I realize this might not be a option for many people, especially if they have certain software that does not work on Linux through Wine etc.
but that ‘no at thankyou’ stuff seems like a quicker way to do it as I was aware of what Julian Hicks said above as I think I did that when I setup Win11 on my VM a while ago but I had to disconnect internet from the VM temporarily for it to work if I recall correctly (like after the reboot from the ‘oobe etc’ stuff). but I might play around with Win11 in another VM just to see if I can get what John said working and Leo. but I can see why Leo mentioned his method since it seems a bit more straight forward than other methods people use.
If you set up a PC with only a local account, will you then get on-screen pop-ups or other “reminders” to set up a Microsoft account on the machine?
Yes.
Small update: I was just playing with a fresh Win11 virtual machine on Linux through QEMU/KVM etc (which I talked about in my previous post) and this time I used Leo’s method and it worked exactly as shown. nice and easy as I am definitely sticking with this method as I can’t see something being quicker/easier than this.
also, I heard the next version of Win11, which is 24H2, will apparently require the SSE4.2 CPU instruction to function as without that it appears Win11 won’t boot/function outright. but good news is the odds are your unsupported CPU will work as my i5-3550 is from the year 2012 and it has the SSE4.2 CPU instruction and I am pretty sure Intel CPU’s a fair amount older than mine still have that and I heard on the AMD side it goes back even further.