Microsoft Word collaboration features can fool you.
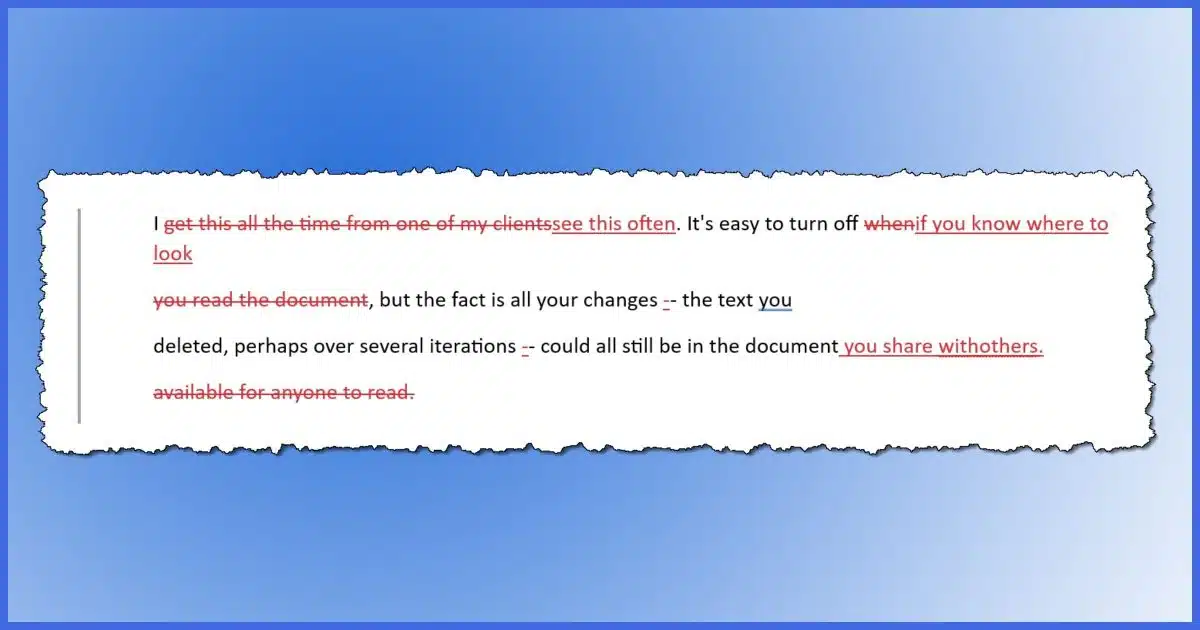
I see this often. It’s easy to turn off if you know where to look, but the fact is all your changes — the text you deleted, perhaps over several iterations — could all still be in the document you share with others.
Even if people know how to turn it off when reading (and many don’t), I’ll assume you really don’t want to share your dirty laundry like that.
Let’s turn it off.

Why are my revisions visible in Word?
Track Changes is a feature in Word that retains deleted or changed information so the evolution of the document can be seen. It’s important to remove it before sharing to a wider audience, which you can do either by accepting all changes or by using Word’s handy document inspector.
Revision tracking
Revision tracking is a feature allowing you to see what changes were made to a document over time. It’s valuable in collaborative environments where multiple people might be working on or reviewing the document as it’s changed.
When you’re done with your revisions, though, you want to publish your final version without all the tracked changes included.
That’s where many people get tripped up.
Viewing changes
Pictured above is an example of a document under revision with Track Changes turned on and visible.
That “and visible” part is important. Here’s that same document displayed with a different view.
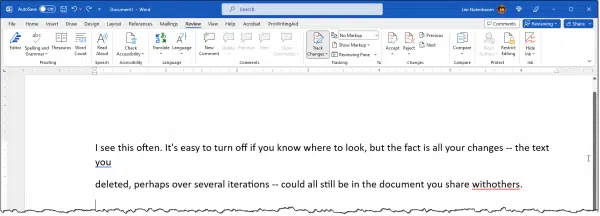
Here’s the catch: the old information that was deleted and or changed is still in the document.
The difference is in the Track Changes section of the Review ribbon.
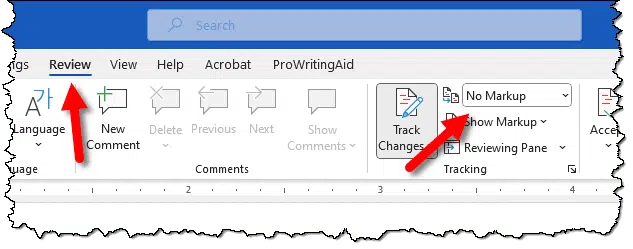
“No Markup” is selected, which hides but does not remove the previous content of the document. Change that to “All Markup”:
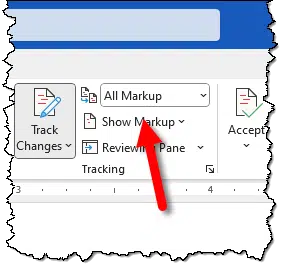
And all the changes are displayed once again (as in the topmost image above).
There are other variants and settings that may affect how, if, and when the changes are displayed. What’s most important here is that the original version of the document, prior to your changes, remains in the document file for anyone to view.1
Removing changes
The way to avoid this problem entirely is to “accept all changes”.
Click on Review in the Word menu, then click on the downward-facing arrow under Accept in the ribbon, and finally click on Accept All Changes.
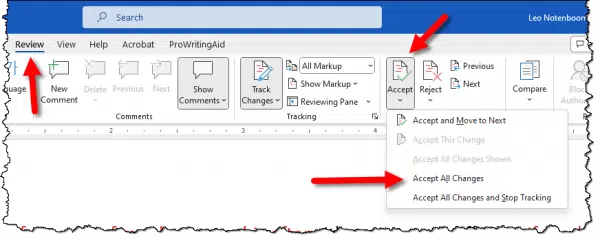
Then save the document. All the old information will have been removed.
If it’s important that the change history be preserved (perhaps you need to continue to work on the document and that history is important), make sure to save a copy of this document before accepting all changes. Then be careful to send out only the copy with the changes removed.
Combating information leakage
While not directly related, in addition to unexpectedly sending out all your document’s changes, it’s also not uncommon for a lot of other data — often referred to as “meta-data” — to be included that perhaps you’re not aware of.
The great news is that Word now includes a “Document Inspector” to inform you of everything you might be including in your document that you’re unaware of.
Click on the File menu, then Info.
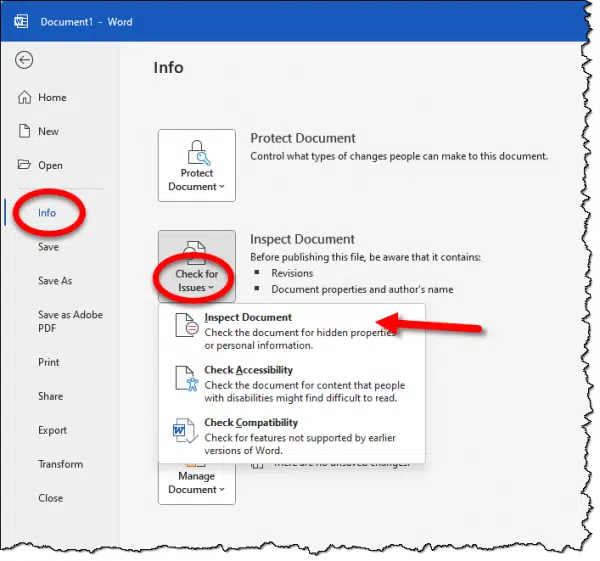
Click on Check for Issues, and then Inspect Document. (You may be prompted to save your document.)
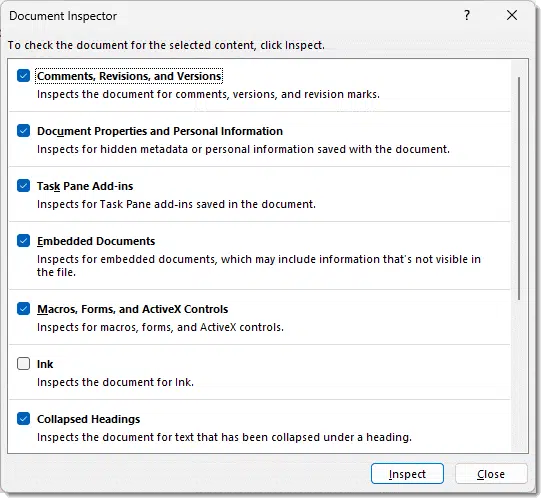
The inspector includes a scrollable list of various items it can check for. Leave them all checked and click on Inspect.
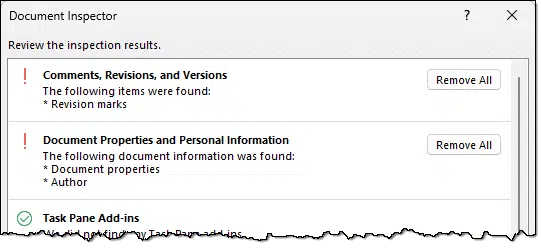
You’ll notice in my example that both Comments, Revisions, and Versions and Document Properties and Personal Information are flagged.
Comments, Revisions, and Versions covers the revision history items I discussed above, as well as other items that are common as documents are worked on and collaborated on over time.
Document Properties and Personal Information includes a variety of information often associated with your installation of Word, most notably your name and the title of the document itself, as well as things like the Word template that was used, the document subject and category, if specified, and more.
In each case, clicking on Remove All will scrub the document of those items.
Turning it off
Revision tracking is a useful feature, but perhaps you simply don’t need it at all. If that’s the case, you can turn it off.
Click on the Review menu item, and then note the state of the “Track changes” button in the riboon.

If it is enabled, just click on Track Changes to turn it off.

Now no changes will be tracked, and nothing should be saved to the document other than its current state.
No longer a threat: Fast Save
In the distant past, the “Fast Save” feature of Word was perhaps the most common cause for unexpected data leakage. It was an optimization to save documents faster by writing only the changes to disk while leaving the original untouched.2
Microsoft closed this hole in 2003 by removing the Fast Save feature completely. It had become somewhat pointless anyway as disk speeds increased.
Do this
Use revision tracking, aka Track Changes, all you like. It’s a useful feature to understand what’s happening as your documents change.
But if you’re about to send a document to an audience that shouldn’t see all the details of the document’s change history, be sure to accept all changes first or consider running the document inspector.
Consider also subscribing to my free newsletter, Confident Computing! Each week I offer advice, such as this, as well as solutions, answers, and tips, right in your inbox.


I am reformatting a document that was sent to me by someone who had been using track changes. I told her to accept all changes and make sure she turned off the track changes feature before she saved the document. She assured me that she did that.
When I opened the document the tracked changes were turned off. I also removed the option under Tools and Options — Editing tab “Keep track of formatting,” yet it is still tracking some of the changes. It is mainly tracking formatting each time I use the Draw Table feature to split cells in a table.
What is wrong? Please help.
I also do not have the option to accept changes as the function is greyed out. Any help with this would be appreciated. Thanks
Regarding the question from several commentors about why the “accept changes” function is greyed out, the document may be protected. Go to Tools, Options and the Security tab to see if there is an option to “unprotect” the document. Click on it. If a password box pops up, the author has sent you a “protected” document. Changes you make in a “protected” document most likely will be revealed to the author when you return it to him/her, including the date and time you made each change. If you are concerned about protecting this sensitive information in your revised document, copy and paste the entire document sent to you into a new document. Be sure that tracked changes is turned off in the new document before pasting what you copied into it. If you then want to turn on track changes in your new document, you can turn it on and the functions that were greyed out in the original document should now be available. If you do turn tracked changes on in your new document, consider whether you want the person to whom you are sending the revised document to see the date and time of your changes. If not, go to Tools, Options and the View tab and be sure that “Screen Tips” is unchecked so that the date and time information bubbles are not automatically displayed as your mouse rolls over changed text. (This still may not protect all sensitive information.) Heed Leo’s caution about turning off the auto fast save option in the Tools-Options-Save tab. Before you send the document back, consider whether you want to protect it, or scrub it depending on whether you have a scrubber tool and the scrubber’s options and capabilities.
Leo directed me here after I asked a very similar question, and I found his description very useful 🙂
I’d managed to accidentally turn on the tracker, not noticed, and was then stuck with the red ‘modifications’ every time I opened the document.
I just needed to accept all the changes, and everything went back to normal again. As a bonus, it halved the size of what was a considerably large document to begin with.
Wonderful, informative article. Thank you!