Yanking that USB out is less dangerous than it used to be.

In Windows 10, the default for what’s called the “Quick removal” setting was changed. The result is that you should not see or need to use “Safely Remove Hardware” as often.
Let’s look at why that is.

Safely remove?
Windows 10 changed the default setting for many removable devices to “Quick removal,” which disables write caching. This makes it safer to unplug USB drives without using the Safely Remove Hardware dialog. While removing a drive mid-write can still cause data loss, the risk of thinking the data has been saved when it hasn’t is lower.
Removal considered harmful1
Removing or unplugging an external drive or USB stick while your computer is turned on can be risky. If anything is being written to it at the same time you unplug it, you risk corrupting the data stored on the drive.
Unfortunately, this is directly at odds with a speed optimization that can make it look like your computer has completed writing data to the drive when it has not.
Pull the plug at the wrong time, and bad things could happen.
Help keep it going by becoming a Patron.
Write caching
Write caching is a speed optimization designed to make your computer more efficient.
You might see this when you perform a save operation with a large file. You click on “Save” and it seems to happen quickly — perhaps almost instantly. But if you look closely, the light on your drive (if it has one) might still flash for a while as the data is transferred in the background.
Write-caching collects data in your computer’s RAM memory to be written to a disk later in the background. The application writing the data sees it complete faster than the device could handle. The application moves on to other things while the system actually writes the data from RAM to the physical disk at a speed the disk can handle.
RAM is faster than your disk and especially faster than your USB drive. By not forcing the program to wait until a write has been completed, the program — and the entire computer — operates more quickly.
Quick removal
“Quick removal” turns write caching off.
That means that a program writing data to disk must wait until the data has been written to the device before it can move on to other things.
With write caching turned off, when you click “Save” on that large file, it’ll take longer. You’ll have to wait until the file has been saved before you can move on. You’ll likely see the lights on your external drive stop flashing right around the same time the save operation completes.
Quick removal is safer because you’re less likely to think that data has been completely written to disk when it’s still underway.
Safely remove hardware
The Safely Remove Hardware item in your Windows Taskbar notification area is, in concept, very simple.

By clicking on “Safely remove” for a specific device, you force Windows to:
- Complete all the cached writing that might be underway (known as flushing the cache).
- Attempt to close any other open files on the device.
Once complete, you get the familiar “You may now remove…” message.
Changing the default
When you connect an external drive, Windows has to decide whether to enable write caching.
In the past, for many (if not most) drives, the default was to enable write caching and therefore require the use of “Safely Remove” before the drive could be removed.
Windows 10 changed that default. Now Windows does not enable write caching in most situations, opting instead for what’s called quick removal.
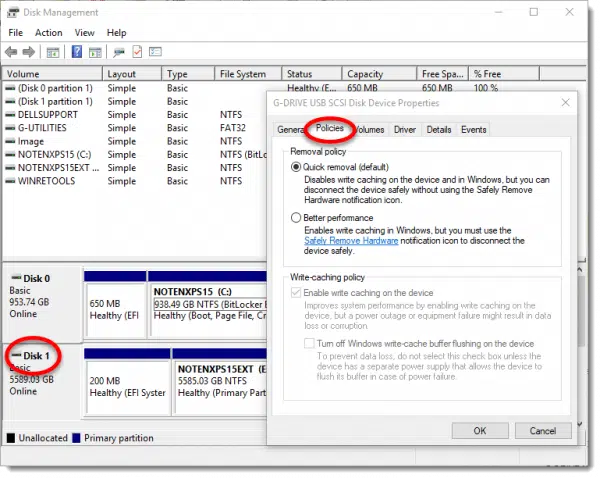
You can see (and change) what Windows has selected for your drive. With the drive attached, right-click the Start Menu, click on Disk Management, right-click on the disk representing the drive, click on Properties, and then click on the Policies tab.

“Removal policy” shows the current setting. You can change it if you like and click OK.
The practical impact
On modern machines, the benefits of write-caching on external USB drives have become minimal. With USB 3 (and even USB 2 to a large degree), data is written fast enough for the additional caching to have little practical effect.
Not having to worry about “Safely remove” is probably of more benefit, as it reduces the risk of data loss by pulling the plug at an inopportune time.
To be clear, pulling out a device while it’s being written to is always a bad idea and can cause corruption and data loss. “Quickly remove” just makes it less likely for the device to look like it’s done when it’s not.
If you see Safely Remove Hardware” present for a USB device, that device probably does not have “Quick removal” turned on2. If “Quick removal” is enabled, you’ll not need (or see) Safely Remove Hardware.
Do this
Use Safely Remove Hardware if it’s present and if you choose to, but pragmatically, as long as you’ve got a relatively modern computer with a relatively fast external drive, and as long as you’re not actively doing something on the drive, just unplugging it is likely to be safe.
Remember, though: that’s not an excuse to have your data properly backed up. That external device can still fail for many other reasons.
Subscribe to Confident Computing! Less frustration and more confidence, solutions, answers, and tips in your inbox every week.
Podcast audio
Footnotes & References
1: “Considered harmful” is almost a meme in computer circles and dates back to 1968.
2: I have at least one device that still appears in “Safely remove” even though it’s marked as “Quickly remove”. I do not get a warning if I remove without using “Safely remove”, however.


Sounds great, but I have USB devices that don’t have a flashing light or the flashing light is facing the wrong direction when it’s plugged in so I can’t see it. So how do I know that it has finished writing to the USB device, if I don’t have to click Safely Remove?
Wait until whatever you were doing to be done, as best you can.
Thanks for the info, Leo. I wonder if this will affect being unable to “safely remove” a device because it’s in use, but you don’t know what’s using it, or how to release it. The safe solution is to shut down the PC, but that’s not practical if it’s a server and you’re trying to change a backup disk. Why is there no EASY way to determine what’s using a device? Or at least not that I’ve been able to find.
I’m curious about this too. At one point I used a program called taskkiller (I think) that would help identify what was running (and allow you to kill it) but I’ve stopped installing it as I trust 3rd party software less and less these days. Anyway, curious if Leo has any input on this question.
Leo. I am running Win 10, 1809 with all updates up-to-date and following your suggestion “With the drive attached, right-click the Start Menu, click on Disk Management, right-click on the Disk representing the drive, click on Properties, and then click on the Policies tab”, Policies is not offered. 1. With a USB Flash drive installed: When I click on Properties the pop-up screen is different than what you show. Mine offers General, Tools, Hardware, Sharing, Ready Boost and Customize, none of which reveal Policies. 2. With an external hard drive installed: The options offered are now Security Previous Versions Quota General Tools Hardware sharing. Again no Policies. Please help.
I have checked all my external HDD and they are all on “Quick Removal” according to the procedure described in your article, but out of an abundance of caution, I am still using “Safely Remove Hardware”. I have to admit that I am scared that something would or could happen to my data on those drives. And if that ever happens, it is like all hell is breaking loose.
Two things: 1) nothing wrong with your approach at all 2) if you’re concerned about losing data if one drive fails to eject properly, you’re not backed up. Start backing up your data right away. Rule of thumb: if there’s only one copy, it’s not backed up.
Backing up religiously my system is my mantra after having been with AskLeo for a very long time. If I understand correctly your answers, my way of doing things is OK since I am playing on the safe side. With regard to my important files, I am a subscriber to Office 365 and OneDrive is backing up everything regularly. On the other hand, all my system image backups with Differentials ( I am not a big fan of Incrementals) are on those external HDDs which for nothing in the world I would like to mess up with. Here lies the reason why I am being careful by still using “Safely Remove Hardware”. I don’t unplug them frequently, but under certain circumstances, or for one reason or another, that might happen.
Thanks to both of you, Leo & Mark Jacobs for your insight.
Quick removal is turned on for my Seagate drive, but I still see the icon on my taskbar for safely removing it. I thought my “problem ejecting USB attached scsi (UAS) mass storage device” error was due to using Cobian Backup and it not closing files, but I tried copying just a desktop shortcut to the drive and I had the same problem. I have no problem safely removing the drive if I don’t interact with it after plugging in. Explorer isn’t opened to view the drive and no relevant services are running when I check on the taskbar. Even if I reset my machine, I still have the same problem. In Disk Management, there’s no option to eject the disk or put it “offline”.
Leo,
Thank you for providing this information and the newsletter, and your wonderful videos. You are appreciated!
Kit Dwyer