Fix a common complaint.
I originally published this as an Ask Leo! Tip of the Day, but in a recent article discussing the differences between Windows 10 and 11, it came up so often that I’ve done a full article and demonstration.
Let’s get the old (and apparently much missed) Windows File Explorer right-click menu back.

The old right-click
Miss the old right-click menu in Windows 11? A simple registry tweak brings it back. Run the provided command in Command Prompt and restart Explorer or reboot. The result: the classic right-click menu you’re used to. But be warned: Microsoft may remove this workaround in future updates.
In short: the magic command
In a Windows Command Prompt, run the following command1.
reg.exe add "HKCU\Software\Classes\CLSID\{86ca1aa0-34aa-4e8b-a509-50c905bae2a2}\InprocServer32" /f /ve
You can copy-paste it directly from this page into Windows Command Prompt. You may be given a UAC prompt and/or a warning about making registry changes.
After the command has been run, either reboot or kill explorer.exe and re-run it. You should now have the old, lengthy right-click menu back.
Before and after
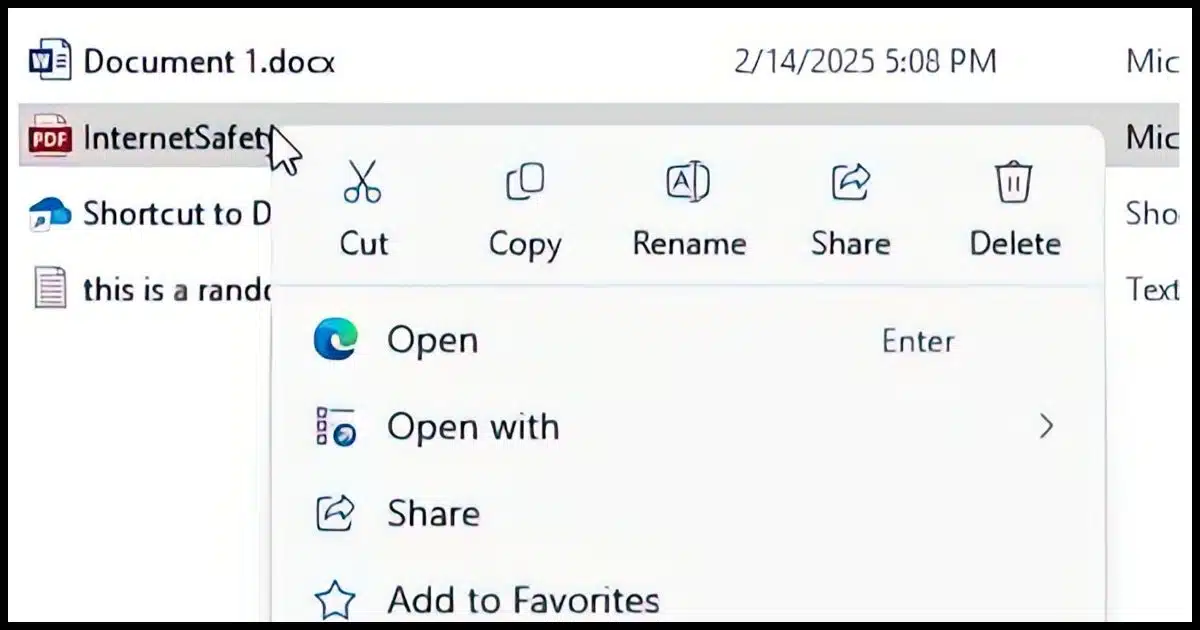
The problem we’re attempting to fix is this. If you right-click on a file without the modification, you’ll get the Windows 11 version of the right-click menu.
There are two major issues with it:
- Many people don’t like the icons across the top, preferring normal menu items for these common operations.
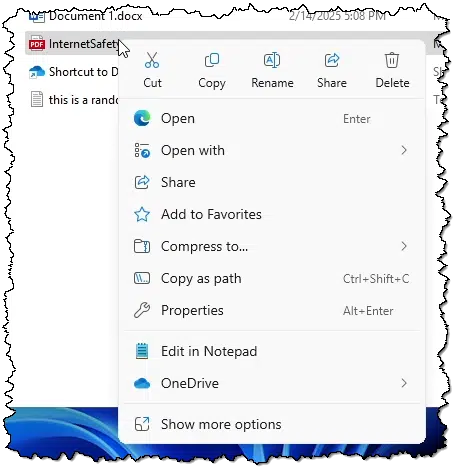
- Many additional menu items require a second click on “Show more options” to be displayed.
After applying the registry setting, the right-click menu returns to its older look and feel.
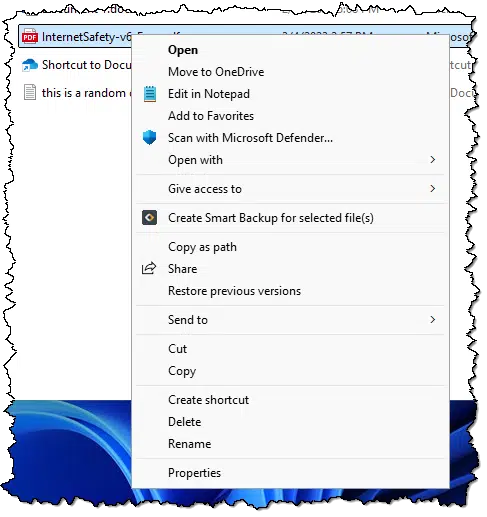
Many people find this much more familiar and comfortable. It’s one less change they need to deal with.
Do this
Part of me suggests that you get used to the new layout. It’s quite possible that the registry setting we’ve applied above will stop working at some point.
I also recognize that this change can be annoying. Apply the tweak as you see fit.
Subscribe to Confident Computing! Less frustration and more confidence, solutions, answers, and tips in your inbox every week.
Podcast audio

Footnotes & References
1: At your own risk, of course. Make sure you’re fully backed up before running this.

I had applied this change to my installation a few months ago, but reverted the change. I am used to the new layout, and programs have started integrating into the new context menu. These changes don’t require elevating privileges to admin, and they seem to take effect immediately without restarting Windows Explorer.
This article should probably tell people how to revert those changes if they want. The command to do so replaces “add” with “delete”.
reg.exe delete “HKCU\Software\Classes\CLSID\{86ca1aa0-34aa-4e8b-a509-50c905bae2a2}\InprocServer32” /f /ve
Yeah, my first thought as well. Not sure why he left that out. Its not clear for everyone how to such a thing
I prefer using shift + right click to see the expanded version now.
Kinda weird, after doing this, it reset it self somehow. todat got the long menu again
I want to reverse it but can’t figure out how to do that. The instructions mentioned in the comments does not work
reg.exe delete “HKCU\Software\Classes\CLSID\{86ca1aa0-34aa-4e8b-a509-50c905bae2a2}\InprocServer32” /f /ve
If that fails, include the symptom of the failure (“it doesn’t work” isn’t enough for me to go on).
I’ve gone even further with the Context Menu, adding “Copy to Folder” and “Move to Folder” and a few other options, using registry edits.
I have a folder with those registry keys and others to roll back Windows Explorer to the way it was in Windows 10. Whenever I perform a clean install of Windows or get a new computer, I just open the folder and add the registry entries.
My experience has been that when Windows 11 updates, the changes remain in place.
You mean you make a desktop file, put it in with files and folders, repeat the process an type no instead of leaving yes?
I’ve saved all of the tweaks in a folder as .reg files. All I need do is copy that folder to a flash drive and when I perform a clean install I use that flash drive to add the registry entries. Clicking on a .reg file to open it will open Registry Editor and merge the file with the registry. Saves time by not having to type them out and reduces the chances of errors.
It worked once on a .wmv file. Then it stopped working, as if MS had detected a change and nullified the change! I reran it and it exhibited the same behavior. Windows 11, 23H2
I, like so many others, often resist change. However, I have found the new Right Click Menu to actually be an improvement (at least for me).
I’d say 90% of the time that I right click on a file in Explorer, I either want to cut/copy, rename or delete that file.
This new menu puts those tasks at the top of the menu, making them easy to find and access.
Checking the file’s Properties is the next most common reason. This task is not at the top of the menu, but is consistently in the same place, so it is easy to find.
The old menu had these common tasks spread throughout the menu, making each visit a “hunt and peck” search.
I, for one, am happy with the new Win11 right click menu.
I agree with Bruce (above). I like the new Right-Click menu. If I could have Microsoft make any changes, I’d ask that they add the Send to … item to the new Right Click menu, moving it from the More options list, or better yet, allow users to decide which items they see in the Right-Click menu, and which they want relegated to the More options list.
I’ve always been a fan of user choice,
Ernie
Simpel, hold SHIFT and Rightclick………….thats all
Wow, no reg change. Just shift right click. I love that OPTION, thanks!
I just updated a computer to Win 11 from Win 10 on October 16 (yes, I waited until the last minute)
Sadly, this regedit doesn’t work for me.
doesn’t work for me either 🙁