There are several different ways. Bluetooth might be the most inconvenient of the bunch, but I’ll touch on it, as well as the techniques I use myself.
As you might imagine, I prefer techniques that are automatic, and all in the name of backing up.
Become a Patron of Ask Leo! and go ad-free!
Automatic via the cloud
The short version is this: simply install any of a number of apps associated with cloud storage, and there’s a very good chance it’ll offer to upload your photos automatically right after you take them. Install the corresponding app on your PC, and the photos will be automatically downloaded as well.
For example, install Dropbox on your phone and on your PC. Even if you don’t already have a Dropbox account, a new account includes two gigabytes of free storage, which is plenty to start with. As you set up the phone application, it’ll ask if you want to enable “camera uploads”. Say yes, and you’re done.
Take a picture, and a few minutes later it’ll show up on your PC. Once there, you can move it elsewhere at your convenience if you want to free up cloud storage space.
I’ve used this technique successfully with Dropbox and Microsoft’s OneDrive. Currently, I use Google’s Photos app on my Google Pixel phone. Each mobile app will offer to automatically upload your photos to the associated cloud storage. Install the corresponding PC equivalent, and your photos will be automatically downloaded to your PC.
All three offer this functionality in roughly the same way.
Cloud confusion
This technique of using mobile apps in conjunction with cloud storage is so ubiquitous, it can actually be a problem.
I have apps for all three services installed on my phone. Each one offers to automatically upload my photos. It’s important to pick just one for the task, and turn the feature off in the others, or you might find yourself uploading multiple copies of every photo you take. In a sense that’s benign, except that it eats up your data plan and slows down your connection while all the uploads happen.
Bandwidth control
Speaking of data plans, if you’re concerned that you might use too much data uploading all these photos as you’re out and about, most mobile apps offer a few ways to control what’s uploaded and when.
- Upload when connected via Wi-Fi only. This causes the app to never use your mobile carrier’s data plan, but to perform the upload only when the phone is connected to Wi-Fi. Typically, as soon as you’re back home and your phone connects to your local internet via your Wi-Fi connection, the photos are uploaded and copied to your other machines.
- Use mobile data to upload only pictures under a certain size. This allows the app to upload “small” photos immediately (measured by file size, typically in KB, or kilobytes), and save the larger ones for Wi-Fi connection. Since most phones take photos of a similar size, this isn’t very useful.
- Upload photos, but not videos, via mobile connection. Videos can be large. If the application supports uploading the videos you take (most do), then it’ll probably default to only doing so when connected via Wi-Fi. Most apps will let you configure this upload to use your data plan if you like.
Connecting the phone to your PC
 The other common approach is to connect your phone to your computer. You can typically do this in either of two ways: via cable or Bluetooth.
Honestly, Bluetooth for file transfer has proven unreliable for me. If you can get it to work, great, but it’s not the approach I recommend.
Use a cable. Chances are your phone came with a USB cable to connect your phone to your computer. The copies will happen faster, and as a side benefit, your phone will probably also be charging its battery at the same time.
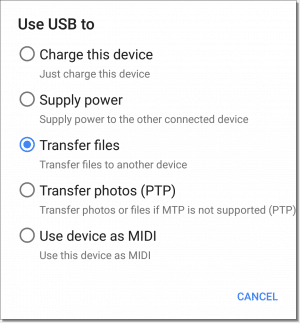
Once attached, your phone should appear in Windows as if it were another disk drive on your computer, just like inserting a USB memory stick. (On some phones, you may need to change a setting to appear as a “data drive” for file transfer. Check your settings, or any settings that appear when you attach the phone.)
Depending on how Windows itself is configured, and the software you have installed, it may automatically prompt you to import your photos.
If not, use Windows File Explorer to look for a top-level folder called “DCIM”. Your photographs will be in that folder; use Explorer to copy or move the picture files from your phone to wherever you’d like on your PC.
Back up
Whether you use automatic uploads or copy the photos to your computer manually, I strongly recommend you make sure things are backed up. Photos are the one thing that can’t be recreated if lost.
If you use the cloud storage approach and elect to leave things there, that could be enough. It’s at least something, especially if you have the corresponding app also downloading copies to one or more computers you own.
But I recommend you back up the photos (along with everything else on your PC) anyway. Because of the way cloud storage providers synchronize files across devices, one mistaken delete on your part could result in all copies of a photo being deleted.
That’s easily prevented with a regular backup – which is something you should do anyway.
Do this
Subscribe to Confident Computing! Less frustration and more confidence, solutions, answers, and tips in your inbox every week.
I'll see you there!


Another simple method is to use wifi if you have it. With a file manager app like ES Strong or File Manager HD (there are several good wifi capable file manager apps in the Google Play Store) , it’s easy to transfer files between your Android device and your PC without having to connect cables.
Dropbox was a lifesaver for me! I had a lot of pictures on my phone when I added my gmail to my phone, and I thought well I’ll just pull the sd card and put it in the computer and save them. but a small zap when I put the card in wiped out the entire disk! I was just SICK about it. Then I realized I had recently installed dropbox and lo and behold, all my lost pictures were there! Seriously I cried because I was so happy. Some of the pics were of my brother who had passed away a few months beforehand. So I highly recommend dropbox!
I have an Android, I tried an app from the PLay Store that uses Bluetooth to transfer any file including pictures via bluetooth. Computer asks for your permission on each file before it transfers, which means you have to sit in front of your Pc the whole time. There may be some way around it but I gave up quickly. The app was easy and did all the work connecting bluetooth for you….but transfer rate was very slow. I went back to my cable, but I am going to try the “Dropbox automatic upload” that sounds like way to go.
An extra benefit of uploading the photos from your phone to DropBox, is that DropBox gives you an extra 500 MB of cloud storage for each 500 MB of photos or videos you upload. You can get up to to 3 extra GB from doing this. If you move those photos from DropBox, you still get to keep the extra 3GB.
When I take a photo with my Apple I Pad and want to keep it for ever, I just email it to my desk top and save in my pictures and every fwdays i transfer these phot
os to a portable stand alone hard drive kept especially for my photo’s eazy peazy.
Elizabeth K. may find it “easy peasy”, but I do HOPE she backs up that drive as well ! My add-on HD has just died….
… or even “eazy peazy” ;-)
…or, as I’ve just done if you can’t find the right cable, take out the memory card and put it in a card reader.